For the most accurate determination of the state of structures and their elements, instrumental examinations of structural elements are carried out. This process is very important in order to determine the suitability of the main structural elements of the building to be disassembled for further use in the reconstructed building or at other facilities if the building is to be demolished.
The found deformations during the examination of structures can be divided into general and local. The common ones include deformations of structures within the entire building, and local ones are the result of deformation of nodes, mates, and support - within the same structure.
For the exact determination of deformations, special devices, devices, systems and whole sets of devices are used. As it is known, the cause of the main deformations of the building structures is an unlawful draft of the foundation foundation. This is due to incorrect calculations in the design of buildings or under improper operating conditions, resulting in soaking of planting soils, thawing of ice layers, and accidents on engineering networks.
To measure the sediment of buildings, crepes, shifts of buildings and structures, as well as individual structural elements, apply methods of engineering geodesy.
Measurements of shifts of individual structures are carried out using theodolites. To determine the position of several points of a building in one plane at once, to control the accuracy of construction and installation works, and deformations of large-span structures under static or dynamic loads, engineering photogrammetric and stereogram methods are used.
A very important point in the technical examination of the structure is to establish the nature of the cracking. Cracks are of various types:
- microcracks;
- macrocracks;
- internal voids;
- interspersions of foreign bodies.
Flaw detection methods can be installed without opening the concrete location of defects in the reinforcement and in the body of concrete. For such operations, methods of ultrasonic flaw detection (pulsed or continuous irradiation) are used.
The width of the crack opening is determined using microscopes. The dynamics of crack opening is determined using beacons (plaster, glass or metal). The depth of cracks is determined using construction needles and probes, combining these studies with ultrasonic flaw detection.
To calculate the thickness of the protective layer of concrete and the diameter of reinforcement of reinforced concrete products using the method of radiography and ionizing radiation, the radioisotope method.
Measured work. Dimensional drawings of architectural monuments are usually carried out at a scale of 1:50 (main projections). This determines the accepted accuracy of measurement - up to 0.5 cm, which gives a scale of 0.1 mm in the scale - an extremely small, noticeable amount. Only for extremely thin and carefully made parts, if they are drawn on a large scale, measurement is sometimes performed with an accuracy of 1 mm.
Measurement is performed using roulettes (preferably steel) and folding meters. Examples that are produced along any single line are carried out “by accrual” from a single point, and not separately, since with the folding of individual particular examples, inevitable small errors can increase.
In order for the architectural form of the monument, which is pre-accepted as irregular in architectural and archaeological measurement, could be fixed on orthogonal drawings, its elements should be tied to reliably verified straight lines (taut cord), verticals (plumb line) and horizontals (repulsed on the monument " zero line "). Measurement usually starts with a zero line around the perimeter, on all floors or tiers of the building separately. All these zero lines should be reliably interconnected and, if possible, tied to the nearest reference point. The zero line is repulsed using a water level (two glass tubes connected by a rubber hose), and with a large building, with a level. Breaking the zero line allows you to get a horizontal slice of the building, its plan, which can be measured by relatively simple means.
Triangulation is the basis of the measurement of plans - the breakdown of any space that is complex in configuration into separate triangles is the simplest geometric shapes in which, provided that all sides are measured, each point can be accurately determined by serifs from two other angles. At the same time, the accuracy of construction will be the highest if the serifs intersect at an angle close to 90 degrees, which must be considered when choosing a measurement system. The simplest example of triangulation is a measurement made from two points, the so-called basis. As a rule, the simpler and clearer the chosen triangulation scheme, the more reliable the accuracy of measurement and its construction.
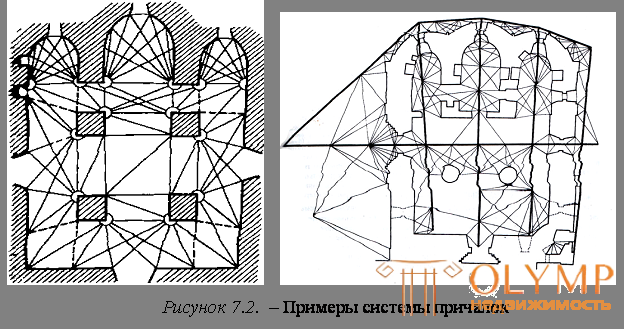
For rooms of very complex configuration, having internal columns or cluttered, measurement from one base is impossible, and it is necessary to choose different bases for its different parts, making sure that all of them are reliably interconnected. The difficulties increase even more when you have to measure the plan of a whole group of rooms, as well as link it with the external outline of the building. In this case, one has to resort to the installation of an auxiliary mooring system (Fig. 7.2.) - thin cords stretched over one level, forming the geometric basis of the whole measurement scheme. The individual cords of the berths should be especially closely tied to each other, since the possibility of drawing the plan correctly depends on this. All the main points of the monument, or the base points from which the usual triangulation is made, are attached to the quays.

In addition to triangulation, when measuring the curvature of individual walls, the coordinate measuring method can be used - a system of direct measurements between individual points of the wall and a cord stretched along it.
When measuring plans of complex configuration, as well as in the presence of disconnected rooms that are poorly interconnected, it is recommended to replace the moorage device with a traverse with a link to the main points of the plan with a system of polar coordinates. It should be noted that with relatively small sizes, which usually have measured monuments, sufficient accuracy of measuring angles to half a minute, which greatly simplifies the work with theodolite. You can draw such drawings by calculating the coordinates and using accurate geodetic protractors.
To be able to accurately overlap the plans of individual tiers, without which it is impossible to draw vertical projections correctly, all these plans must be interconnected by a system of plumbs, which are recommended to be tied to moorings or to other verified points.
Measurement of vertical projections basically comes down to binding to the points fixed on the plan and to the zero line of all other elements. Such binding is made as follows. All horizontal divisions are attached both at the corners of the building and at a number of intermediate points to the zero line by direct measurements along the vertical. Vertical articulations are attached to the plumb lines, which allows to establish not only their slope, but also the possible curvature.
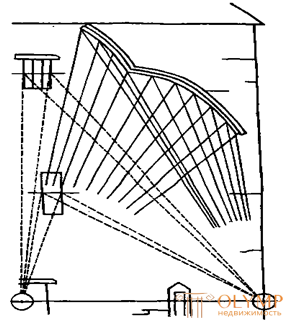
When fixing individual parts of facades and cuts: window lintels, portals, decorative inserts - usually combine measurements from the zero line and from plumb lines for horizontal or vertical elements and triangulation for curvilinear elements (Fig. 7.3). It is especially difficult to measure double curvature lines, for example, demolding, arch edges, etc. In this case, it is necessary to fix each point not only in height, but also in the plan, dropping a plumb line from it and tying it to any characteristic points by triangulation . Only in this way is it sometimes possible to catch the weak flare vault or the existing deformations.
Of great importance in measuring the monument associated with its restoration is the accuracy of the transfer of templates, which later can be used to reproduce the lost elements of the decor. Patterns of flat parts can be removed simply by overlaying tracing paper. The sections of profiles are usually pressed by plasticine and then painted on a sheet of paper. However, since clay is easily deformed when removed from a profile and transferred to paper, it is necessary to immediately cut out the reverse patterns and check them in kind. In the same cases when it is required especially big accuracy, it is necessary to do plaster prints of profiles. Places for removing patterns should be noted each time, since the profiling in different parts of the monument can vary quite a lot, which is especially often observed in pre-Petrine time structures.

Fig. 7.3.
Good quality measurement depends largely on the thoroughness of the implementation of rough sketches - crocs . They should be drawn on thick drawing paper with the possible accurate transfer of proportions and all features depicted parts of the monument. With larger structures, general schemes of its projections are drawn and, separately, larger fragments, on which various parts of the building are fixed with all the details and dimensions are recorded. Each sheet of croquet is signed with the exact designation of the object, the depicted element of the monument, the date and the names of the performers. Crocs are the main document of the field work stage and are to be kept in the archive of the institution.
Dimensional drawings are made on sheets of drawing paper or on tablets. To draw them on paper stretched on a frame, is not accepted, because the drawings cut from the frame may change significantly in size, which will lead to a distortion of the scale. In the drawings all main dimensions are put in the system as they were measured. Thus, the designation of measurement "cumulative total" is preserved. Outlines the drawings made by hand, which allows you to transfer the "live" character lines of the building, who lived a long period of time. In addition to the required inscriptions, each sheet must necessarily be provided with a linear scale.
Characterization of materials of construction. The most promising methods for determining the strength of materials of structures are non-destructive research methods. Sampling sites for laboratory tests and testing directly on the building element are established taking into account the actual loads and effects, stress-strain states of the elements being examined. Non-destructive methods are divided into two types: mechanical and physical. Samples for testing or cut out of the body structure, or detached with chipping by a certain method. As a rule, three samples are taken for laboratory tests. Broken elements are immediately sealed with durable material. Tests are conducted according to a strict method with the fixation of all changes in appearance, the appearance of cracks and the subsequent destruction of the sample.
One of the popular methods for determining the strength of a concrete body is a method based on measuring the rebound of spring hammers (sclerometers) from a concrete surface. However, testing the strength of concrete products should go comprehensively using several methods. The test results are compared with each other and the lowest strength value is taken.
Tests of the strength of brickwork of any kind, concrete and natural stones, as well as masonry walls of them are carried out using the test masonry. Tests carried out by ultrasonic method.
Testing of metal structures and reinforcement of concrete products is carried out by cutting samples from the element body. Metal grade is checked by static stretching of the samples. Tests of samples for impact strength at temperatures of +20 and –20 ° C are carried out on a drum unit. The metal is subjected to chemical analysis (carbon, silicon, manganese, sulfur, phosphorus and other chemical elements). A very important test is the detection of the distribution of sulfur inclusions by the Bauman method of prints. Samples for testing are cut from sheet steel - across the direction of rolling; from shaped steel - along the rolling direction. When tested by the Bauman method, everything is done the other way around. For chemical tests, metal chips of at least 50 g are taken. For impact tests, flat samples with a V-notch are cut. In place of the samples taken, solid elements are welded.
Wooden structures are tested by the gunshot method, as well as by the ultrasonic method. There is a Pevtsov method, when a ball with a diameter of 25 mm falls on the test element from a height of 50 cm and leaves an imprint, which is measured and compared with a calibration table.
The determination of the degree of corrosion and temperature damage of the structural elements of the building is carried out by physico-chemical analysis of samples of concrete or metal samples. At the same time determine:
- the depth of carbonization and neutralization of concrete with aggressive gases;
- type and relative amount of corrosion products;
- the amount of capillary water absorption;
- the concentration of hydrogen ions in the aqueous extract of cement stone.
Particular attention in the examination of reinforced concrete and metal structures should be given to areas exposed to temperature loads, both high and low. The properties of such structures change dramatically, there is a loss of adhesion between reinforcement and concrete, the elastic moduli of concrete are reduced.
In some cases, testing of structures in their design position or after their dismantling is necessary. Naturally, when testing, structures are not brought to failure, but they are loaded with control loads higher than the design ones. At the same time, bends, cracks, and angles of rotation of various elements are fixed. On the basis of these indicators, make calculations and build a conclusion about the further ability to exploit.
Assessment of the state of structures is carried out according to the degree of their wear, on the basis of the tests carried out and the detected deformations and defects. All this information is recorded in the defective statements. Systematizing the signs of damage to structures, establish a certain category of technical condition of structures and make a conclusion about the suitability for operation or the need for measures to strengthen it.
Calibration calculations . The whole cycle of works on the inspection of buildings ends with the preparation of a technical opinion on the state of the objects and the possibility of carrying out reconstruction activities on them. The conclusion is made by the person responsible for the entire cycle of works on reconstruction. This is a comprehensive document, which consists of the following sections:
- the building on the basis of which the survey was conducted;
- used primary sources about the significance of the object, the technical passport and all the technical documentation for the object;
- the composition of the teams that conducted the survey, the names of the persons who conducted the design tests and did the calculations;
- a brief description of the architectural planning and volume-compositional solution of the object, the functional purpose and conditions of operation of the building;
- the results of verification calculations;
- priority measures to strengthen the weakened structures.
The most important section of the report is the conclusion about the state of the supporting structures of the building. To this end, conduct a verification calculation of the carrying capacity of the foundations of the foundations and structures of the object, using the results of the survey. In carrying it out, the loads and impacts should be taken in accordance with the provisions of the standards and refined according to the surveys conducted. The actual permanent load from its own weight of structures should be established on the basis of determining the density and the actual dimensions of the elements. By randomly selecting at least five samples, it is recommended to determine the regulatory loads from the own weight of the structures by statically processing the results of weighing the samples. This method is used for materials with significant density variability: light and cellular concrete, backfill, insulation, and other similar materials. For steel and heavy concrete, density is set according to reference data.
The method for determining loads from the own weight of structures by establishing the density of the samples implies weighing them, calculating the volume of the structure and, on the basis of these data, obtaining the density, which is the starting point for establishing the actual load.
Carrying out calibration calculations of building structures of reconstructed buildings is divided into two stages:
- determination of the carrying capacity of individual elements (calculation of the limiting states of the first group);
- determination of the forces in the structures from external loads and impacts corresponding to the design task for reconstruction.
В тех случаях, когда конструкции не имеют никаких отклонений от проектного решения и при наличии технической документации, включая данные о их несущей способности, поверочные расчеты могут быть выполнены в ограниченном объеме. При этом производят сопоставление внутренних усилий, возникающих от расчетных нагрузок, с несущей способностью конструкции, приведенной в технической документации.
Поверочные расчеты несущей способности существующих конструкций здания должны выполняться по данным проведенных обследований. Здесь учитываются фактические размеры сечений, прочностные и деформативные характеристики материалов, обнаруженные дефекты и повреждения элементов конструкций.
The transition from standard values of resistance to design, as well as methods of transition from the determined strength characteristics (yield strength for steel, class of compressive strength for concrete) to other characteristics of strength and deformability is carried out in accordance with the requirements of SNiPs.
The conclusion on the technical condition of buildings and structures serves as the basis for a preliminary decision on the expediency of reconstruction of the construction part of the buildings.
Что бы оставить комментарий войдите
Комментарии (0)