SVP is an innovative pattern of leveling tiles when laying on walls and floors. She came to us from the west, where she has been successfully used for a long time. It is suitable for laying ceramic tiles and porcelain tiles with a thickness of 3 to 20 mm (depending on the manufacturer).
Quick article navigation
The use of SVP is not recommended at temperatures below +10 degrees.
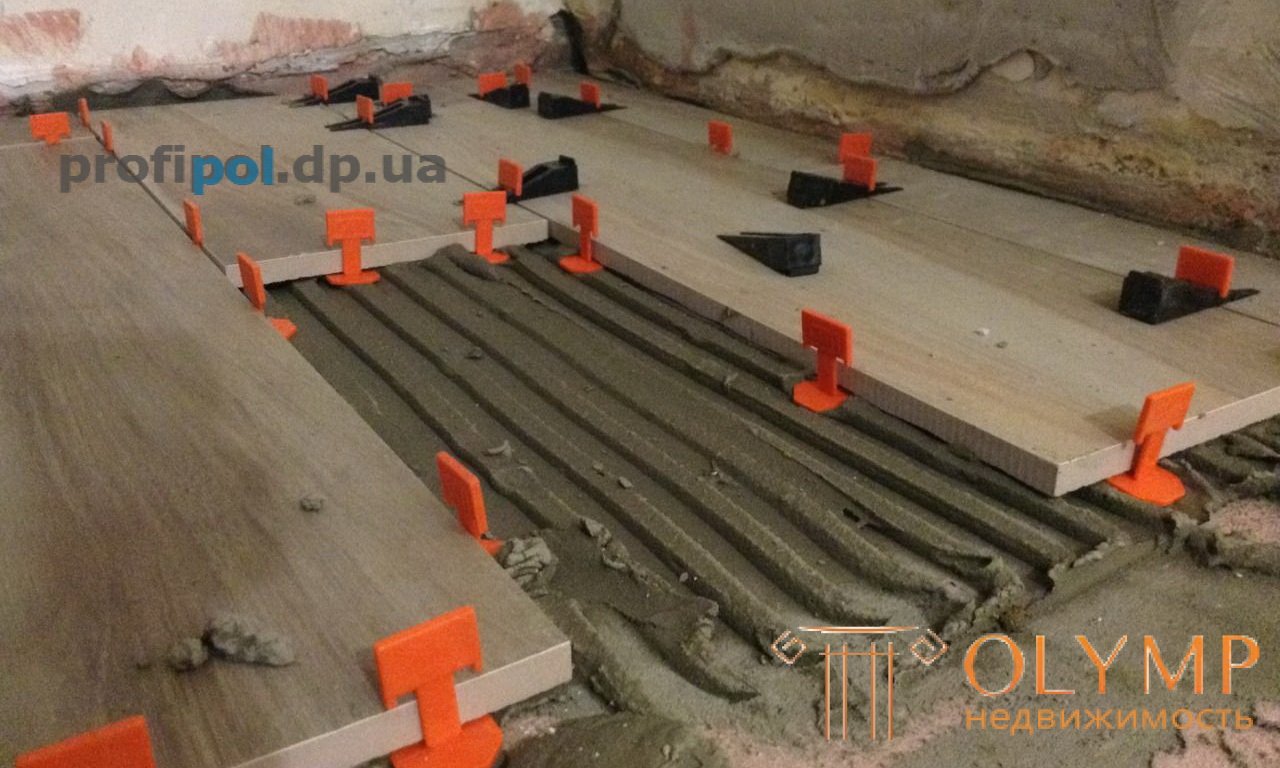
In the photo you can see what happens with the adhesive when using SVP. Cuddling does not form voids. For clarity, using transparent glass tiles.
The domestic leveling system consists of two elements: a wedge and a clamp. The wedges can be used repeatedly, and the clips are a consumable, since after laying, some of them will remain inside the seam.
Foreign options are more difficult - for their installation and removal requires special tongs. The clamps are made in a different way, sometimes they are the same wedges, sometimes flexible petals.
In my experience, I tried out the Spanish system of leveling tiles Rubi Tile Level and domestic SVP. Each of them has its pros and cons, which are below.
Also similar devices are available at Raimondi (called levelling system).
Pros:
Minuses:
Pros:
Minuses:
Mounting clamps
Rubi has a slightly different instruction (see photo):
Rubi Tile Level instruction
The table shows the approximate consumption of the tile leveling system depending on the size (number of clips per square meter):
| Sizes, mm | 1200 | 1000 | 900 | 800 | 600 | 500 | 450 | 400 | 330 | 300 | 250 | 200 | 150 | 100 |
|---|---|---|---|---|---|---|---|---|---|---|---|---|---|---|
| 1200 | 6 | |||||||||||||
| 1000 | 7 | eight | ||||||||||||
| 900 | 6 | eight | 7 | |||||||||||
| 800 | 7 | 9 | eight | 9 | ||||||||||
| 600 | eight | ten | 9 | ten | eleven | |||||||||
| 500 | ten | 12 | eleven | 12 | 13 | sixteen | ||||||||
| 450 | eleven | 13 | 12 | 14 | 15 | 18 | 20 | |||||||
| 400 | 13 | 15 | 14 | sixteen | 17 | 20 | 22 | 25 | ||||||
| 330 | 15 | 18 | 17 | nineteen | 20 | 24 | 27 | thirty | 37 | |||||
| 300 | 17 | 20 | nineteen | 21 | 22 | 27 | thirty | 33 | 40 | 44 | ||||
| 250 | 17 | 20 | 18 | 20 | 20 | 24 | 27 | thirty | 36 | 40 | ||||
| 200 | 21 | 22 | 22 | 25 | 25 | thirty | 33 | 37 | 45 | 50 | ||||
| 150 | 28 | 33 | thirty | 33 | 33 | 40 | 44 | 50 | 61 | 67 | ||||
| 100 | 42 | 50 | 44 | 50 | 50 | 60 | 67 | 75 | 91 | 100 |
Examples of using
It is difficult to find SVPs in ordinary building stores, but it can be purchased online. A set of 250 wedges and 250 clips costs about 1000 rubles.
As a result, the cost of using the leveling system goes from 24 to 400 rubles per square meter. If you buy them in batches of 500 pieces, you can reduce the price to 20-334 rubles.
A complete set of Rubi (forceps, 100 disposable clamps and 100 reusable hubcaps) costs more than 3,800 rubles.
For those who are sorry to give more than 1000 rubles, you can try to easily implement a similar tile leveling system yourself. In 30 minutes you can easily make 170 homemade clamps.
In order not to accidentally break the wire with wire cutters, DVP is used as a limiter.
Bottom view
View from above
SVP and DLS (or 3D crosses, as they are also called) are an innovative technology for us that has been successfully used in the West for quite a long time. Technology is rapidly gaining popularity among both professional craftsmen and those who are trying to lay tiles for the first time.
Unlike conventional crosses, which only set the distance between the tiles, the tile alignment system also levels the plane of the entire installation.
The two main components of this system are the wedge and the clamp.
The system allows you to work with tiles with a thickness of 5-12mm. The clamp width is 1.5 mm - it is also the minimum width of the seam. For wider seams, you will need to use crosses for tiles.
The principle of the technology is based on the fact that the two adjacent tiles are aligned relative to each other with a clamp and wedge spacer.
The clamp has a flat base by which it is inserted under the tile. The wedge is inserted into special slots protruding above the tile. It is the wedge that presses the outer plane and aligns the tile.
After the glue hardens, these wedges with clips simply beat off with a rubber hammer or foot (on the floor).
The wedges are reusable, the clips are disposable - they will have to be re-purchased all the time.
The main advantage of this system is the rigid fixation of the tile and the lack of the possibility of uneven shrinkage of the adhesive under it when it hardens.
Manufacturers also indicate a number of advantages, about which one can argue:
As I said above - with some of the stated advantages can be argued.
So, let's begin.
Ideal plane
To obtain an ideal plane, you must have an ideal base. This is an axiom. If on the basis of a hump a couple of centimeters high, then no revolutionary technology can align it and make the laying plane perfect.
Even smaller drops will be problematic. If the base is not even, then the system will only make it worse.
If one tile lies on the dais, and the other, figuratively speaking, in a pit, then because the wedges will attract the tiles to each other, the second tile will detach from the base and there will be a void under it, which is not good.
Smooth seams 1.5mm wide
This is also a very controversial point, because most tiles are trapezoidal at the ends. That is, the width of the tile from the glaze to the base increases (Fig. 1)
Therefore, using a clamp with a width of 1.5 mm, we get a seam width of 1.5 mm at the base of the tile and about 2.5-3 mm at the top, at its outer surface.
In order to avoid this, it will be necessary to cut the recesses in the ends of the tile in the ends of the clamps. There is always a risk of damaging the outer icing.
An exception. This statement is valid only for calibrated / rectified tile - it has sharp straight ends without any extensions or restrictions (Fig. 2)
Laying speed 2-4 times faster
Another controversial thesis.
Perhaps this will be true for beginners.
Professional technology will accelerate a maximum of 1.5 times.
Firstly, it is because the master does not need much time to set the plane of the tile relative to each other. And secondly, inserting (and then taking out) the usual crosses of time takes even less time than when using all these clamps and wedges.
SVP is the simplest and cheapest of tile leveling systems. Consists of a clamp and a wedge.
For ease of insertion of the wedge in some models of clamps there is a special eyelet for the finger, which allows you to more reliably hold it.
The manufacturer claims that it can be used without any additional tools and accessories.
The principle of technology is the same - the clip is inserted under the tile, and the wedge is inserted into the clip.
The first difference from the SVP in the design of the clip.
Due to the particular structure, these clips can be inserted into the intersection of four tiles, which, compared to the previous system, reduces their number by four times.
According to the manufacturers of this product - this is their undoubted advantage. But how to control (and, if necessary, adjust) the beautiful and precise intersection of these four tiles, they do not explain.
Very interesting moment, if you think about it. If he doesn’t cross it out, he definitely casts doubt on the advantage of this system.
The wedges of these systems are also different - in DLS they are bigger and stronger than in SVP.
Also, unlike the SVP, this system requires the use of an additional tool for clamping wedges.
At cost, the DLS system is much more expensive than the SVP.
Several more variants of 3D crosses work on the same principle. They all differ in appearance, but the principle is the same - leveling the plane of two adjacent tiles.
Here, instead of a wedge, a cap is used, which is also pressed against the tile along the serrated tongue (the principle of plastic clamps / puffs).
With this set you can stack thicker tiles, up to 22mm.
And other systems.
These are all western variations and in our case they are not common, therefore we will limit ourselves to photo examples.
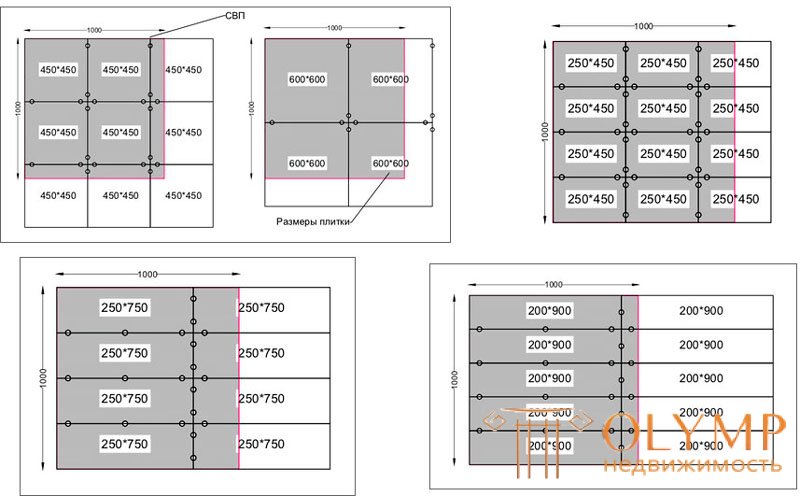
Obviously, the use of SVP is beneficial in price and time only with large-format tiles.
Should I bother to look for and overpay for tile leveling system? For professional tilers - no, but for people without experience, SVPs can greatly simplify the laying process and improve the result. But is it worth it to spend such money for the laying of 5-20 squares, everyone decides for himself.
Disadvantages - additional costs. as well as when laying tiles with spreading only on the base there is a probability after aligning the lifting of the tile with the formation of voids (checked by tapping). therefore, it is recommended that glue be applied both to the base and to the tile. holding a precisely-toothed spatula (so that the glue on the applied surfaces forms the same height), for example, on a surface of 10 mm and on a tile of 5 mm. highly recommended for tiles with lengths considerably exceeding the width or with large sizes of 600, 1000, 1200
Share your opinions and results in the comments.
Что бы оставить комментарий войдите
Комментарии (0)