By veneering, gluing products is called planed or peeled veneer. It can be one-sided and two-sided, as well as one- or two-layer.
With one-sided veneering, the veneer is glued on only one face. The width of the workpiece should not exceed its double thickness, otherwise the product will warp, the veneer is glued directly onto the base. If the base is an array of wood, carpentry slabs or plywood, then to prevent cracking of veneered fan parts, the veneer must be positioned so that its fibers are at an angle of 45-90 degrees to the base fibers. The parallel direction of these fibers is allowed only in parts made of bars of a width that does not exceed their thickness more than 3 times. Chipboards are veneered in a single layer, without fear of cracking, since the fibers of the shavings are located in different directions.
Bilateral veneering trim the most crucial parts of furniture: table covers, walls, doors, shelves of cabinets, walls of drawers. First, peeled veneer is glued to the prepared base, and then the more valuable one is planed. The direction of the peeled veneer fibers must be chosen such that it does not coincide with the direction of the fibers of the warp, and the direction of the fiber of the veneer does not have to coincide with the direction of the peeled fibers. Plywood can be carried out either tightly or by pressing.
It is better to plywood wide surfaces with a preliminary device of a peeled veneer tie. Veneer glue glued with bone, or synthetic adhesives that do not leave marks on its surface. Casein glue is not suitable. It is recommended to withstand the planes of the product under pressure for 6–8 hours, and the edges for 2–4 hours. After depressing, the product should be dried for an additional 3–5 hours at room temperature not lower than 18 ° C. During this time, the bonding strength increases. Only then you can begin to correct defects.
The quality of veneering depends to a large extent on how the surface of the substrate is prepared. First of all, the base must be well otgugovat, to achieve the plane Scratches, scuffs, bursting wood, sagging depth of more than 0.5 mm, glue drips, dirt and other defects are completely unacceptable. Knots, tar should be cut, drilled, and in their place put on the glue wooden cork or insert. Fiber plugs and inserts should be directed in the same direction as the fiber base. Small grooves and cracks are filled with putty.
Putty can be prepared from finely pounded charcoal, best of all birch, or from small sawdust and glue. Putty is applied as many times as it shrinks. After drying, the surface is carefully cleaned with sandpaper.
Then the base, especially of dense, fine-pore wood species, must be treated with zinc-free. The tool must be carried along the fibers. The zine knife will make the surface rough, which will ensure better adhesion of the adhesive to the base.
Particularly carefully be prepared for veneer finishing the ends of the product. They are carefully spat or sealed with wooden lining and planed.
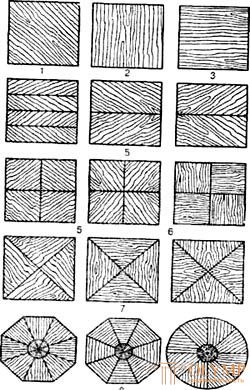
If you intend to veneer large surfaces, then a coupler is needed. It is a large sheet of veneer, made up of individual plots specially selected from the drawing, which are tightly fitted to each other with their edges.
Each assembled sheet-coupler in length and width should be greater than the veneered part by 25-30 mm. What can be options for a set of screeds from veneer, shown in Fig.1. The side of the veneer that comes from the bark is called the right side, and the side that comes from the core is the left side.
There is one feature that must be taken into account - when drying, the left side of the veneer forms a bulge, and the right side forms a hollow.
If the veneer is glued right side up, then its edges will wrap up and lag behind the base. That is why the veneer should always be glued to the base with the left side up.
Deviations from this rule can be only when it is necessary to create a pattern that presupposes the labeling of some veneer sheets with the right side up.
 |  |
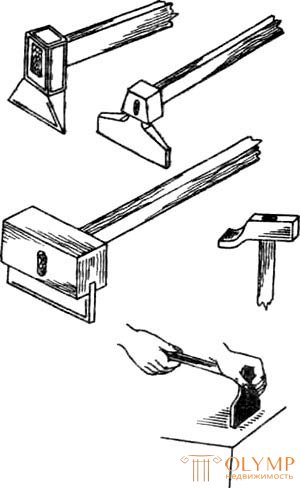
| Fig.1. Variants of a set of screeds from planed veneer: 1 - oblique; 2 - transverse; 3 - longitudinal; 4 - in the Christmas tree; 5 - a cross; 6 - in a checker; 7 - in an envelope; 8 - in a circle or polygon | Fig. 2. Types of lapping hammers and the position of the hammer when working |
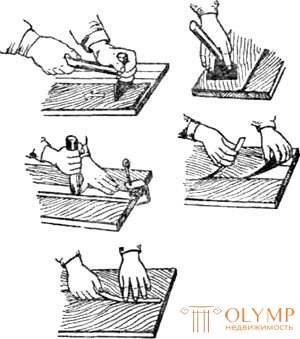
 | Fig. 3. Tricks of plywood very tightly |
Now about the technology set screed. On a planed board (shield), first one sheet is fixed with small nails. The distance from the nails to the edge should be at least 25 mm. The second one is attached to this sheet with the condition that the pattern is combined and the edges fit tightly. Then prepare the edges of the paper with a width of 30 mm. One of the strips is smeared with liquid wood glue and glued on the front side of the screed onto the joined edges in such a way that the middle of the stripe falls on the joint line.
In the same way should be fixed and the next sheet. In conclusion, it should be noted that lapping a large screed is difficult. To a large extent, this is due to the fact that the applied glue thickens rapidly. Improving the process allows the method of faning up very tightly.
This method involves the use of a special lapping hammer. In fig. 2 depicts such a hammer and shows its action. In principle, instead of a hammer, you can use a regular iron. The technology is as follows: the veneer is first moistened with warm water from above. Then the hot glue smears the base. Plywood or screed is immediately applied to the base, hands are smoothed and lapped from the middle to the edges. Then, with a heated hammer, one must carefully start the movements from the middle to the edges along the wood fibers (Fig. 3). The movement of the hammer is made with a gradual increase in pressure and acceleration. In this case, a strong pressure is not required, because all the glue is squeezed out. The lapping is considered complete when the veneer will lie flat on the base and there will be no blistering. If the surfaces for veneering are significant, then it will be more rational to stick individual sheets. In this case, hot glue is applied only to the area to which the first sheet of veneer is attached. After finishing the lapping of the first sheet of veneer, glue the surface of the base under the second sheet with adhesive. This sheet of veneer overlaps the first sheet so that its edge overlaps the edge of the first sheet by 5 ... 10 mm, then it is attached to the edges with small nails and rubbed
In the same order paste and subsequent sheets. After the glue dries, the veneer edges protruding into the shield are cut off and the defects are corrected. If the shield is plywood on both sides, then immediately after the veneer is glued on one side of the shield, it is started on its sticker on the other. If you postpone this operation, the shield will warp.
Elimination of veneer defects
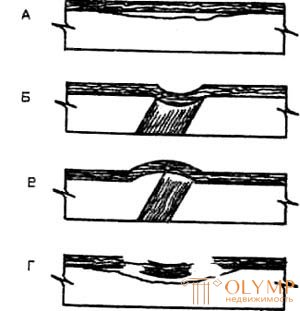
First of all about what is a defect. This, above all, bubbles, cracks in the veneer after drying, the divergence of the veneer, dents. In addition, this includes the infiltration of glue, peeling of veneer, overlapping veneer, various mechanical damage (Fig. 4).
Leaked glue is difficult to remove. In the case of gluten glues, the surface can be bleached with a 15% solution of hydrogen peroxide. This will greatly lighten the leaked glue.
The reason for the appearance of dents can be careless preparation of the base, if there are any recesses on it, dents. In practice, such defects cannot be eliminated.
 | |
| Fig. 4. Possible defects in violation of the technology of veneering: A - depression under the layer of veneer; B - trough caused by the pocket; B - swelling over the knot; G - eating veneer |
Easily eliminate the defect of lag, putting up veneer. In this case, it is enough to lift the un-glued lining, insert adhesives into the defective place and reinsert it.
If an excessive amount of glue was squeezed out during pressing, a defect appears - putting up the veneer. The same happens in the event that the glue thickens before the pressing process begins, with insufficient exposure of the product in the press, insufficient pressure. This defect is eliminated in the same way as in the case of lag.
Air bubbles are also removable. An oblique incision is made (certainly along the fibers), glue is inserted into the incision. After this, the usual lapping operation is carried out.
Joiner's furniture
Что бы оставить комментарий войдите
Комментарии (0)