Parts of old furniture wear out or are lost, may be broken during the repair. Due to the symmetry of many types of furniture, it is possible to make a duplicate of a damaged part, using the existing part as a model. However, it should be borne in mind that these two parts were rather mirror images of one another than exact copies, therefore, the duplicate profile needs to be reversed.
The process of making copies always begins in the same way: the available part is removed, which will be a model. Although disassembling furniture may seem time consuming, it undoubtedly deserves this effort. A copy is much easier to make if you can turn the part from which it is removed to check its outlines from different angles.
If the shape of the part is relatively simple and it has one flat surface, this part can be used as a sample, putting its shape on a new piece of wood. Professionals donate a model to get a flat surface, and cut it lengthwise into two halves, but in this case two new parts will be needed instead of one. More often they make one sample, putting all part profiles (front, back and side) on a sheet of paper and using these silhouettes as samples for transfer to the tree.
When you make a copy of a piece of furniture on a lathe, the paper sample will be the negative of the form that has the finish (i.e. the concave line on the model will be convex on the sample). When applying profiles, especially if the parts have a connection or these parts must function in unison, such as a pair of rocking chair sliders, accuracy is very important. Pencil when drawing the outlines of the parts must be held vertically. Very often, a profile template that is pressed against the contours of a part is useful, but such a template is usually not long enough to capture more than one section of a part at a time.
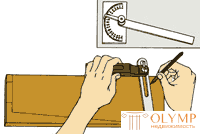
To transfer the dimensions of the parts of joinery (keys and sockets, or sockets and thorns), measuring tools are needed: a caliper, a protractor, a sliding bevel. These tools are also useful when you need to copy profiles, compare the shapes of new parts with the old ones (during the work).
In addition to the delineation of the part, it may be necessary to move the carved part. Tape a sheet of paper to the thread, rub it with a pencil or chalk and transfer the outlines of the thread to a new part using copy paper, a sharpened pencil or an awl.
The tree for the new part should resemble the old one as much as possible, and its size should be large enough to cover this part by a few centimeters. When cutting for the first time, make rough wood with a band saw, hacksaw or figure saw; You can process it with scraper or strugom. Chisels, chisels and a plane will be required to shape the parts; a milling cutter equipped with a corresponding blade is useful for reproducing lost parts, for example, decoration elements.
Transfer of diameters and angles
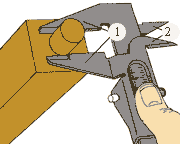
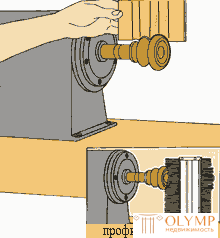
The use of calipers . To measure and transfer the key diameter, loosen the caliper screw and open its clamps until they are installed on the widest part of the key. Close the grippers and use the sharpened tips of the caliper legs located opposite the grips to mark the key diameter on the new piece of wood. Breeding capture calipers equal dilution of his legs.
To measure and transfer the diameter of the key hole, close the caliper legs and install them into the hole; open them until they touch the walls of the hole. Close the caliper by tightening the screw and, using the sharp tips of the legs, mark the diameter of the hole.
To measure the depth of the key hole, install a caliper rod (1 - in the figure) on the hole and pull it to the bottom of the hole. Take readings of the depth of the hole from the scale on the caliper rod.
 |  | The use of calipers: 1 - grabs (cheeks); 2 - legs |
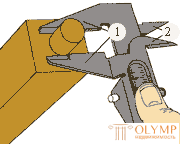
 |  | Sliding bevel application |
The use of a sliding bevel . Slightly loosen the wing nut, then position the handle and bevel blade on both sides of the corner you want to copy. Tighten the wing nut. Move the bevel to a new piece of wood, attach the handle to the edge and draw lines along the blade to transfer the corner.
To measure the angle in degrees, you can use either a goniometer with a slanting bevel, or an instrument that is a combination angle bevel. Loosen the lock nut and align the bottom of the protractor plate with one side of the angle to be measured. Align the bevel handle with the other side of the corner and take the angle reading in degrees from the protractor plate.
Pattern modeling for machining on a lathe
The spindle or leg is a straight cylinder and can be replaced with a key of the same size. However, if the leg has a certain shape or if the drawer has a ball-shaped pen with a figure, then the only possible way to make a copy is to use a lathe. To do this work manually, it will take hours of tedious styling, first with a scraper, then with a chisel and chisel, and the results are usually unsatisfactory.
If you do not have a lathe, you can rent it or entrust the work to a professional. In any case, you can save time and money by making a template consisting of two parts. One part is a guideline for marking the highest and lowest breaking points on a smooth cylinder. Another landmark is the negative profile of the part, which is kept in the course of the work for comparison. If you want to make your own replacement part, you have to make your own template.
 |  | |
| Removing a copy from an existing part | Use pattern | |
 |  | |
| Cut template | ||
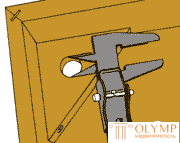
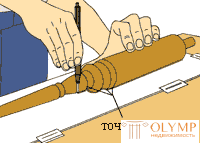
Removal of a copy from the available part . Place the part that is being copied onto hard wrapping paper on a hard, smooth surface and, using an automatic pencil with a released stylus, apply the front and back profiles. Using calipers, compare the transverse dimensions of the original and the dimensions of the contour at each break point; correct the contour so that it exactly matches the original. First, draw the center line for the entire profile length, then the second line (it is called the pattern line), parallel to the center line, retreating 75 mm from the profile contour in its widest part. Draw perpendicular lines known as break lines, from break points to a pattern line. Mark on each such line the diameter of the original part at the corresponding break point; use calipers when measuring.
Cut template . Make a cut with scissors along the central and patterned lines. Using rubber glue, glue the contour to plywood or hard cardboard 3 mm thick. Attach a tree or hard cardboard clips to the desktop and cut along the profile line. If the saw blade does not rotate accurately enough to follow the outline, cut as close to the part as possible, while remaining outside this line when you deviate from it, and complete the profile shaping with a file.
If the original has any part in the shape of a square, as happens in the legs of tables and chairs, make a pattern only for curved elements. The part in the form of a square cannot be fashioned on a lathe.
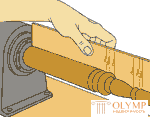
Using a template . Before you start contouring (shaping) the parts on the lathe, attach the straight edge of the template to the slowly rotating wooden cylinder so that you can attach a pencil tip to each profile break line to draw these lines on the cylinder.
Start cutting and shaping the part by stopping the machine when approaching the end to compare the profile of the cylinder with the profile edge of the template. Use calipers for frequent diameter measurements at break points. For a while while working with calipers, stop the machine to avoid gouging the wood.
When cutting out any part (for example, a spherical door handle), make comparisons with the template, as described above. To check the end profile, use the profile template. Install this template by holding it onto the original part and inserting the teeth into the pattern.
EXAMPLES:
Making a new rocking chair
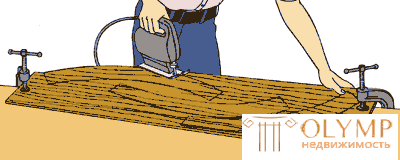
Outline. Using the existing slider as a sample, apply three of its outlines (contours) on a board whose thickness is one third of the thickness of the slider. Place these outlines on the board so that the structure of the tree on each of them goes in different directions; if possible, avoid short structures at the ends of the runners, as they are fragile. Instead, you can cut a new slider from one segment of a stronger tree.
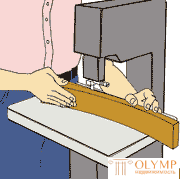
Cutting out parts of the runner. Press the board to the workplace with clamps or install it on the sawhorse for cutting and, starting from the edge of the board, cut out the parts of the slider. Support each slider when the saw approaches the edge of the board so that it does not fall and break.
Bonding slider. Apply yellow glue to both sides of one part of the slider and to the inside of the other two parts. Assemble the pieces and clamp them between the wooden blocks to evenly distribute the pressure. Let the glue dry within 24 hours. Remove the clips and align the curved surfaces of the new slider with a planer, a scraper, or a shaped cutter. Then cut through the holes for the keys and spikes that will connect the slider with the chair, trying to position them at the same distance from the ends as the holes on the original slider so that the chair swings smoothly. Apply glue to the new slider and press it to the point of attachment.
 |  |
| Making a new rocking chair runner. Contouring | Making a new rocking chair runner. Cutting out parts of the runner |
 | Making a new rocking chair runner. Bonding the slider |
Styling of a concave horizontal strapping back of a chair
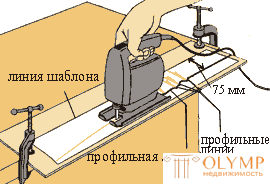
Cutting complex bends. Draw the outlines of the concave (front, back, and top) profiles of the new horizontal strapping of the chair on the wooden block, long enough to accommodate the spikes at both its ends. Use a band saw to make a rough cut of the front and rear bends, cutting off the rear corners and deepening the front. Then trim both bends, working slowly and evenly so as not to gouge the tree, not to twist and break the blade. In the same way roughly cut and trim the top profile.
Smooth the front, back and top bends with a rolled planer or a shaped cutter. Measure the nests on the horizontal straps of the chair and cut out the spikes towards them using the tenon saw and chisel. If you manage to cut the spikes as short as possible, you will be able to insert a new harness without separating the already installed harness. Glue and replace the new trim.
 |  |  |
| Styling of a concave horizontal strapping back of a chair. Cutting complex bends | Difficult cut for a bent leg. Drawing the profile of the original |
Difficult cut for a bent leg
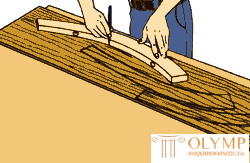
Drawing a profile of the original. Apply the leg, which is removed from the copy, sideways on a piece of paper and apply its profile. Using a caliper or a ruler, compare the dimensions of the leg and the contour; correct circuit if necessary. Cut the contour with scissors and place it on a wooden block (having a length so that the whole foot and thorn could fit on it) so that the “knee” (1 is in the figure) and the foot (2 is in the figure) touched the corner of the block in the place where the two sides converge. Transfer the profile to the tree, then turn the sample over and move it to the next side so that the “knee” and “stop” touch the same points on the first contour. After that, transfer the profile also to this side.
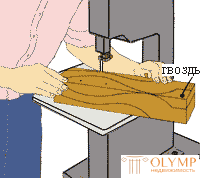
How to make a complex incision. Lay one profile, face up, on the band saw table and make cuts at both ends of the profile. For a while, nail the carved parts of the excess wood into place, trying not to drive the nails into the leg. Then lightly strike the wooden block, lay the other profile face up and re-make cuts along both edges of the profile. Try to prevent the blade (blade) from falling on the nail.
After making the last cut, trim the roughly-cut foot with a shaped cutter or a rolled planer to match the original. Cut out the decorative details with a chisel and chisel and polish the foot.
Application of a V-shaped clamping device for cutting a narrowed leg
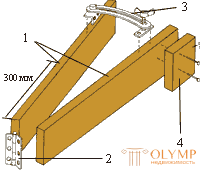
Tapering jig disassembled
Tapering fixture can be made from the available materials: two pieces of wood section of 75x25 mm for folding legs; 60-mm fixed pin hinge (2 - in Fig.), Connected abutting, attached screws to one end of each leg; sliding support (3 - in Fig.), attached to the opposite end, to install and hold the angle of the legs, and a wooden stopper (4 - in Fig.) section of 75x25 mm on the outer side of the open end of one leg. The landmarks (1 in Fig.) Used to set the angle are marked on the inner edge of each leg 300 mm from the end of the loop. Before applying the taper clamping device, it is necessary to determine the taper (millimeters per 300 mm). For example, measure the width of the legs at the top and bottom (in millimeters) and find the difference by subtracting. Divide this number by the number obtained by dividing the length of the leg by 300 mm. The result will be a number showing the desired constriction. Open the legs of the jig to the number obtained and tighten the wing nut.
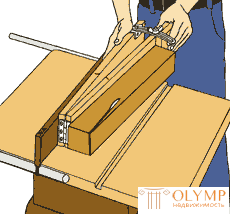
Use clamping device for narrowed cut. Start with a wooden block that has an original foot length and a width equal to the upper width of the foot. Having placed the block on the clamp, push the clamp and the block through the saw. Turn and cut the other three sides of the block, but double the taper angle whenever the tapered side is on the jig; cut the third side at the same angle as the first, and the second and third - at double the angle.
 |  |  |
| Application of a V-shaped jig for cutting a narrowed leg. Tapering jig disassembled | Application of a V-shaped jig for cutting a narrowed leg. Using a clamping device for a constricted cut | Styling with hand tools. Using the bracket to cut the armrest of the chair |
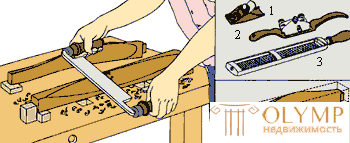
Styling with hand tools
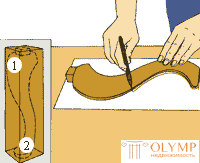
Using the bracket to cut the armrest of the chair. Apply the contours of the curved surfaces of the armrest to the wooden block. Attach the bar to the work table and run the scraper on the upper surface of the tree, holding its slanted blade downwards. To remove thin chips, hold the scraper handles almost parallel to the surface of the wood; For thicker cuts, turn the knobs down. Work slowly and check the dimensions often with the original using a caliper and a scale bar. Flip the bar, cutting off all four surfaces.
To complete the shaping, use a rolled planer (1 - in the figure), a plane (2 - in the figure) and a shaped cutter (3 - in the figure), which is equipped with alternating large, medium and thin plates. To handle hard-to-reach corners or complex contour configurations, use a rolled-on plane 75 mm long. To give a smooth finish to surfaces that have already been roughly cut, use a plow; For processing curved surfaces in the plow there are blades with special convex and concave surfaces.
Что бы оставить комментарий войдите
Комментарии (0)