Alignment of any surface in the room under the final finish is one of the main problems of any repair. You can speed up the process, make the surface smooth, add decorative elements (arches, shapes) using such a universal material as drywall. But the casing is always preceded by the stage of manufacturing a special base, on which the sheets will later be fastened. Mount the frame for drywall on the ceiling should be with special care, because it is he who will be "responsible" for the reliability of the future design.
The list of preparatory activities
Any work must begin with a plan. And the installation of a suspended ceiling is no exception. Therefore, you should clearly understand the future design of the structure and be sure to fix all your thoughts on paper in the form of a sketch. After that, you can begin the calculation of the necessary components and make an estimate for going to the building supermarket.
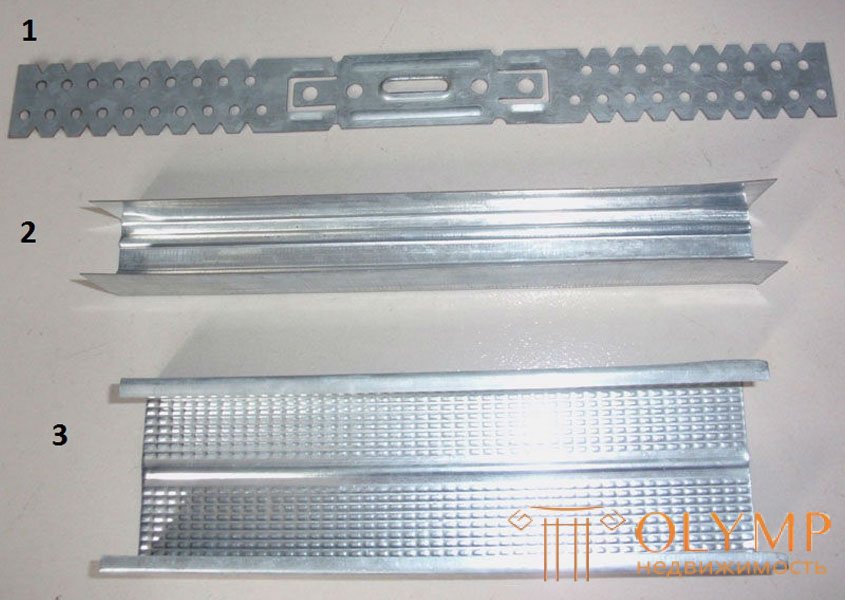
To create a framework for drywall on the ceiling will need:

In practice, it is usually advised to buy screws in the amount of not less than 100 pieces per sheet from 1200 to 2500 mm in size. It is better to take the material with a margin, especially if you plan to create a complex framework for a two-level gypsum board ceiling. For example, there is always a chance to spoil it when bent, so a couple of pieces will not be superfluous.
Significantly simplify the task can ready-made calculations for the frame of a suspended ceiling made of plasterboard, developed by some construction companies, as well as special online calculators. Below is just a list of "consumables", but it is better to make estimates yourself, focusing on prices in the region. Experienced builders always recommend multiplying the amount received by two, and this applies to all stages of repair.
On the ceiling sheathing under 1 sq. M. material should be bought:
| Name | Unit meas | Consumption |
|---|---|---|
| CD profile | m | 2.9-3 |
| UD profile | m | the length is equal to the perimeter of the room |
| Cross connector | PC | 1.7 |
| CD Profile Extension | PC | 0.2 |
| Anchor suspension with clip for profiles 60x27 | PC | 0.7 |
| Traction suspension with eye | PC | 0.7 |
| Wall plugs | PC | the perimeter of the room multiplied by 2 |
| Ceiling dowels | PC | 0.7 |
| Screw LN 9 | PC | 1.4 |
| Screw TN 3.5x25 | PC | 23 |
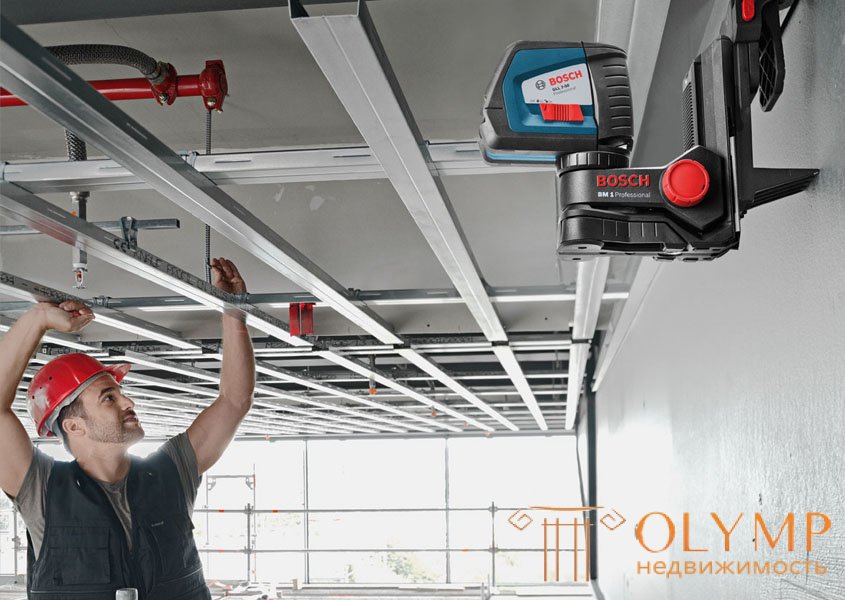
These values should be multiplied by the ceiling area and rounded up. In addition, in the manufacture of the frame you will need a laser or hydraulic level for mounting guide profiles, as well as a perforator. Bearing profiles can be mounted using a tensioned thread.
After all the preparatory activities have been completed, you can proceed to the first part of the installation of the gypsum board ceiling framework - the markup. To begin with, the lowest angle should be determined by measuring the height from floor to ceiling. It is from this angle that one should measure the distance under which future communications will be hidden.
In the marked place, you need to set the laser level and using the light lines to set the part of the grid, which you can then simply outline with a pencil. It is worth considering what type of frame is used - metal single-level, multi-level or wooden. With the crate under the gypsum multi-level ceiling will have to tinker, especially those who do not have sufficient experience of such works.
The next step will be markup for ceiling profiles. For this, ropes are stretched from the edge of the wall at a distance of 0.6 m, along which the profiles themselves will subsequently be placed.
The wooden frame will require pre-treatment of the material to protect against excessive moisture. Such work is very laborious and with insufficient quality performance will lead to the rapid destruction of the base. Therefore, the metal structure is in great demand, except in cases where the main floors themselves are made of wood.
To content ↑
Assembly work
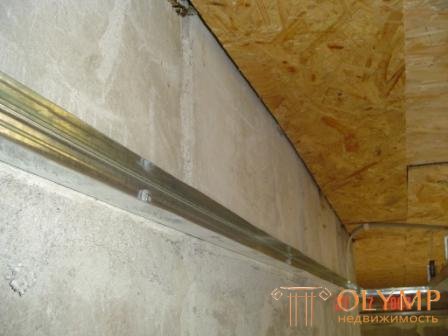
Installing a UD Profile
There is a lot of information and training video on how to make a framework for plasterboard on the ceiling, which can be downloaded from the Internet. Next, we will discuss the features of the main stages of installation of a metal base.
The UD profile is installed in such a way that its lower part coincides with the previously marked level.
To do this, use dowels or screws for quick installation. The order of work will be as follows:
In the case of an uneven surface of the wall is to cut the profile on both sides with scissors for metal.
The CD profile should be mounted so as to subsequently eliminate the cracking of gypsum boards at the joints. The main rule: the more used bearing profiles, the smoother and neater the ceiling looks.
The distance between them is usually chosen 40 cm, but it strongly depends on the shape of the room itself. For convenience, between the guides, you can stretch the parallel threads, which will become the visual basis for the future frame. After installation, all communications, wires, insulation should be laid, and then proceed to the plasterboard plating.

Completion of the installation of the frame to the ceiling
In the case of installing a framework for a two-level plasterboard ceiling, a dilemma arises: in which order to install the first and second levels. The fact is that the standard technology, when the upper tier is first mounted, and then the lower one, has several disadvantages: deterioration of structural strength, increase in costs (long self-tapping screws are needed).
In case of reassembly, the laboriousness of the operation and time costs increase, which, in the case of using a hired construction team, are always taken into account. In the manufacture of a frame for the ceiling of drywall with your own hands it is worth spending extra time, but to do the work better, “for centuries”.
There are many recommendations on how to make a framework for drywall on the ceiling, from both professional builders and self-taught masters. Such information is very useful and I wanted everyone who came across the installation of suspended ceilings to share their experience and recommendations with novice repairmen. After all, any business has its own secrets and non-standard solutions of various issues.
Что бы оставить комментарий войдите
Комментарии (0)