Colons are less and less used for their intended purpose to maintain the arch of the building. Now they are mostly used for decorative purposes. Columns of drywall began to appear in modern apartments and private homes. They perform the function of an element of decor, but sometimes their main purpose is not even that. What do they do? And why is drywall used to create them? And how can you create cylindrical figures from flat sheets? We will understand all this in order.
Content: [hide]
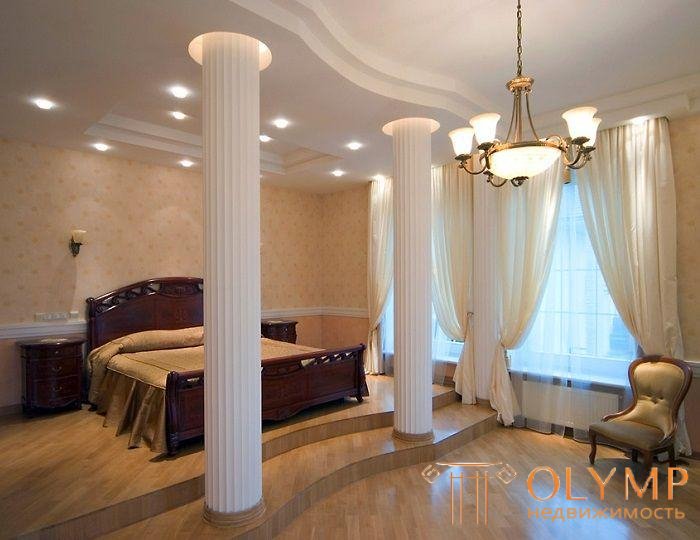
Columns look good in a refined interior.
We will consider decorative designs, since the creation of columns of solid stone or concrete does not interest us (their installation in an apartment is meaningless). So why do we need columns of drywall in the apartment?
Drywall is well suited for the creation of various decorative items. Of course, other materials can be used to create the column, but they are not as practical and cheap as the GCR. Especially in the environmental friendliness of the building material, that 99% consists of gypsum and cardboard can be no doubt.
The beauty of the column is manifested only after finishing
The great advantage of drywall is its lightness. As a result, the finished design will also be light and durable. The load generated on the slab will be minimal. It is very convenient to work with the GKL not only to work, but also to give it various forms. Therefore, with its help, not only rectangular but also round columns can be beautiful.
Drywall is very clean material, and after working with it there is very little dirt. To create a drywall tower, the following tools and hardware may be required:
There are two variants of the column: with a rectangular and round section at the base. The rectangular option is simpler. Of course, a rectangular column is not as beautiful and elegant as a round one, but anyone, even those who have not dealt with drywall before, will cope with its assembly.
Rectangular pillars are rarely made due to their simple appearance.
The first step is to choose a place and mark it. A rectangle is drawn on the ceiling, and then using the level all the lines are transferred to the floor. If there is a laser level, then you can start marking up from the floor, and then transfer it to the ceiling.
The lines should indicate well the internal or external contours of the profile, but not in its middle. The thickness of the profile and gypsum can play an important role in the final form of the structure. Therefore, these parameters should definitely be taken into account before making a column of drywall.
The guide profile is cut to size and fixed with dowels along the contour to the floor and ceiling. With the help of a square, you can easily check the correctness of the applied markup and the installation of basic profiles. At least two dowels must be attached to each profile. If the profile length is less than 60, then these two dowels will be enough.
The rack profile is cut to the height of the room and vertical edges of the structure (rack) are made of it. They need a minimum of 4 pieces. If the width of the wall of the column does not exceed 60 cm (and it must be smaller), the rack profile is installed in the corners. The water level will help set the rack profile smoothly. The rack and guide profiles are held together by a sifter. In his absence fit screws for metal.
Horizontal jumpers are installed between the vertical posts with a step of 60 cm. For this, a long profile is incised so that a short profile can enter it. Additional stiffening ribs will give stability to the whole structure.
If the column hides water pipes, then you need to use soundproof material, and then sheathe all the plasterboard. When building a column of drywall, you can pre-cut the gypsum board or do it in a place where it is more convenient for anyone.
Work begins with marking the floor and ceiling, but first you need a compass. You can screw a screw into the center of the future circle and pull a thread from it, on the other end of which there will be a pencil. So the circle is drawn. You can also make a compass from the profile. In this case, a screw will be screwed in one place of the profile so that it turns, and a pencil is placed at the other end. As an option, a piece is made, and then two identical circles are drawn.
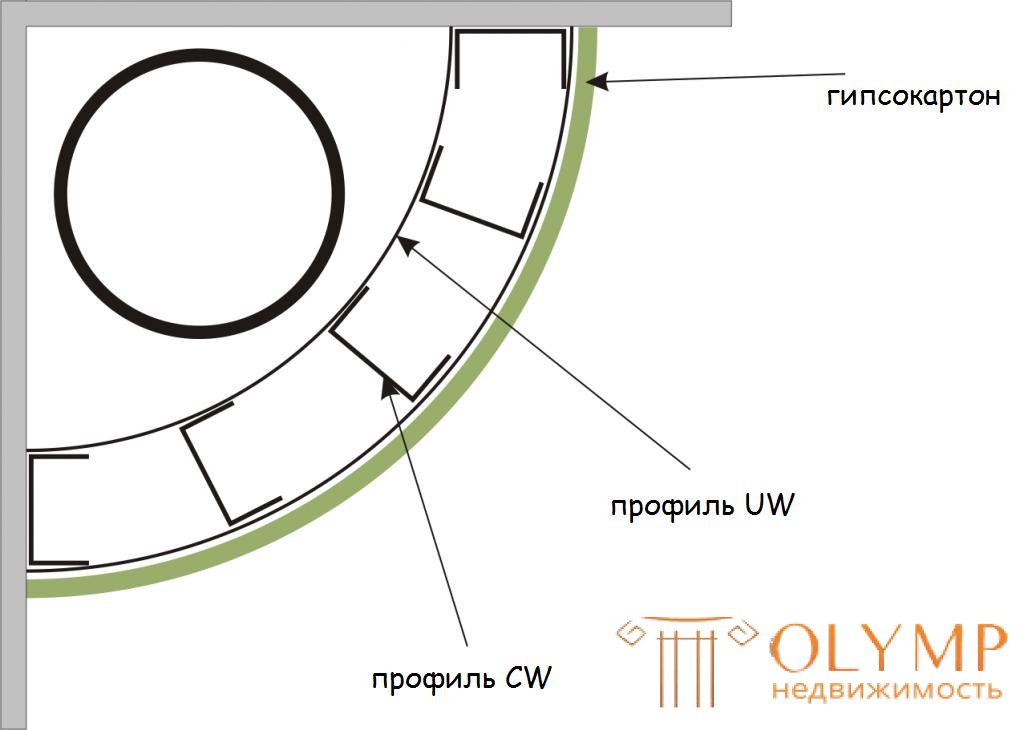
Top view of a semicircular column
In any case, it is necessary to designate the center of the circle on the ceiling, and then transfer the mark to the floor using a plumb line. Further two circles are drawn. This will be the internal diameter of the column, on which the profile is laid out, and then drywall will be attached. Before you make a column of drywall, all this must be taken into account so that the design does not come out too bulky.
You can make two circles on each surface, and between them set the cropped profile. In this case, the work will be more accurate.
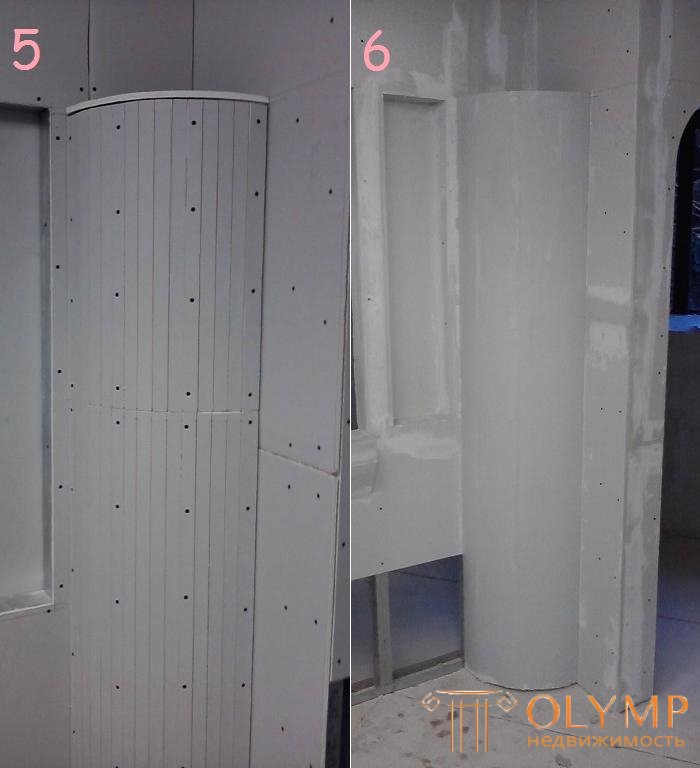
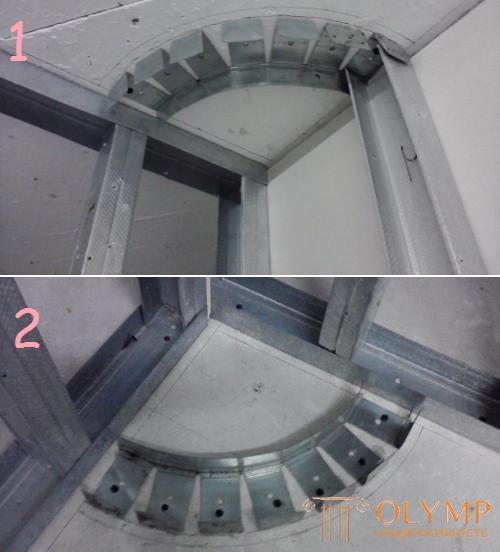
The profile must be cut in increments of 5-7 cm so that it bends in an arc. For this, the guide is cut across so that only one side remains intact, the one along which the bend will be made. Now bending profile is applied to the surface and curved around the circumference. It must be attached to both bases with dowels with a step of 5-7 cm for greater reliability. After that, you can insert a vertical profile (it can also be guides).
Similarly, the frame is made for a round column.
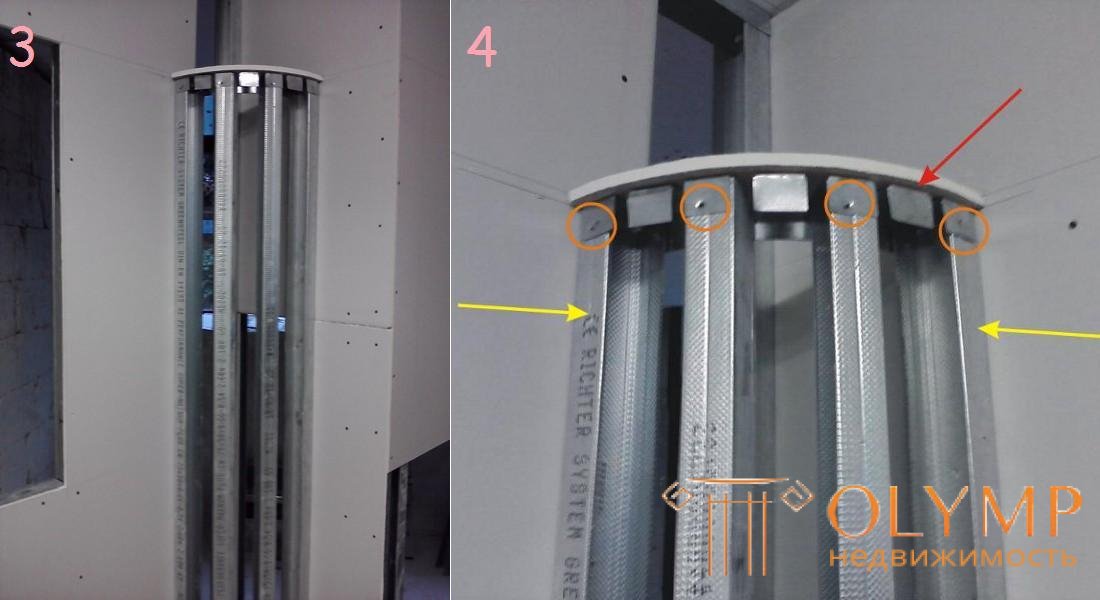
The vertical profile is inserted sideways in the middle of the two guides. For the best effect, you need to insert it into each section of the cut profile (you can do it in one). This may seem costly, but then the column will have a round shape without flaws. The smaller the radius of the column, the closer you need to install racks to each other. It is clear that horizontal jumpers will not be required.
To fasten a profile to each other is best done with a cutter.
Radial columns of drywall can stand apart from the wall, and can rest against one or even two walls (in the corner). The latter option is rational for hiding sewer pipes. If a semicircular structure is made, then vertical lines are drawn on the adjacent wall, and then vertical guides are screwed along them. The rest of the process is no different from the above.

With the help of usual putty the column is leveled to the maximum round shape.
There are no problems with the lining of a rectangular structure, because it is quite standard, as if the gypsum board is mounted on a wall of profiles. However, with a round column will have to tinker. The problem is that you need a drywall somehow bend. Consider the most popular ways to solve this problem.
We use arched drywall . He is very thin and easily bends. Flexibility to bend this building material could make it ideal for use when creating a drywall tower. However, it is somewhat more expensive than ordinary plasterboard and very fragile (sheet thickness 6.5 mm). Such a sheet is brought to the column and one edge along the entire height is fixed with screws. Then over the entire height they fasten it to the second pillar, then to the third, and so on. In the process of fixing the arched drywall will bend, taking the desired shape.
Apply the wet method . For this method, the usual drywall is taken, which is pierced to the middle with one side of the needle roller. Then it is moistened to become supple and fit on a specially created form. Sheet pressed, kept to dry, and then simply attached to the frame. By this time he will receive the necessary form.
The problem with this method is that you can give a little or a lot of water during humidification. You need to bend the sheet together, and you need to build a special device for this.
Dry fold . With this method, the reverse side of the drywall is milled so that it can be bent without fear of breaking. Grooves for 2/3 thickness are made with a V-shaped or U-shaped form. The smaller the radius of the column, the closer the grooves should be from each other. Then with such a drywall, it just bends around the frame of the column, and he lights it up with screws.
You can also make cuts along the entire length from the front side, in order to later break the drywall. But it does not need to cut the cardboard, which holds the broken piece. So the whole sheet is cracked, and then it is very easy for them to round the frame for the round column.
For a rectangular drywall column, the burping process is quite standard. The main thing to pay attention to the corners, which must necessarily be protected by a reinforcing corner made of plastic.
If an arched drywall was used, then there is almost no work with it. Only standard putty joints and screw caps. This is very good, because it is very hard to putty rounded shapes. The situation is the same if the wet-faced gypsum plasterboard was used.
After a dry fold, the cardboard has a not very smooth surface, therefore it is necessary to apply and smear the putty over its surface several times. It will be necessary to achieve a completely rounded shape, which is very difficult. Many at this stage may fall into despair, because a round column does not come out. It will work out, but this requires practice and certain skills in working with the solution. If you do not have them, then it is better to use arched drywall. In extreme cases, you can see in the video how to putty such constructions.
Что бы оставить комментарий войдите
Комментарии (0)