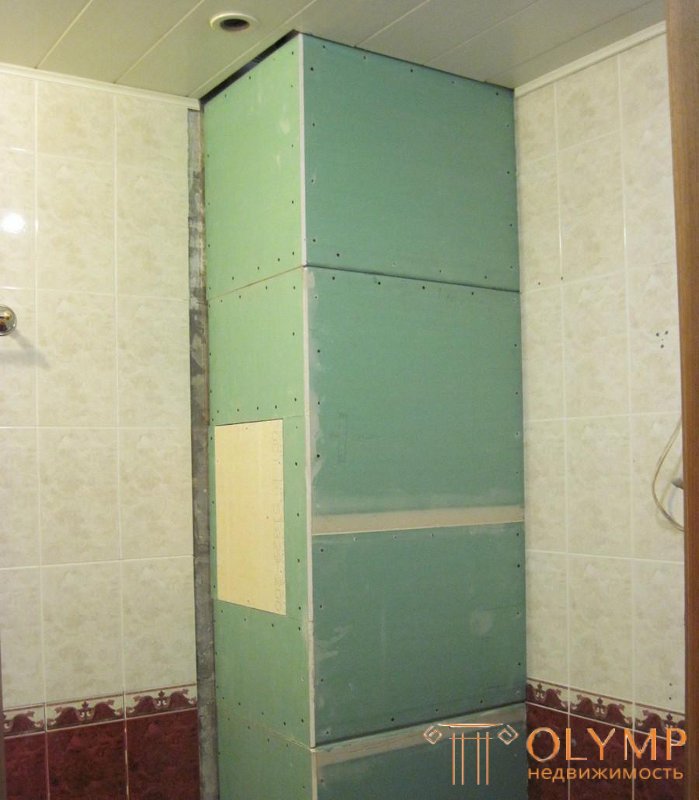
The appearance of the bathroom can hardly be called beautiful because of the pipes rising from everywhere. If you hide them, the bathroom can be transformed. Therefore, use a box of drywall in the bathroom. It allows you to hide sewer plums, risers and water pipes. Also, with the help of a box, you can think of additional lighting.
Content:
Mainly the box is needed so that the ugly pipes are hidden and not frightened by their appearance. Moreover, even after sewing the pipes, you have the opportunity to install shelves on the box. So this design is multifunctional.

You can always leave the hatch to have access to water meters
If you make a vertical box in the bathroom from the drywall with your own hands, then it can be equipped with additional spotlights, which will create a unique atmosphere. You can resort to the classic version, when the lighting is located on a horizontal structure. In both cases, it is necessary to be confused with the lamps themselves, because the necessary special materials, devices and equipment for working in rooms with high moisture content.
Summarizing the intermediate result, we can say that the plasterboard box in the bathroom has the following functional purposes:
Depending on the need, the box can be vertical or horizontal, small or large, narrow or wide. From this depends on the method of its installation. It's one thing to make a thin box for a drywall bath and it's quite another thing to mount a wide box right above the ceiling.
To workflow went quickly and without a hitch, you need to prepare in advance so as not to stop in the process. It all starts with a drawing. It is very simple. You already know what pipe to hide, so it remains only to consider the dimensions of the future structure, it is enough to retreat from the pipe by 2-5 centimeters in both directions and fix the profile there. This distance will be quite enough, and there is no need to hide the place.
When plating a vertical pipe, you must use a plumb, because it may have a certain slope. The pipe will retreat as much as possible from the wall near the floor or ceiling. From this place, and you need to retreat a couple of centimeters, and then move the point to the opposite surface.
The drawing itself can be created on a piece of paper for greater clarity, and you can make all the markup on the wall without using a drawing. Before you make a box of plasterboard for pipes in the bathroom you need to mark up. We will consider the option with pipes that run vertically in a corner, because this situation occurs in the absolute majority of cases.

Marking for boxes in the middle of the room
As already stated above, with the help of a plumb mark points on the floor and on the ceiling near the walls. With the help of this simple device, they will be clearly opposite each other, which will allow you to create an even frame. Then, using a paint cord or a profile with a pencil, parallel lines are drawn on the walls, which will indicate the place of fastening of the guides.
Now from the marked points it will be necessary to draw lines on the floor and ceiling so that they form a right angle in both cases.
After a simple markup, you need to cut the gypsum strips of the required size so as not to fool around in a small space with large sheets. It is necessary to cut two strips over the entire length of the sheet across the width of the box. You will also need a couple of smaller pieces, the length of which depends on the height of the ceiling. For a box of 25 * 25 cm one standard sheet of drywall is enough. The material still remains.
The drywall box in the bathroom has the same assembly principle, regardless of whether the riser or the wiring pipe is hidden. To work will require:

Profiles fit together at a right angle
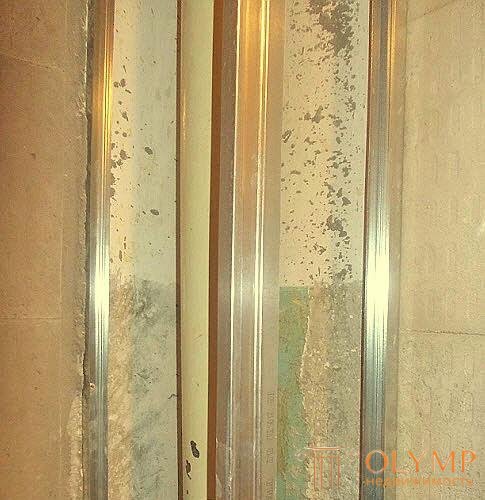
Along the lines on the wall is mounted a solid guide profile. For its installation it is necessary to take dowels with a length of 40 mm and fix the guides with them with a step of 50-60 cm to the wall. After that, the same profile, but of much shorter length, is mounted in two places on the floor and in two places on the ceiling along the lines available. Two dowels in each of the four profiles will be enough ( even if the length of the guide 20 cm you need two dowels, one is small ). At the junction points of the profiles it is not necessary to fasten them to each other, this will be done at the time of plasterboard plastering.
Condensate often runs down the pipes. It is in the place of contact with the floor pipes begin to rot. Since we will not see this process, it must be prevented. To do this, the pipes are wrapped with the help of corrugations for thermal insulation. Condensate will not appear and we can not worry about what is happening with the hidden pipes.
For greater structural strength, a rack profile is inserted parallel to the two guides on the walls. Assembling a box of drywall in the bathroom, below and above, we connected at a right angle two short profiles. And one of them rested on the other. The rack profile must be inserted into this very different guide so that it is at the very corner of the structure. For these purposes, we need exactly the CD profile, and not the UD that we used earlier. The central (corner) stand is not attached to anything, as a matter of fact, therefore it must be stiffer than the rest of the frame.

If you do not glue the tiles on the box, you can use the usual guides
The rack will be firmly fixed during the installation of drywall. It already goes tight enough into the guides and does not fall out. Of course, you need to choose a rack profile of such size that it fits tightly into the guide. UD 27 * 28 and CD 60 * 27 are in this case classics of the genre. All the way, use the level to design went without distortions.
Many people prefer to procure a sufficient number of jumpers before making a box of drywall in the bathroom. But if you are new to this business, it is better to cut the jumpers in the process. They must be installed in 40-60 cm steps between the central pillar and the wall guides. As a result, the design will be more reliable. Drywall will be attached to the racks, which will make the surface of the box stronger and more even. The jumpers themselves can be made both from the CD profile and from the UD (what you have left). If the jumper is of the rack profile, it easily enters the guides.

Jumpers can be fixed with a piercer to avoid knobs from screw heads
If it is not possible to insert the jumper directly into the profile, then you need to cut off a few centimeters of edges from the jumper on both sides, while leaving its base. In other words, the sides of the lintel are cut off so that it can enter between the profiles and there is a tongue with which it can be fastened. Attach them to need screws for metal.
Sometimes it is required to leave the viewing window for the meter or other needs in the box. Therefore, in advance you need to note the place where the hatch will be located. Just insert the jumpers on its top and bottom border.
Only moisture resistant plasterboard can be used. It traditionally has a greenish color. Cut sheets of gypsum fasten first on one side of the box, and then on the second. And you need to make sure that the joints of the sheets are not on the same level (the design will be more reliable). Moisture-resistant drywall is fastened with black screws 25-35 mm long with a step of 15 cm. Be sure to install the screws in all corners. As mentioned earlier, in this place not only is the GCR attached, but profiles are also attached to each other. It is also necessary to fasten drywall in places where jumpers are installed.
Hats of self-tapping screws need to be driven into the drywall so that they do not tear it, but do not stick. It is ideal to screw in the screws so that the cap is pressed into the sheet by 1-2 mm. In this case, the design will be convenient to putty, and it will not lose its strength characteristics.
Now it is clear how to assemble a box of drywall in the bathroom, but you need to prepare it for finishing. For this, all the caps of the screws are puttied, as well as all the joints. It is desirable to chamfer from the joints to form a small hollow, where the putty is applied. Pre-joints should be primed to keep the putty better. Reinforcement mesh is used to strengthen the joints.
It is necessary to pay careful attention to all points in preparation for the finishing. It is necessary to carry out the above procedures carefully, and then the whole box from the GCR will be primed and puttied again. After all, it will be in the bathroom, so you need a good protection from moisture. Rely on moisture-resistant drywall and nothing else not to think not to turn out. Very often the box is finished with tiles, and these are high loads. Therefore, the design must be durable, and putty does not lag behind. Do not forget the antifungal supplements, but these are the nuances of finishing.
If you need to sheathe more than one pipe and the design of the box seems to be difficult, then this video can help with such nuances.
Что бы оставить комментарий войдите
Комментарии (0)