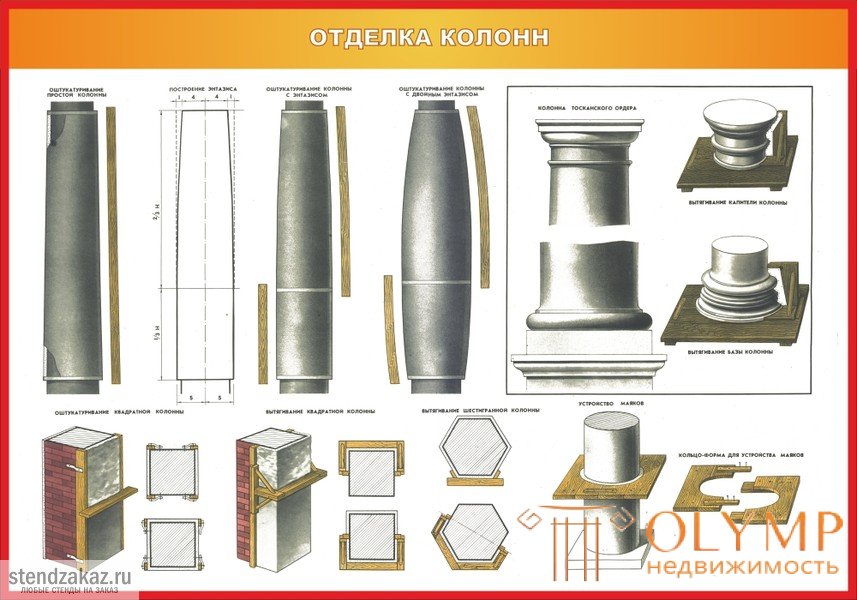
Types of columns and making template for columns with entasis . Bearing columns and supports in buildings are often designed in the form of columns - square, multi-faceted, round. The surface of the columns is often smooth, but sometimes it is decorated with grooves - flutes. In addition to the flutes on the columns arrange rusta. Columns in classical architecture are often arranged with entasis. A column with entasis at 2/3 of its height from the bottom has a cylindrical shape, the remaining 2/3 gradually taper upwards.
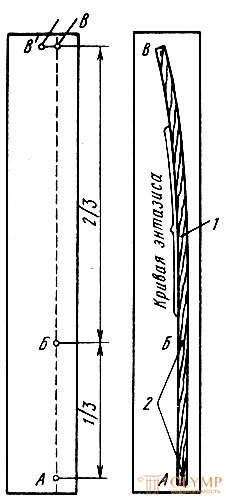
For plastering the column with entasis a special rule is needed - a piece. In a simplified way, they are satisfied with entasis using a planed lath with a section of 30 x 30 mm, a length equal to the height of the column (fig. 75). They take a plank of the same length as the rake, draw a straight line on the plank and measure the point B and the second point B1 at the top of this line at a distance equal to the narrowing of the column, for example 5 cm. The straight line on the board is divided into three parts. The lower part remains straight, and the two go to narrowing. To the line drawn 1/3 from the bottom two nails nail the rail at points A and B, and then bend it to point B and nail it. The curve formed by the rod shows the form of entasis.

Fig. 75. Construction of entasis in a simplified way: 1 - rail, 2 - nails
The rail is lined with a pencil and a curve is drawn on the board. Then they remove the rail and make a cut along the curve, clean it and get the rule-pattern necessary for leveling the solution when plastering the column with entasis.
Hanging columns and pilaster . If there are several columns located in the same straight line, first hang the outer columns. Then, with the help of a cord stretched over hammered nails or made marks, the remaining columns are fixed.
The protruding parts on the columns are cut down, and if this is not possible, they increase the thickness of the plaster on all the other columns so that the protrusion becomes imperceptible.
Straight columns are fixed like this. At the top of the thickness of the plaster drive a nail or make a mark. From the head of the nail they lower the plumb line and drive in the second nail. Then, over the hammered nails, they tighten the cord, through which, if necessary, intermediate nails are driven into the column. After fixing the outermost columns, tighten the cord over the hammered nails and drive in nails or make marks on all the other columns.
Columns with entasis hang in this sequence. Measure the upper and lower radii of the columns. Suppose the upper radius is 300 mm and the lower one is 400 mm. At the bottom of the column they drive in a nail or make a mark 2 cm thick. A plumb line is lowered onto a nail or mark from the top of the column in such a way that its cord touches the nail head or mark. Then, at the top of the line of the cord, 100 mm is measured in the direction of the column (the difference between the lengths of the radii). For this mark, a nail is driven in at the top of the column or a stamp is made.
For the device marks on the columns at the point of hanging throws bosses of plaster or lime-plaster solution. The bosses on the side allow a plumb line and cut the front surface of the bosses along the line of the cord. Cutting the bosses from all sides, get the exact brand. Stamps arrange at a distance of 1.5-3 m from one another, i.e. at a distance equal to the length of the rule. On the columns with a height of about 5 m arrange two marks.
Pilasters and semi-columns are laid out in the same way as columns.
The device beacons on the columns . Lighthouses suit only on round and semicircular columns, as well as pilasters; lighthouses encircle the column like a belt.
For the device beacons produce a template ring. First, knock a board out of boards with a thickness of 20–30 mm, on which a circle with a circumference of the desired diameter is drawn. Then the shield is divided into two halves and with a saw or a knife cut out the delineated semicircles from each half. After they are stripped and folded together, a separable ring pattern is obtained. For a column with entasis, two rings are made, and sometimes more.
The rings are put on nails driven into the column or stamps arranged. To prevent wooden rings from crawling down, plaster bats are plastered under them or nails are driven in. In the interval between the rings and the barrel of the column throw plaster or lime-plaster solution. When the solution is set, the rings are removed. To make the ring easier to lag behind the solution, the ring should be tapped with a hammer. If shells form at the lighthouses, the latter are smeared with a solution and cleaned.
There is another way to make beacons. The beacon rings are pulled out of the gypsum mortar using a template mounted on a flat board board or plywood sheet. After stretching the ring is cut into two parts and put on the column in the right place. Extrusion of rings takes more time than their casting. Therefore, when a large number of gypsum columns are made, the shape of two rings is inner and outer. Forms - rings are coated twice with alcohol varnish, then with lubricant, mounted on a shield and plaster beacon rings are cast in them. After the gypsum mortar is set, the outer shape of the ring is removed, the beacon is cut into two parts and removed. Before re-casting, lubricate the ring mold.
Lighthouses on semi-columns are arranged in the same way, but with the only difference that it is not a ring that is used, but a half ring. For polyhedral columns, rings are made in the shape of a column. The more precisely the ring is made, the more correctly the beacons are obtained.
When pulling out tetrahedral columns, the rules should be set not by beacons, but by nails driven in by a plumb line or directly by a plumb line. So that the rules do not bend when stretching, under them in several places throw solution.
Plastering four-sided smooth columns . When plastering columns (fig. 76, a) by hand on two opposite sides of the column, rules 2 are steadily reinforced so that their edges protrude from the plane of the column to the thickness of the plaster (15-20 mm). Between the rules, layers of mortar are consecutively thrown in - spray, soil, coating - and leveled them with a scraper or a rule. After setting the solution is overwritten, and the rules are removed and outweighed by the other sides of the column. Plastering thus all four sides of the column, rub the usenko.
The plaster layer on smooth columns can be fully pulled by the template in two steps with the same rules. To do this, on two opposite sides of the column, exactly along the axis, hang rules and establish a template on them. First pull one side of the column, and then transfer the pattern to the opposite side and also pull. After extrusion, the rules are removed, and the furrows from them are sealed with mortar and rubbed.
Plastering and stretching round smooth columns . When plastering round smooth columns (Fig. 76, b) between Beacons 1, they throw in solution 3, they press rule 2 to the beacons and, moving it from top to bottom, cut off the excess solution, thereby making out the surface of the column. After the primer, a covering is applied, then the surface is rubbed with a scraper or swab.
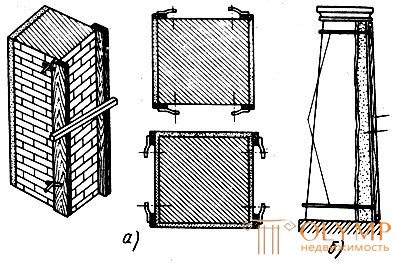
Fig. 76. Plastering columns: a - four-sided, b - round; 1 - beacons, 2 - rule, 3 - solution
Columns with entasis (Fig. 77, a) are trimmed as follows. They make beacons, throw in the solution and level it. On flat places they are level by a direct rule, and on entasis - by a rule-pattern.
Smooth and tapering round columns without flutes are often trimmed by hand. With a better finish, the plaster layer is drawn onto them with a pattern. For even columns use a pattern, a profile board which pulls out half of the surface of the column. The rules hang exactly one against the other on the lighthouses, dividing the upper and lower circumferences of the column for equal parts.
Columns with entasis are also pulled out (Fig. 77, b) with a swinging template with a curved profile board. The column turns out more precisely if it is broken into a larger number of grabs. Typically, such columns are drawn from six grabs. The profile board of the rocking pattern corresponds to one sixth or eighth, etc. parts of the column circumference.
To hang rules on beacons or on deposited ground, the circumference at the top of the column is divided by the accepted number of grippers (six, eight) and marks are made. A plumb line is lowered from these marks and marks are made at the bottom of the column. According to the marks they tighten the cord and beat off the lines along which they will hang the rules. After extrusion, the rules are removed, and the places under them are sealed with a solution, cleaned and rubbed.

Fig. 77. Columns with entasis: a - plastering, b - stretching; 1 - patterns, 2 - direction of the patterns, 3 - beacons, 4 - pattern, 5 - rules
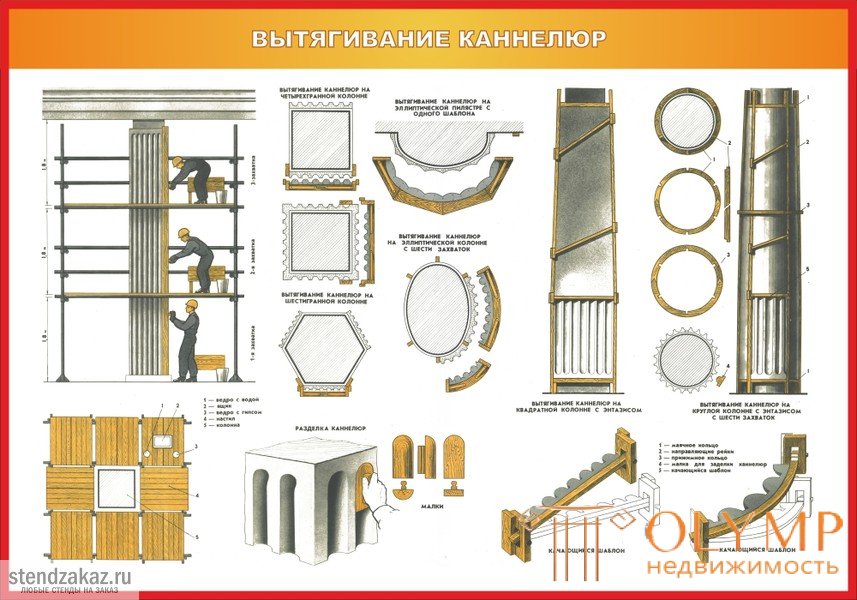
Extrusion and finishing of flutes on tetrahedral columns . The flutes are called vertical grooves on the column, separated from each other by narrow belts. On flat tetrahedral columns, flutes are pulled out with a simple pattern (Fig. 78, a).
The profile of the flutes is cut out on board 4, which is forged with sheet steel, and skids 3 are nailed on both sides of the board. Rules 1 are hung on the column from two sides, a template is placed on them and the rails 2 are nailed to the sleigh. they are increased by double the thickness of the plaster. Therefore, on the slide template fill an additional bar. Pull the flute in the usual manner.
The top and bottom of the flute are trimmed by hand (Fig. 78, b, c). The top of the flute should be strictly at the same level. The same requirements are imposed on the bottom of the flutes. For cutting the top of the flutes are used in addition to the ruler and cutting the pullet from the board or plywood.
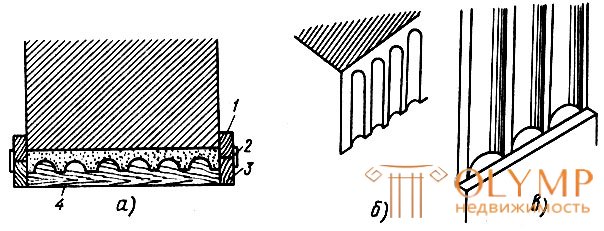
Fig. 78. Extrusion (a) and decoration (b, c) of flutes: b - from above, c - saw; 1 - rule, 2 - polozok, 3 - sled, 4 - profile board
Throw out the solution on the unfinished places, level it and rub it in the shape of the column. On the applied solution, they beat off the line of the level of the top of the flutes and draw their shape according to the template. Then, with the help of a ruler, a cut, and a small one, an excess solution is chosen and the profile of the flutes is obtained.
To cut the lower parts of the flutes, sprinkle a solution onto the column, level it, rub it over and beat the flute level line around the column. Then, with the help of a cut, an excess solution is chosen and the sides are cut with a ruler, cleaned with trowels, and rubbed with a cloth tampon, thick felt, felt or foam rubber.
On tapering columns, flutes are pulled out a little differently. First, the column is hung; axes are determined on its faces. On both sides of the axis at equal distances below and above hang rules.
To draw the flutes, a swinging template is required (Fig. 79, a). The profile board 1 of the template is made to the size of the widest part of the column with an allowance of 100 mm on each side for the device of the lugs. The profile board is bound with sheet steel, holes are drilled in the ears. The sled 2 is made 300-400 mm long from thin boards or from bars with a section of 50 x 50 mm. Through holes 100-150 mm long and 20-30 mm wide are cut in the middle of the sled; in the sides of the slide, perpendicular to the existing holes, drill holes for the axis with a diameter of 5-7 mm.
When assembling the template on the ears of the profile board, they put a sled on and fix them with large nails or thin bolts. In a properly assembled template, the sled should swing freely and change its position relative to the profile board by at least 30 °. For this purpose, the ears of the profile board are inserted into the hole of the sled not closely, but with a gap of 5-10 mm (sometimes more, depending on the taper of the column).
A template is installed (fig. 79, b) on the rules in the same way as when drawing out even columns (with fastening of the 3-way skids to the sled). Throw a solution between the rules, insert the template and start moving it up, pressing the slide to the rules. As the column narrows, one side of the pattern moves forward; As a result, the profile board is warped, changing the width of the flutes and ribbons. When pulling flutes, one side of the template should always go forward, otherwise flutes will turn out to be turned in different directions.

Fig. 79. Swinging template (a) and its position (b) when pulling the tapered flutes: 1 - profile board, 2 - slide, 3 - poloks
Extrusion of multifaceted smooth columns and flute columns . To extend the multi-faceted columns, they are hung, stamps and beacons are installed on them and the rules are hung, and then pulled out in the usual way.
Smooth and smooth polyhedral columns (Fig. 80, a), depending on the thickness, can be pulled out in two steps. Along the axis of the column on two opposite faces hang rules. Make a template for extruding half the circumference of the column. If the column is straight, but with flutes (Fig. 80, b), then they make the usual pattern with flutes on the profile board; if the column is tapering, then a swinging template is used to draw the flutes. In this case, each face is pulled apart.
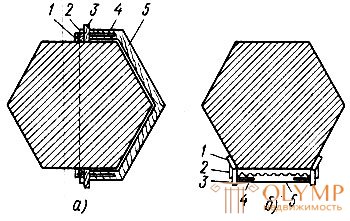
Fig. 80. Stretching hex columns: a - smooth, even, b - with flutes; 1 - rule, 2 - skid, 3 - sled, 4 - strut, 5 - profile board
When pulling flutes on tapering polyhedral columns, it is possible to make a template for drawing two narrow faces at once. In this case, you only need to accurately hang the rules and move the pattern (it’s best to do two plasterers so that the pattern does not break away from the rules, otherwise the flutes will be distorted).
After the column has been pulled out, the rules are removed, the remaining grooves are sealed with a solution, and then the flutes are rubbed or finished.
Extrusion on round columns of flutes, bases and capitals . To extrude flutes, you must first define them. profile and size. Cannelures are marked on the drawing (fig. 81, a, b).
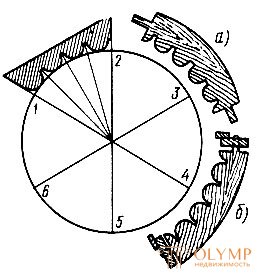
Fig. 81. Drawing the flutes for the profile board (1-6 - dividing points of the circle): a - profile board, b - template
Pre-determine how many grapples you can pull the flute. For even columns, and especially for tapering, this is very important, since when stretching, a tapering round column is more correct if it is broken into a larger number of grips. The template should be made so that its slides go according to the rules, hung in the centers of the flutes, and the profile board pulls belts or hooks along its edges, since it is much easier to trim the middle of the flute than belts. Equal column can be pulled in two steps, tapering - in six.
Profile boards are usually manufactured. At the ends of the profile boards, not the whole flute is cut out, but a part less than half, since it is necessary to leave space for the rule.
A template for drawing out even flute columns can be made into 1/3 or 1/4 columns. The swinging pattern for pulling round tapering columns is the same as for pulling quadrangles, the only difference is in the shape of the profile board. The final layout of the template is made according to the established rules.
The rules are hung over beacons in the same sequence as on smooth tapering columns. Rules must be centered in the flute. In the rules insert the template and correct it rassastku. It is recommended to perform the layout and installation of the swinging template as shown in fig. 82
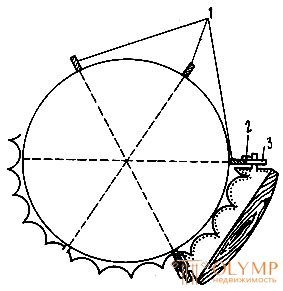
Fig. 82. Rasnastka and installation of the swinging template on the column: 1 - rules, 2 - skid, 3 - skid
The number of flutes should be taken into account when breaking down tapering round columns. The column should be divided into grips so that there is no residue, and if this is not possible, you should pull the remaining flutes apart. After refining the template layout between the rules, throw in a solution, insert a template into the rules and draw out flutes.
Having stretched the flutes on all the grippers, the rules are removed, the remaining grooves are filled with a solution and the flutes are finished with a trowel by hand or pulled out with a small pattern. Malka pattern rotates as the flute narrows.
When pulling the flutes on the columns, the template should always move one side forward.
Capitals and bases are pulled out using a template (fig. 83). As the upper and lower rules, according to which the slide and the slider 4 patterns will move, they reinforce the thick rope 5, tying it in one place and freezing it with a gypsum mortar on the entire circumference. Pull capitals in the same way as straight-line traction.
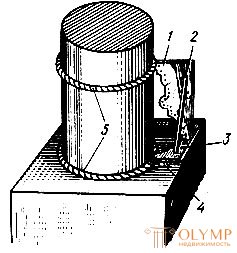
Fig. 83. Pulling out the base on the column: 1 - profile board, 2 - struts, 3 - sled, 4 - skid, 5 - rope
Extrusion with facing layers . When pulling out, in addition to the usual solutions for coating, decorative ones are also used. In this case, the thrust is called thrust with facing layers (Fig. 84). To perform this work, use a template with an overlaid metal profile that protrudes 10-15 mm in thickness due to the main wooden profile. First, pull in the ground with a template with a metal profile. Then the metal profile is removed and the template is inserted into the rules; between the profile board of the template and the ground, the space necessary for applying a covering layer remains.

Fig. 84. Exhausting with facing layers: 1 - place for the covering layer, 2 - ground, 3 - profile board, 4 - strut, 5 - sled, 6 - polozok, 7 - rule
After that, the soil is scratched. When he grabs, apply two layers of cover in two or three steps. According to the solution, draw the template until the draft is completely formed. For drawing out a solution of the same composition as for the walls. However, the aggregate should be no larger than 2 mm. Solutions with fine aggregate are more plastic and more convenient to apply them in the process of drawing.
Что бы оставить комментарий войдите
Комментарии (0)