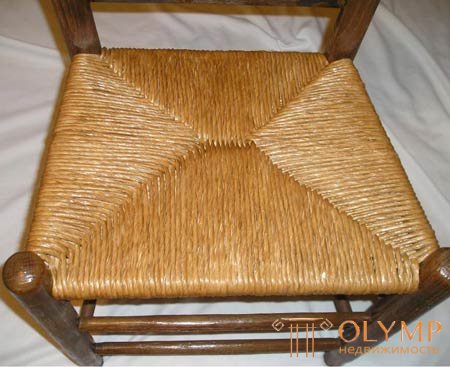

Stages of winding the seat of a chair made of artificial cane . How to wind corners. Stages of winding the seat of a chair from natural cane . Twisting cane. Masking the first turn. The rules for cutting ends. Corner joints. How to do a seat pad. Last node. Restoration of wicker chair seat. As the cane is inserted into the groove. How to insert a comb. Weaving a chair seat : How to lace up the first vertical row. How to tie the ends. How do you fill the lacing of the first horizontal rows. How to lace the first diagonal row. How to lace the second vertical rows. How to lace the second horizontal rows. How to lace the second diagonal rows. How to increase the edges of the seat.
Natural cane consumption: 80 g of reeds are used for an area of 300 mm2, with a maximum of 72 holes in the braided frame.
Stages of winding the seat of an artificial cane chair
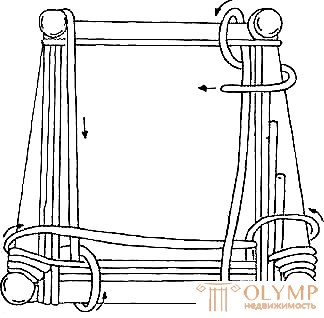
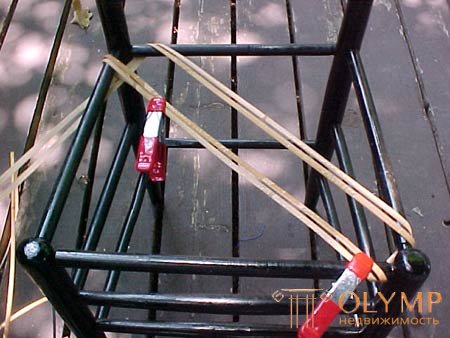
How to wind corners . In case the front horizontal strapping of the chair is longer than the rear one, it should be marked with a pencil in front of the points where the rear trim comes out of the seat bars. Attach one end of the strand (after 30 seconds soaking) to the inner side of the left trim 7.5 cm back from the front corner. Strand the strand, first under, and then above the front harness. Next, make a loop back under it, and then under and above the left harness (Fig. 1).
Now stretch the strand across the opposite side. Make a loop under and above the right harness, then stretch the strand back under it and over the front harness. Then attach it with a stud to the inside of the right trim across from the point at which it is attached to the left trim. Attach the second strand to the inner side of the left trim for the first one, then wind it along the same pattern until you fill the triangular sections between the front corner posts and the marks made in pencil. To intersect the broach reed kept at right angles, you must tighten the strand through the seat (Fig. 2).
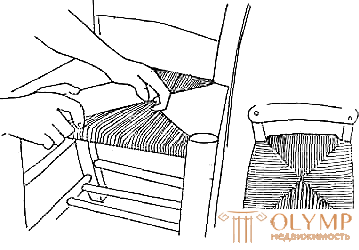 | 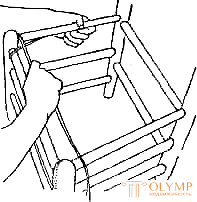 |
| Fig. one | |
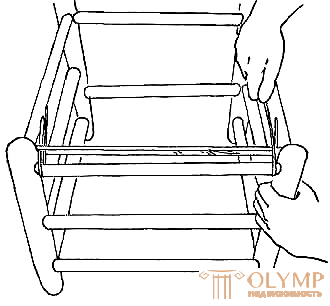 | |
| Fig. 2 |
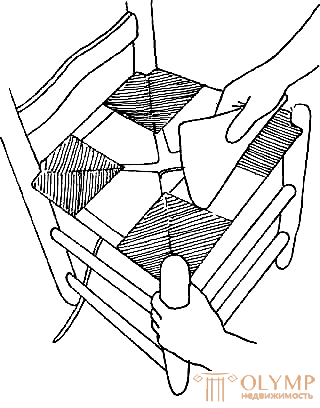
Completion of the cycle of winding corners . When the corners are aligned, slightly moisten some 6 m of reed with water, fold it into a supple spiral, then attach one end to the left side trim, directly behind the last strand that forms an angle of 90 °. Wrap it around the two front corners in the same way as you wound the corner strands, but attach it not to the right trim, but continue drawing in the direction of the right rear corner and further in the direction of the left rear corner and, finally, in the direction of the left front corner - such the way you complete the whole cycle. Wrap continue until you completely use up the whole reed. Then attach a new piece of reed moistened with water to the reef knot, making sure that the knot hit the underside of the seat and the harness. After passing 6 cycles, attach the reed to the strapping with a spring clip and make sure that the strands form intersections of a rectangular shape (Fig. 3).
 |  |
| Fig. 3 | Fig. four |
As necessary strands correct. Then the winding is continued, stopping from time to time to check the straightness of the corners. When the reed remains about 10 cm until the full trimming of the side ties, it is necessary to insert a cardboard triangle into the pocket between the lower and upper layers of the reed on each side trim. Also continue to twist through cardboard until a gap of about 10 cm is left on the front and rear straps. Next, insert the cardboard triangles in the pockets along the back and front straps. If these straps are lower than the side straps, as is often the case in many chairs, it is likely that additional layers of cardboard will be required to fill the pockets. After placing the cardboard in all the pockets, cut off the tips of all the triangles so as to provide more space for the weave. Continue to bind until all the side straps are filled (fig. 4).
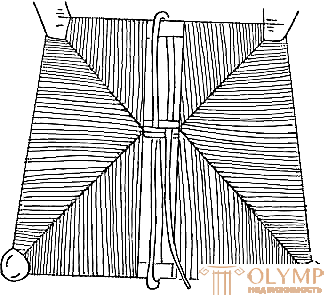
Finishing winding . In order to fill the remaining space on the front and rear straps, the reed should be stretched through the center of the uncovered area over the front harness, up again through the unclosed site and over the rear harness, then up again through the same site to form the figure eight. Then also continue to twist the figure eight until the front and rear straps are filled, then with the help of a rubber hammer and a small wooden bar you need to trim the layers of reed where they intersect in the center of the seat. Nail the end of the reed to the rear trim, then cut off its excess.
To make sure that all rows of reeds lie in the same plane, you can wipe the seat with a wooden bar. If necessary, insert additional cardboard pad between the strands on the underside of the chair. To do this, use a hard wooden ruler.
Stages of winding the seat of a chair from natural reed
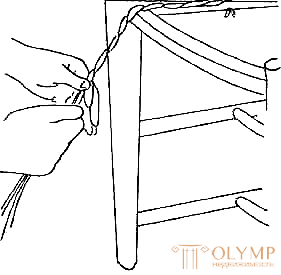
Twisting cane. Take two stalks of cane and put them together (after soaking them in water for 15 minutes) end to end and run your thumb and forefinger over them - this way you need to squeeze water and air out of them, and you should hear a loud, jerky sound. These actions must be repeated on subsequent pairs. Using a cord or twine, tie one end of the reed cord to the inside of the left trim about half the length. Then twist the reeds together and make the first coil (Fig. 6).
 |  |
| Fig. five | Fig. 6 |
Masking the first turn . Wind the twisted segments above and below the front harness, then above and below the side harness. Pull the loose ends towards the center of the front trim (Fig. 7).
How to connect a new strand . Tie a new strand to the free ends of the first pair of half-loops, checking that the knot at the same time hit the center and the top of the frame. Twist the strands and wrap them above and below the right harness, then above and below the front harness. Tie the ends with a string to the inside of the right trim through the point at which the first strands are tied to the left trim (Fig. 8).
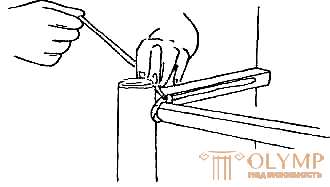 | 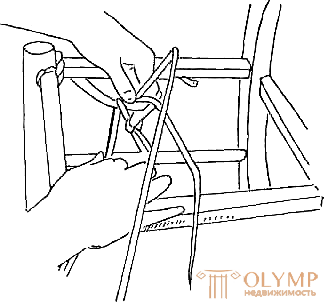 |
| Fig. 7 | Fig. eight |
The rules for cutting ends . At this stage, continue the weaving, repeating the steps described above, until the distance between the front corners equals the width of the rear trim. If the strands are too far apart at the intersection of the straps, then gently tap them back using a wooden bar and a rubber hammer. If, on the contrary, they are located too closely, then they are aligned with a hammer, thus expanding the weave. After that, it is necessary to cut off the excess reed, which protrude under the twine on the side trim. When the chair is aligned to a rectangular shape, two reeds should be folded end to end and tie one end to the left harness with string. Wind the reed stalks around the left front corner, and then around the right front corner (the drawing should be continued in the direction of the right rear corner, then in the direction of the left rear corner well and, finally, in the direction of the left front corner, in order to complete the whole cycle (Fig. 9).
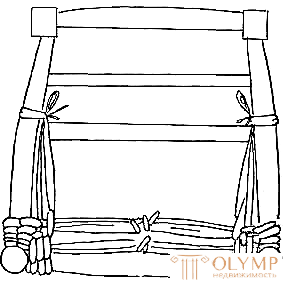 | 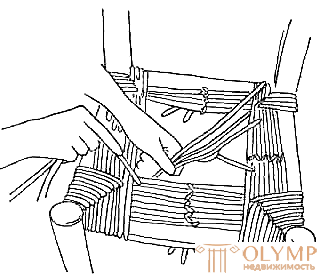 |
| Fig. 9 | Fig. ten |
Corner joints . After completing the cycle, continue to twist until the strands run out. Connect new strands with half-loops, placing the knot so that it hits either the center of the strapping or the corner. If he hit the center of the strapping, you need to make sure that the ends of the knot hit the bottom side of the seat. With the corner joint, pull the ends up between the last two rows and wind them around the new strands (fig. 10).
How to do a seat pad . As the side pads are filled, from time to time, turn the chair upside down and firmly hammer the tufts of the damaged cane and trim it into the corner cavities, using a cut-out screwdriver to seal the packing. Such stuffing will keep the seat from tilting and loosening. Along the way, the ends of the knots should be cut off with scissors (fig. 11).
 |  |
| Fig. eleven | Fig. 12 |
Last node . After the side straps are almost full, the cord that was used to tie the strands to provide a square shape must be cut off. After that, continue to twist until the side straps are completely filled. Close the last row with a screwdriver. In order to fill the remaining space on the front and rear straps, weave it in a figure eight, again wedging the last row with a chisel. In conclusion, turn the chair upside down and tie the strands (Fig. 12).
Surface smoothing (rolling) . When all the remaining surpluses around the knots are cut, turn the chair upside down again and smooth the seat with a chisel so that as a result you can squeeze all the rows tight enough. At the end of the job, the seat should be comfortable and durable, and the two reed stacks should intersect at right angles.
Restoration wicker chair seat
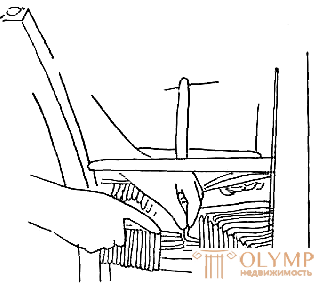
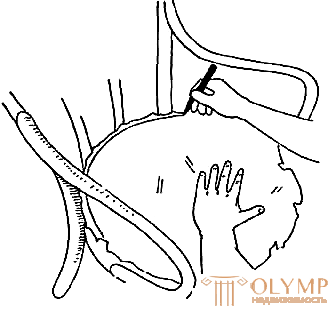
How to cut a sample . After removing all the remaining reed, comb and glue from the groove and pre-polishing it, glue a piece of paper on the seat. With a pencil, mark it on the inner side of the groove edge, and then cut the paper along the lines to make a sample for a reed blank. Glue the sample on the part of the reed blanks, arranging it so that one double-strand laying goes directly to the center from the front to the rear trim, and the other laying is parallel to the front trim, and if the seat is square or parallel to the front legs, in case the seat is round. Cut the weave 2.5 cm larger than the sample size. Soak the reed in water for 15 minutes in a container in which it can lie at full length, then place it on the seat in the correct position. All strands that go along the groove of the seat, you need to remove (Fig. 13).
 |  |
| Fig. 13 | Fig. 14 |
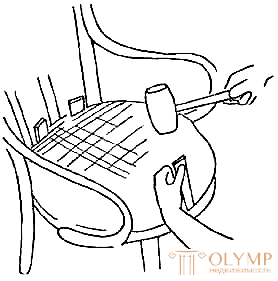
As the cane is inserted into the groove . Using a rubber hammer and a 10 cm long hardwood wedge, drive a reed block into the 50 mm section of the groove in the center of the back of the chair. Secure this section with a 2.5 cm solid wedge. After that, as tightly as possible tighten the reed in the direction of the front part and drive it into the 50-mm section of the groove in the center of the front part. Then reinsert the locking wedge. Continue the work along the groove, first on one and then on the other side, inserting the reed into sections 50 mm wide and locking them with wedges until the entire groove is full in a circle. From time to time rub the reed with a sponge so that it remains quite supple. To cut the ends of the reeds, use a sharp knife or hammer and a sharp chisel protruding from the groove, removing all locking wedges as you work (Fig. 14).
How to insert a comb . Take and straighten the ends of a piece of reed comb with a length of about 2.5 cm greater than the circumference of the groove, and soak it for 20 minutes in water. Insert a small amount of glue into the groove on top of the reeds. In case the slot grooves a rounded seat, start with the ridge at the back, easily hammering it into the groove to the required depth with a rubber hammer. After the entire cycle is almost complete, turn the comb up, mark the point of overlap and cut the comb with a sharp knife. After that, hammer in a wooden nail with a rubber hammer to firmly install the tongue into the groove so that it is flush with the frame surface and its ends form a butt joint. Then wipe off any excess glue with a sponge and let the seat of the chair dry for a day.
When the groove goes around the seat with rectangular corners, the comb should be adjusted to the groove in the same basic ways, just use the ridge for each trim and cut the ends so that they fit together in the corners. Try to make such bevels so that they form neat joints.
Use tweezers or fine emery paper to remove the antennae that have risen during the soaking process; cut larger hairs with scissors. Over time, the reed billet darkens, but it can be colored if desired (fig. 15).
Chair seat weave
How to lace up the first vertical row . If the seat of the chair is square, insert about 10 cm of reed moistened with water into the central hole in the rear harness or into the central hole closer to the left harness if the number of holes is even. Secure it with a peg or a small wedge of wood or reed.
 |  |
| Fig. 15 | Fig. sixteen |
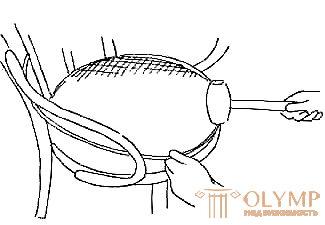
Find the corresponding central hole on the front trim and pull the reed strand through it from top to bottom, the shiny rim should be at the top. Stretch the strand along the underside of the front trim, then pass it up through the first hole to the right of the hole you just passed through. Then stretch the strand through the seat and pass it through the corresponding hole in the rear harness. Next, continue to lace the same way, working from the center to the right, just do not lace up through the corner holes. The reed should be stretched smoothly, but not too tight, as it will shrink after drying (fig. 16).
After the strand is over, leave about 10 cm of the overhang under the strapping and attach this end with a peg. Drive a new strand into the nearest hole with a peg, again leaving about 10 cm of overhang under the strapping. If there are still blank holes on the front trim, connect each blank front hole with a separate hole on the side trim with a separate reed strand so that the strands run in parallel and are located at equal distances. Leave the ends approximately 10 cm long on the front and side straps. Lace the left side of the seat in the same way, leaving the corner holes blank again.
If you are dealing with a round chair, use the same basic methods, but special attention should be paid to what should be started with the corresponding holes in the center of the front and rear sides of the chair. When lacing to fill the curved sides, you must select the holes that provide parallel lines that are located at equal distances. If there are unfilled “corner” holes on the round seat - it is not scary.
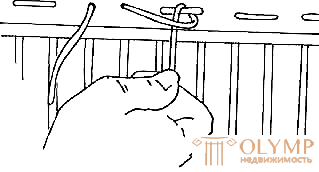
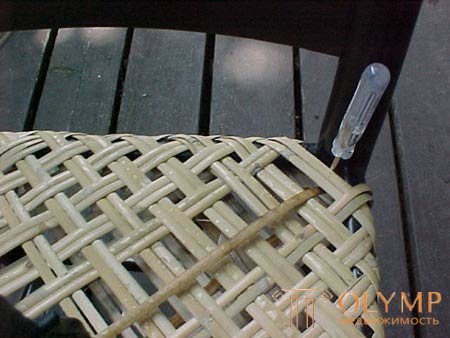
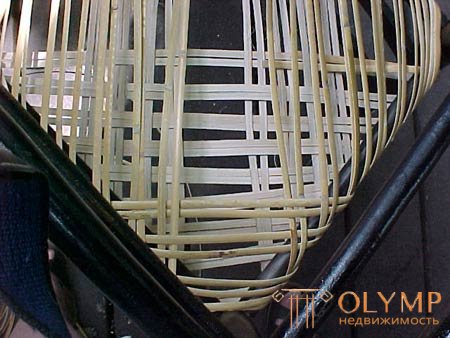
How to tie the ends . Before continuing to weave, turn the chair upside down and tie all jammed ends - this should be done in a knot around the loops on the underside of the chair. Wipe each end and the adjacent loop with a sponge as carefully as possible, then carefully lift the loop with an awl and pass the end to the bottom. Reed need to keep the rough side up, bringing under it a loop in the direction from the inside to the outer edge of the strapping chair. After that, pass it through the new loop that it formed (from the outer to the inner side of the strapping), and finally tighten it, keeping your thumb on the knot. Place the knot in the center of the loop to be able to do more than one knot per loop if necessary. Cut the ends to 1 cm (fig. 17).
 |  |
| Fig. 17 | Fig. 18 |
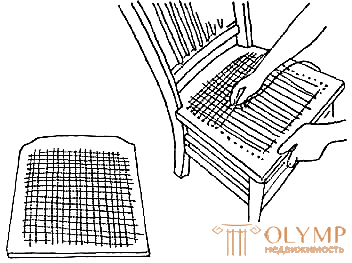
How to perform lacing the first horizontal rows. If you are dealing with a square-shaped seat, start horizontal lacing at the backrest, working between the side holes, but skipping the holes at the rear corners. Fix the end of the reed with a peg, follow the lacing from side to side above the vertical strands, holding the reed with the shiny side up. Finish the weave, then go through the last pair of holes, excluding the holes that are located in the front corners (fig. 18 —19). Now tie the jammed ends.
When the chair seat is round, do the lacing in compliance with the sequence discussed above. Start the lacing from the center of one side to the center of the other, then from these sides in the direction of the back.Then return to the center and then lace up in the direction of the front side.
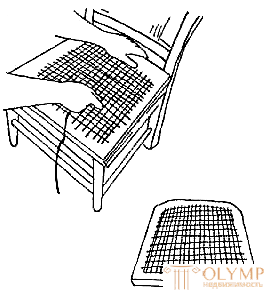
Как шнуровать первый диагональный ряд. При прямоугольном сидении, шнуровку начинайте с диагональных рядов с правого переднего угла, прикрепив конец камыша колышком к первому отверстию слева от правого переднего углового отверстия. Свободный конец пропустите вниз через первое отверстие на правой боковой обвязке, рядом с этим углом, и вверх через следующее отверстие на этой же обвязке. Теперь верните камыш назад к передней обвязке, делая проход под каждой вертикальной и над каждой горизонтальной прядями. Свободный конец протяните назад к боковой обвязке таким же образом. Переплетение диагоналей продолжайте до тех пор, пока не будет пройдено угловое отверстие. Также можно вплести две диагонали в одно и то же отверстие на одной стороне и пропустить отверстие на другой, чтобы ряды камыша были ровными.
 |  |
| Fig. nineteen | Fig. 20 |
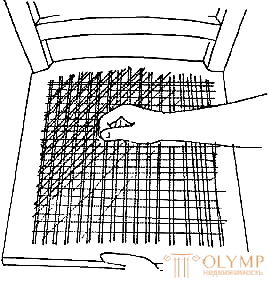
В процессе выполнения этого действия и всех последующих действий, требующих весьма сложного переплетения, чаще смачивайте водой свободный конец камыша, а также нижнюю и верхнюю части переплетаемого сиденья. Для того чтобы делать более длинные проходы через сиденье, работайте спокойно, плавно, обрезайте свободный конец до нужной точки и вытягивайте все излишки камыша после каждых четырех или пяти стежков, чтобы камыш не согнулся и не образовал большое количество изгибов в форме S. Диагонали следует переплетать через вторую половину сиденья, начав с отверстия на задней обвязке, ближайшего к левому заднему угловому отверстию, и проводя камыш между левой и задней обвязками. После того как первые диагонали будут протянуты, через отверстия на левом переднем и правом заднем углах должны пройти две пряди камыша. Теперь подбитые колышками концы необходимо связать. Когда же вы имеете дело с сиденьем круглой формы, первые диагонали нужно переплести, следуя способам, использовавшимся при переплетении сиденья (рис. 20).
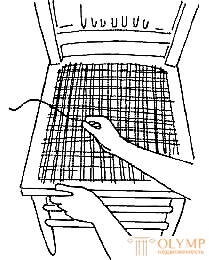
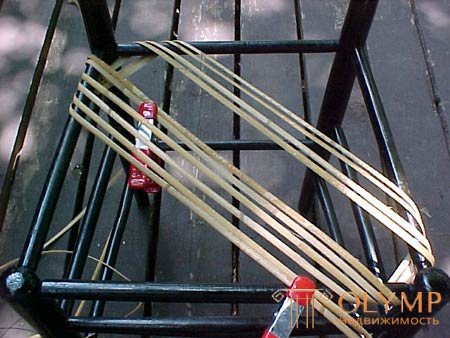
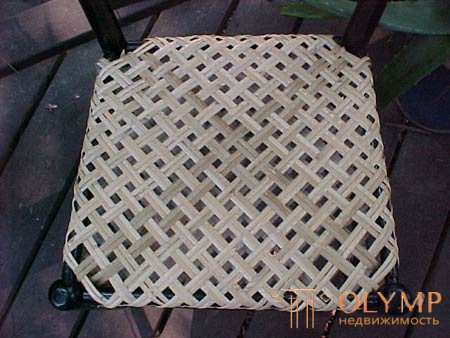
How to lace the second vertical rows. Using the same methods that have already been described above, weave a second stack of vertical strands between the front and rear straps, positioning them slightly to the right of the first vertical strands and stretching them over all the weaving done at the moment. Just as before, tie the fixed ends (Fig. 21).
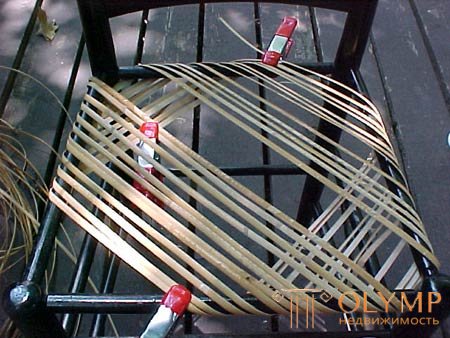
How to lace the second horizontal rows. In order to facilitate the implementation of this action, as a tool for separating each pair of vertical strands you will need to use two pegs. Weave the second laying of horizontal strands behind the first horizontal strands, and you should start with the hole on the right trim, closest to the right rear corner hole. You must follow the same sequence as when lacing the first horizontal rows. As you weave, head under all the first diagonal rows and first vertical rows, but above the second vertical rows. In the course of work you need to straighten the ranks and try not to make mistakes. After finishing the interlacing of the second laying of horizontal rows, it is necessary to tie all the fixed ends through the entire seat.
 |  |
| Fig. 21 | Fig. 22 |
| Fig. 23 | |
 |
|
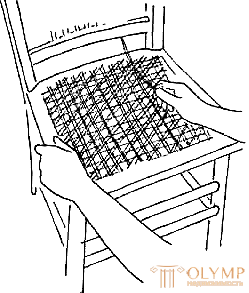
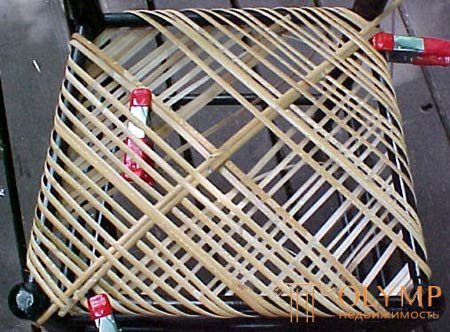
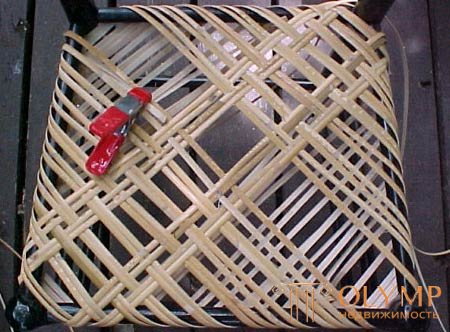
How to lace the second diagonal rows. Using ordinary sewing, gently seal the already twisted strands in each hole, in order to provide space for additional strands. After this, weave diagonal rows at right angles to the rows already laid. You must start with a hole in the front trim (that is closest to the left front corner hole) and pass under the first diagonal and above the second diagonal, going to this corner hole. Next, pass the strand down through the hole on the left harness, closest to this corner hole, and up through the next hole on the same harness. Now continue to twist between the front and left straps, carry the strands over the vertical rows, below the horizontal rows and alternately above and below the diagonal rows. You can avoid the possibility of confusion at the ends by following one rule: never go under or above two successive diagonal strands.
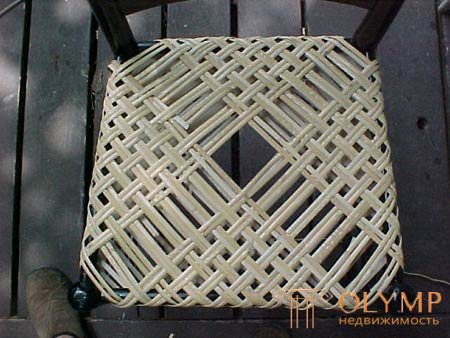
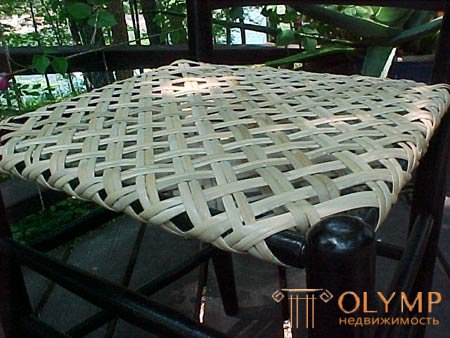
In order to maintain the symmetry of the pattern, you need to skip holes or double rows in one hole, where it is required. Reaching the corner hole, stop. After that, twist the diagonals through the second half of the seat, starting at the rear trim with the hole nearest to the right rear corner hole, and weaving between the right and rear straps. Tie the ends together (Fig. 22).
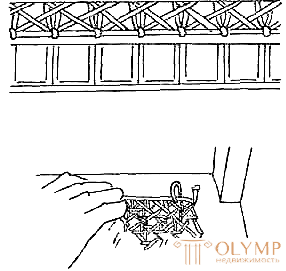
How to increase the edges of the seat. In case the seat is rectangular, cut a section of reed for each harness, making it 5 cm longer than the length of the harness. Take four extended reeds, soak them, and also take four strands of interlaced reeds, then secure the peg to one end of the reed for the rear trim in a hole in the right rear corner, making approximately 2.5 cm of the overhang of reeds under the seat.
In the next hole on the rear trim, you must skip the interlaced strand under the trim; tighten it with a loop over the accrued reed from the back to the front, then pass down through the same hole, securing the accrued reed on the harness. On the underside of the strapping, you should tie one end of the weave and tighten the loose end, making sure in advance that the weaving goes at right angles to the accumulated reed and that the accumulated cane lies tightly enough, stretching. Fasten the hinges in the same way in each hole on the rear trim. Increased reed and weaving insert into the left rear corner hole, then fix them with pegs.
Before you start building on the left side trim, you will need to insert one end into the left rear corner hole and secure it with pegs. Next, you need to fix the building along the left harness, as it was done on the rear harness. Similarly, complete the front and right strapping and insert the last end of the reed into the right rear opening from which you started. In order to keep the ends in place, it is necessary to cut the soft wood sleeve that fits to each corner hole, hammer the sleeves at the same level with the frame of the chair. Now smooth out the extended stitches and remove random hairs. In case the seat of the chair is curved, for the entire perimeter of the seat you will need to use a section of reed. On chairs with rear corners and a curved front, use 2 segments of accrued reed - one for the sides and the front, and the other for the back (Fig. 23).
 |  |
 |  |
 |  |
 |  |
 |  |
Что бы оставить комментарий войдите
Комментарии (0)