A crack or a fracture in the supporting frame of the furniture actually causes the need to put the joint where it was not intended - in places that were originally intended for heavy loads. After repairing the crack, the broken part should be as strong as before and able to withstand these loads; at the same time, the repair itself should, if possible, be invisible. Some types of breaks can be very successfully repaired with a single adhesive. However, since the cracked wood in many cases is dry and brittle, it is necessary to introduce glue into its pores in such an amount that, after being absorbed on the surface, it remains enough to form a good bundle. Some breaks require additional support in the form of dowels (wooden nails) or in the form of quadrilateral fastening blocks. Inserted or attached to the point of rupture, these pins and blocks make the joint rigid, providing more space on the surface for glue to set.
Nails should be hidden in the broken part or inserted into the holes drilled from the outside; in the latter case, the end of the key will be noticeable. If any part is split in two, and holes can be drilled in the centers of the formed parts to accommodate the dowels, the hidden dowel is the best repair option. But if the rupture occurred at a large angle or is in place of the bend of this part, it is easier to insert one or two nuggets on the outside - the repair will be no less durable. The diameter of the dowel, as a rule, should be equal to half the thickness of the repaired part, and its length is twice that thickness, although if more durable grip is required, the dowel may be longer.
For repairing gaps in thin flat parts of furniture, for example, in the backrest of a chair or in the frames of a sofa, spacers are used. On the visible part, the fastening unit must be inserted into the slot, cut out so that it overlaps the gap, but in hidden parts, for example under the upholstery, the spacer can be installed through the gap without such a socket. The thickness of the strut should be equal to half the thickness of the broken part, and its length - approximately twice the size of this part.
Both dowels and struts hold up better and last longer if they fit snugly but not tightly - too loose the fastener will leave the glue gaps, and too long will divide the gap and may even cause splitting of the surrounding tree. These reinforcements must be made of solid wood, cutting it along the entire length of the structure for strength and flexibility. Short pins of hardwood can be bought in finished form; Pins of any length can be cut from the key bar of the correct diameter. Solid wood for spacers can be bought in building materials warehouses or you can choose from solid unwanted furniture. Sometimes it is possible to get pieces of suitable hardwood from hidden parts of the most broken furniture, for example, from glued blocks or drawer sliders. In all cases where glue is used, appropriate compression is crucial. The clamp must be installed so that the compression force is perpendicular to the break line in order to pull the ends together without pulling them out of the alignment. Since the production of furniture strictly perpendicular angles of 90 ° are not observed and gaps do not always occur along precise straight lines, some ingenuity may be required when choosing special ways to fasten furniture for each repair case.
G-shaped clamps, for example, can be used for placement in the middle of a gap having a large angle, or for pressing the fastening blocks into the slot. A g-clamp can also be attached to a curving part as an anchor point for a girdle clamp that extends from the G-clamp to the end of the broken part perpendicular to the break. The girdle clamp, which cannot be installed so that it exerts compression perpendicular to the rupture, will pull the broken elements out of the gauge, forcing this part to bend along the rupture line. By positioning the second girdle clamp from one end of the first clamp to another piece of furniture, it is possible to shift the compression force so that, after drying, the connection becomes straight.
 |  |  |
Typical fracture joinery furniture | ||
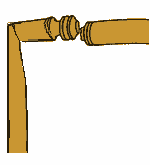
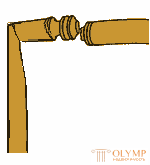
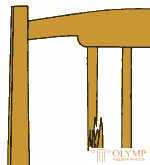
A “clean” fracture may occur in the wooden part of the furniture. With such a fracture, the areas on which glue can be applied are small. Repair needs to be supported with a strut or dowel. The tree may break with the formation of chipping (Fig. Above center). Such a fracture creates a large uneven surface that provides an effective adhesive bond. This type of repair becomes the equivalent of a tongue and groove connection. A tree that breaks along the structure line creates a long corner gap that has a large surface area, but not many “teeth” for glue to set. When repairing a corner fracture, it may be necessary to reinforce the joint by adding a dowel or spacer.
Splicing a “clean” furniture break with a hidden rifle
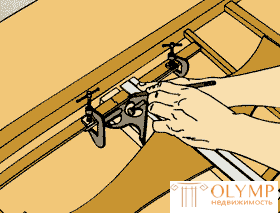
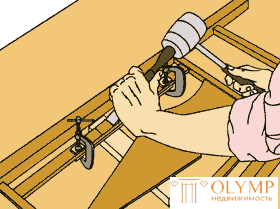
Drilling holes for nagel . Install the furniture (in the example described - a chair with a broken leg) at a comfortable height, with the broken end up. Attach it to the workbench or goats, if it is unstable, and clamp the broken part in a vice, also broken end up. If the fault is “clean”, it will be sufficient to drill the holes with the drill at the exact centers using a key clamp as shown in the figure. If, due to the shape of the fracture (fracture) or the furniture itself, you cannot use the key clamp, you will have to determine these centers visually. Using a small drill, drill a guide hole in each element; then drill the final holes with a drill of exactly the same size as the dowel that will be inserted into the hole. Clean the holes from the fragments formed during drilling, vacuuming or turn these elements upside down and knock out the fragments.
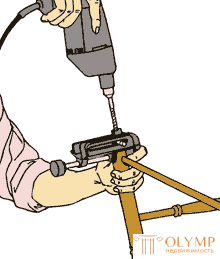 | 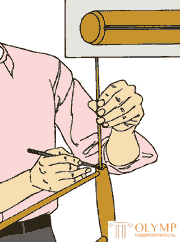 | 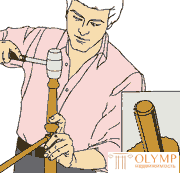 |
| Splicing "clean" furniture fracture hidden dowel. Key hole drilling | Splicing "clean" furniture fracture hidden dowel. How to make a nog | Splicing "clean" furniture fracture hidden dowel. Connection of elements |
How to make a nog . Insert the undersized nog in each key hole and mark their depth. Cut the nugget of the correct diameter for a tight fit with a length slightly shorter than the total depth of the holes. Slant the ends of the dowel slightly with a file or sandpaper and make grooves on its sides for the channels along which the glue will spread.
The connection of elements . Put glue in one hole and on one end of the dowel; hammer the hole into the hole with the hammer to the very end. Then push another broken element onto the protruding nog, without glue, to check if the broken ends are precisely aligned. If not, cut one side of the dowel with a file or edge cutter to align the elements. After aligning them, place the glue on the other end of the dowel, in another hole and on the broken ends, then firmly knock the elements together. Wipe off excess glue.
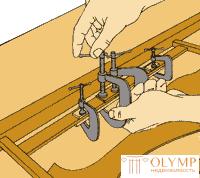
Fastening clip . Install the girdle clamp from one end of the broken part to the other perpendicular to the fracture, as far as possible. If the clip cannot be installed strictly perpendicular, and it pulls the elements out of the leaf, install the second one at the right angle to the first one, connecting the new clip to any part of the furniture opposite it to draw the elements back into the leaf.
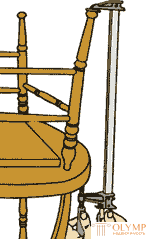 | 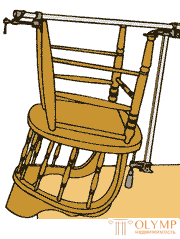 |
Splicing "clean" furniture fracture hidden dowel. Clip mount | |
Corner fault repair with visible dowel
Key hole drilling . Apply the PVA glue on the broken edges and squeeze the elements together using two strips of wood and two G-shaped clamps to hold them in place. At the most inconspicuous area, drill a guide hole for the key hole through the first broken element and partially through the second (at right angles to the fracture). Using the guide hole as a guide, drill a hole the same size as the nog, which will be inserted into it. Clean the hole from sawdust.
How to insert nog . Take the nog with the grooves applied to it; make it a little longer than the depth of the hole. Put glue in the hole and on the nog; hammer the hole into the hole with a hammer. Remove the clamps and supports and wipe off any excess glue.
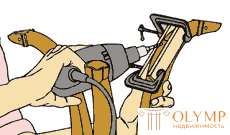 | 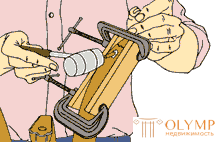 | 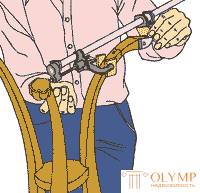 |
| Repair of the corner fault visible dowel. Key hole drilling | Repair of the corner fault visible dowel. How to insert nog | Repair of the corner fault visible dowel. Bend bond |
Bending bond . To create a compression perpendicular to such a fracture, attach a G-shaped clip near the fracture and use it as a bracket to create a compression using a girdle clamp. Attach the girdle clamp so that it goes from the G-clamp to the end of the broken part, overlapping the rift and remaining perpendicular to it. After the shrinkage of the adhesive, process the protruding end of the nagle with a saw and sandpaper so that it is flush with the surface of the broken part.
Pin for flat rift
Furniture installation . Place the furniture on a workbench or place it on the floor with the back side or the least visible section, broken by a part horizontally up. Apply glue to broken edges and join them together. Connect the fault section using two G-clamps (one on each side of the fault) to attach a strip of wood that overlaps the lower side of the fault. If necessary, support the broken part from below with a second strip, as shown in the figure. Using the combined corner mark the edges of the nest so that they are on opposite sides of the fault, at right angles to the length of this part.
Cutting the nest . Cut the ends of the socket to the marks to the planned depth using a tenon saw. You can use the chisel, holding it vertically, the sloping side to the fracture. Knock on it with a hammer. Holding the chisel at an angle and the sloping side down, make notches (in the area between the cuts) every 10 mm to a depth slightly less than the expected depth of the socket. Reverse the direction to remove slivers. Trim the bottom of the nest evenly: swipe it with a chisel, holding it with its oblique side down. Smooth the bottom of the nest with an emery paper or wood file.
Mounting support Cut a hardwood strut tightly into the socket, then put the glue in the socket, on the back side and on the ends of the stanchion. Insert it into the slot, wipe off any excess glue and, without removing the previously installed G-shaped clips and strips of wood, tighten the support into the slot using additional G-shaped clips. When the glue is dry, remove the clips and sand the support to fit the shape of this part exactly.
 |  |
| Jack pin for flat break. Furniture installation | Jack pin for flat break. Nest cutting |
 |  |
| Jack pin for flat break. Mounting support | Hidden backup on the screws. Simple amplifier (krepitel) |
Hidden prop on screws
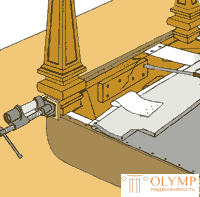
A simple amplifier (krepitel) . Identify as many hidden broken parts as possible; if the rift is under the trim, remove the buttons or brackets and unscrew the fabric about 200 mm from each side of the rift, taking care not to damage it. Apply glue to the broken edges and squeeze them together with a girdle clip running from one end of the frame member to the other. Drill the guide holes through the corners of a wooden rectangle between 6 and 12 mm thick that overlaps the rift on the open side of the broken part. Apply glue to this support and attach it with screws. When the glue is dry, remove the clips and reattach the fabric.
Что бы оставить комментарий войдите
Комментарии (0)