Redevelopment of the apartment is what everyone thought about. For one reason or another, it may be necessary to reallocate the space in the room. But for this you need to build a new wall, which is a difficult and costly process. Therefore, they invented the creation of plasterboard partitions. Outwardly, they may be indistinguishable from real walls. However, they are built easily, quickly and cheaply. That is why a plasterboard partition for zoning a room is a good solution for redeveloping an apartment.
Content: [hide]
Under the zoning should be understood division of the premises into zones with different functionality. If we talk about the role of drywall in zoning, it is used for this purpose when creating ceilings and partitions. A multi-level ceiling can, by its form, divide a room into several zones. For example, the kitchen can be visually divided into places for cooking and eating. However, this is only a visual separation, but the partition gives a more tangible effect in this regard.
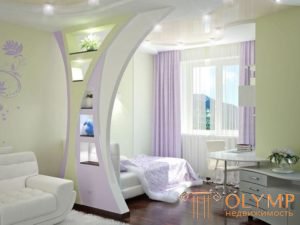
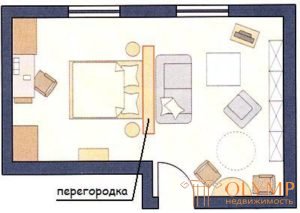
Usually, partitioning is carried out in large rooms in order to divide them into functional zones. In the classic version of the partition "protect" the bed from the rest of the room. Typically, this method is resorted to when the living room is also a bedroom. Therefore, in order to somehow divide these zones, a partition is used.
When you have to divide a room into two parts, albeit visually, you should take care to make it beautiful. Therefore, a decorative plasterboard partition should be used to zoning a room, rather than a simple rectangular structure that is indistinguishable from an ordinary wall.
It is necessary to divide not only large apartments, but also small ones. If we are talking about a studio apartment, then her kitchen and bedroom are in the same room. It would be nice to separate them with a partition. Its thickness is small and it will take little space. But it will create a visual effect of two different rooms, which will increase the level of comfort.
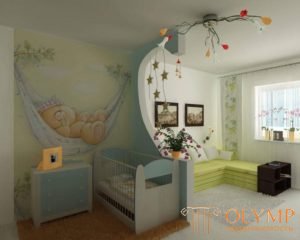
One-room apartment can also be zoned using plasterboard partitions. This may be necessary when you live with children. The partition, though small, will create for them a corner and an additional sense of security.
In the end, every owner of his apartment always knows where to divide the room.
For zoning rooms you can use different designs and materials. So why then the choice should stop on the drywall and partitions? Let's consider what advantages GCR has in this regard.
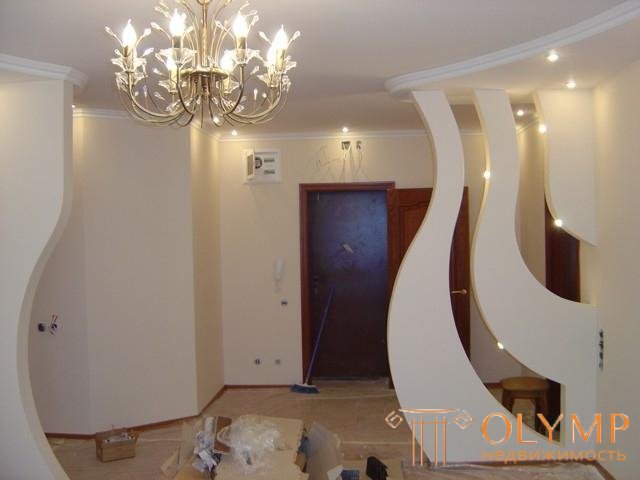
GCR can create partitions of unprecedented beauty
If everything is clear with gypsum plasterboard, then you need to decide why the partition should be used for zoning, and not curved ceilings, new walls or other structures. It’s all about the following benefits:
There comes a very responsible planning stage. It is necessary to determine the place and shape of the partition for zoning. It is necessary not only to understand exactly where the structure will be installed, but also to determine what form it will have. It is desirable to create it as decorative as possible. A simple rectangular design will look very simple and uninteresting.
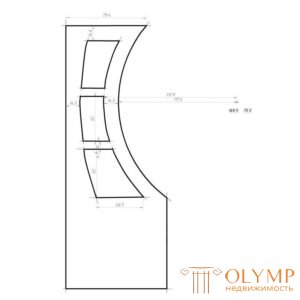
It is best to display drywall partitions for zoning the space in the diagram. In this case, there will be specific dimensions and a clear understanding of where the zoning will take place. In addition to the general drawing with the placement of the partition, you may need to draw it separately. The more complex its design, the more necessary the drawing.
In general, the whole room should be drawn (top view) with all the elements in it. Then you will need to think about where it is best to use the gypsum board construction. You may have to do redevelopment, a little pushing the furniture. In addition to the general plan will have to draw the appearance of the partition in the profile. This is required in order to properly assemble the frame.
When zoning partition may well be half or two-thirds of the height of the room. It should also cover about half the aisle or less.
When creating diagrams, drawings and sketches need to consider some of the nuances. When allocating a new space, it should occupy 25-35% of the total area of the room (not less). At the same time most of the premises should be with a window. If a living area is created for the bedroom, then it can occupy half the area of the main room.
A plasterboard partition wall can be assembled for zoning a room according to two different schemes, depending on whether it is for the entire height of the room or not. Therefore, in one case, the profile is mounted on the ceiling, and in the second - this is not necessary.
The first step is to mark the floor and the wall to which the partition will abut (the ceiling is also marked if necessary). This is done with a level and a plumb line. After markings, straight lines are drawn, which will mark the edge of the frame (not its center, but the edge). The guides should lie flat so that the structure does not come out skewed.
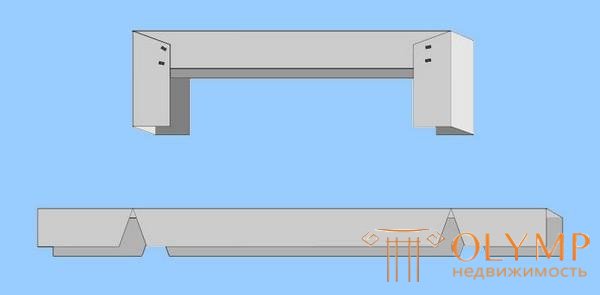
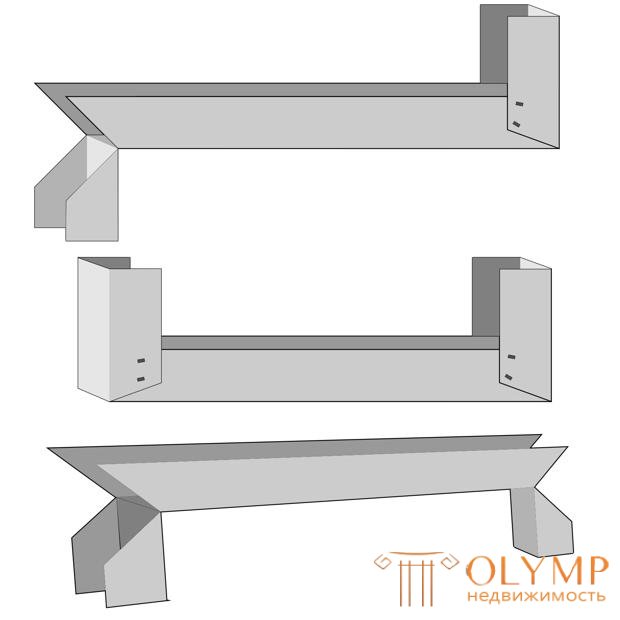
This is how the guide bends at a right angle.
In order not to join the guides in the corners, it is recommended to trim the profile edges so that it is bent at a right angle. Then the guide can go along the floor, and then at right angles flow onto the wall. You can also do with the joining of wall and ceiling profiles. This is a convenient system for those cases when the ceiling mount is not carried out. Then the profile is trimmed and bent in several places, which allows you to create smooth and durable frame edges.
Plasterboard partition for zoning the living room is usually done from floor to ceiling. In a large room, this design is quite appropriate. When zoning other rooms, it may make sense to create a partition by half or two thirds of the height of the room.
Guides are attached to the base surface with dowels. If work is carried out with a concrete coating, then it will be difficult to manage without a perforator. The result should have been a rectangle, which will be the basis of the frame. The corners of such a frame must be fastened together so that the guides do not bend. To do this, in each corner on each side of the profile, 2-3 cuts are made with a cutter. If such a tool is not at hand, then you need to use the "bugs" (small metal screws).
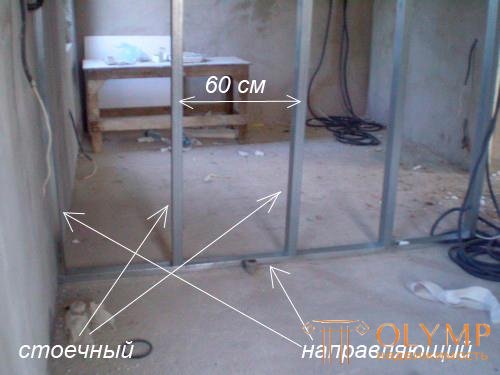
The distance between the racks is 60 cm
For the strength of the frame it is necessary to insert the vertical rack. They must be inserted so that they can be screwed to the drywall on both sides. The easiest way is to insert the rack with an edge if it is so tight (you need to think about it at the stage of buying profiles). You can join together two profiles (insert one into the other, creating a box) and use them as one rack. Then, despite the size, there will always be an opportunity to attach drywall to the rack on both sides.
If the partition for zoning need to make "windows", then they are simply taken into account when assembling the frame. Several jumpers are added so that they can later be sheathed with plasterboard from the inside.
Trimming and buckling jumpers depending on how the racks are installed
Now you can insert horizontal jumpers that are fastened between the vertical profiles, creating a more reliable structure. Everything is also fixed with a piercer or bedbugs. It is worth considering that the jumpers will have to be cut so that they can be inserted between the racks. And an important role will be played by how exactly the racks are installed.
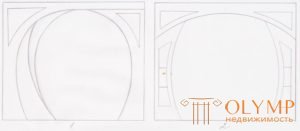
During the zoning of the room is very important to do everything carefully so that the partition created does not look silly and inappropriate. The best way to avoid this is to make it decorative. When the plasterboard partition for zoning a room has a figured appearance, it gently fits into the interior. But giving it such forms is not a simple matter.
The start of work is the same as when creating a rectangular frame. After the guides are attached to the floor, the wall and ceiling should be viewed according to a scheme where you can install a vertical stand. It is necessary to find the point furthest from the wall, from which the edge of the partition takes on a curved shape. In this place and set the vertical stand. Additionally installed jumpers for greater structural strength.
Some designs may have such an artsy look that this rack can not even be installed. Then put the profile diagonally to make the frame more or less durable. It is already possible to lower the jumper to this diagonal profile from the middle.

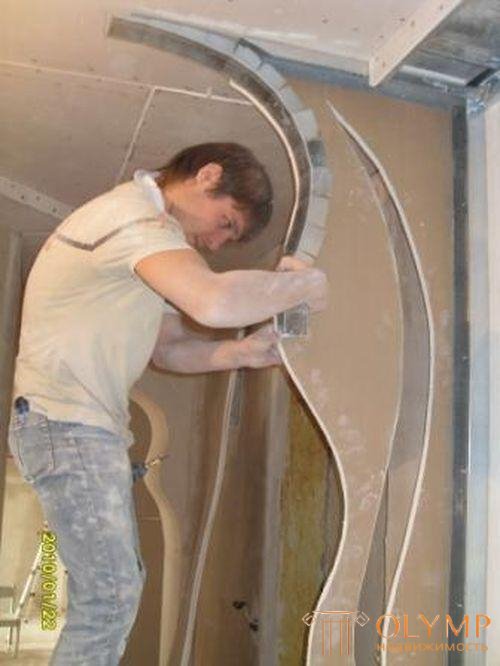
Cutting an arc or a plasterboard wave can be very difficult.
When the basis of the figured partition for zoning is done, then you need to take a drywall sheet that goes to the edge of the partition. It is cut to the desired shape (usually an arc or wave). First, the sheet is laid out with a pencil, and then carefully trimmed with an electric jigsaw or other tool. Similarly, another sheet is made, which will be used to sheathe the frame on the other side.
We sheathe the frame completely with drywall on one side. We fasten it with self-tapping screws with a step of 15 cm. We do not forget about all the places where there are jumpers, fasten the GCR to them for greater stability of the structure. It can be said that one side of a curved plasterboard partition is ready for zoning a room. However, now comes a very difficult and crucial moment.
On the inner edge of the drywall need to attach a profile. To do this, take a guide and cut so as to bend like a snake. It should be bent in such a way as to completely repeat the contours of the attached drywall. for this, the sides of the guide are cut to the base in increments of 5-8 cm (depending on the curvature of the structure). And you need to make V-shaped notches so that you can bend the guide inward.
Cutting the profile and working with it in the future, you must wear protective gloves so as not to hurt your hands.
You need to be very careful, because the guide will be very easy to bend down under the pressure of the screw and you have to hold it with your hand. The main thing to keep is not in the place of screwing the shurpa, otherwise you can punch your hand. Screws pass through the drywall and press it to the cut profile, creating a metal rim. You can attach each petal or through one.

The snake from the profile is applied to the edge of drywall, and they are fastened with screws.
The second side is sheathed easier, because there is already a bezel of a snake from the guide. Therefore, drywall is attached to the frame and to the snake. As a result, it turns out not only the GKL figured sheet, but also a figured profile, which completely repeats the bending of the drywall.
According to this scheme, a plasterboard partition can be made for zoning a room, even if openings of different shapes will be created in it. In this case, the internal openings will also be framed with a cut profile, which can repeat any bends. Ultimately, you will need to sheathe the entire structure with drywall. In the places created by the arcs and waves, there is already a back of the profile to which the gypsum boards can be attached. On such small bends, it is easy to repeat the specified path. In extreme cases, you can use a more malleable and less broken arched drywall. It remains only to putty the joints and prepare everything for finishing.
Что бы оставить комментарий войдите
Комментарии (0)