It is important to know how to properly distribute it on the walls and floor, to do it in such a way that in the visible part there are no narrow undercuts or any kind of "stubs". It is necessary for every master to know and it is useful for every customer to avoid two main mistakes when repairing a bathroom: the wrong choice of ceramic tile and its wrong layout.
First you should tell about the choice of tiles. Not everyone will approach your bathroom or toilet. Tile should be chosen, knowing the basic principles of its distribution on the walls and floor.
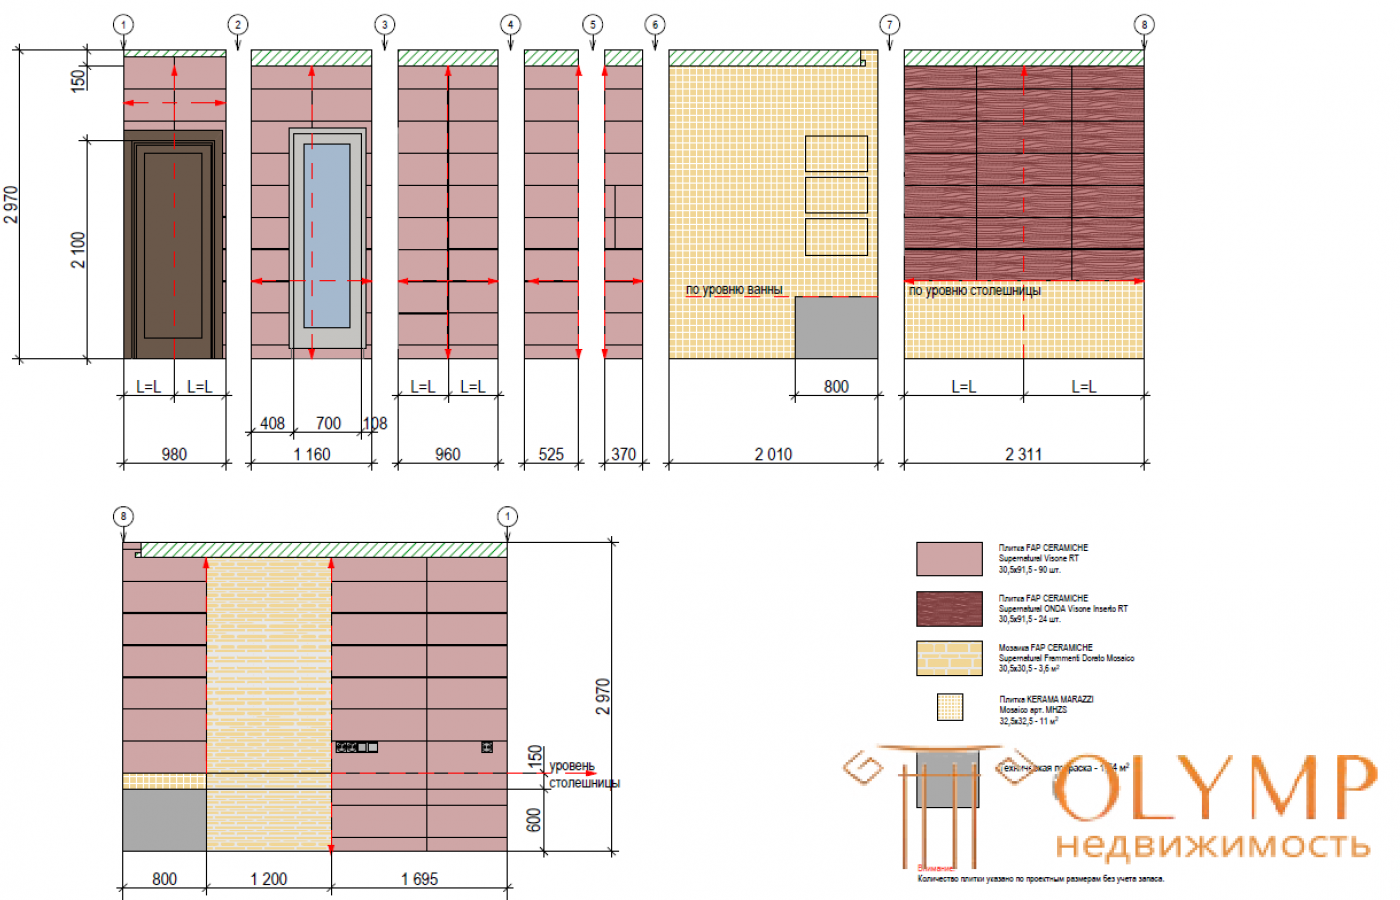
There are three types of tile layout: "miserable", "rustic" and "classic." For example, we will lay out a tile with dimensions of 500 × 200 mm on a wall with a length of 2100 mm in each of these ways. These sizes are best used to explain important rules.
So, the “wretched” layout: the work begins from the angle at which the master sets the whole tile. Then he continues laying tiles on the wall, and fills the remaining space with “trimming”. In our case, four whole tiles fit on the wall, and in the corner you have to lay a “stub” 10 cm wide. The bathroom, faced in this way, looks very poor (hence the name of the installation method). So it would be possible to lay tile in the event that the length of the wall was not 2100 mm, but, for example, 2400 mm: then the width of the “trimming” would be approximately equal to half of the whole tile. But it is better to completely eliminate the use of this method.
With the “rustic” styling, the master acts in a similar way, but divides the corner trim into two equal parts. It inserts one part to the left of a set of the whole tile, and another part - to the right. It looks like two stubs of 5 cm, which is worse compared to the “miserable” method. But in some cases, the “village” layout is quite justified and is found even in properly made baths. Further on this will be discussed in more detail.

Go to the "classic" method. To bring it to life, you need to take three simple steps. First you need to figure out how many whole tiles fit in the same row on this wall (in our case - these are four whole tiles). After that, all that remains is to be expanded from the center - into the edges. As a result, three tiles placed in one row will occupy exactly 1500 mm on a 2100 mm long wall. Left and right spaces are left unoccupied, which is covered by two “trims” of 300 mm each. It looks much better than two "trimming" of 5 cm or one - 10 cm. The width of the seams between the tiles will not have a significant impact on the situation. The main thing is that the trimming length should be more than half of the whole tile. With this approach, any wall with any tile will look holistic, harmonious and correct. When calculating the amount of finishing material, it may turn out that with the classical tile layout, it will take 2–3 m² more. But such expenses will be justified by the greater aesthetic appeal of the room.
Very clearly, the advantage of the “classic” layout can be shown by the example of a box with a side of 550 mm and a tile length of 500 mm: a variant with a seam in the middle looks more preferable than with one or with two narrow “trims”.
In some cases, the length of the trimming is almost equal to half the whole tile. This may be the case if the length of the wall is not 2100, but 2010 mm: side trimming would have been 255 mm each, which doesn’t look the best. In this case, the best solution would be to artificially reduce the size of the room due to the additional plaster of the walls: this will allow laying the tile without any trimming at all.
Then - the following special case, showing that the “village” layout may be quite appropriate: it is necessary to revet a section of the wall of a small width on which a revision hatch is required to be installed. For example, let's take the standard project of the house of the P-44 series, in which we will unite the bathroom. We hide all communications in the box, but in order to provide access to the coarse filters, counters and taps, we will have to arrange a revision hatch at a height of about 1600 mm from the floor. In such cases, the "village" layout is the only correct option to accommodate the hidden hatch. Plastic hatches are no longer used: today install secret, for facing which requires whole tiles. On the sides of the hatch, along the entire height of the wall, you will have to lay a narrow "trimming".
In some cases, the “village” layout also applies to a wide wall: this is also necessary for the installation of the hatch. If you move it to the side to adapt to the "classic" layout, it is not possible, one way out - to apply the "rustic" tile layout. In other cases, this method is not recommended.
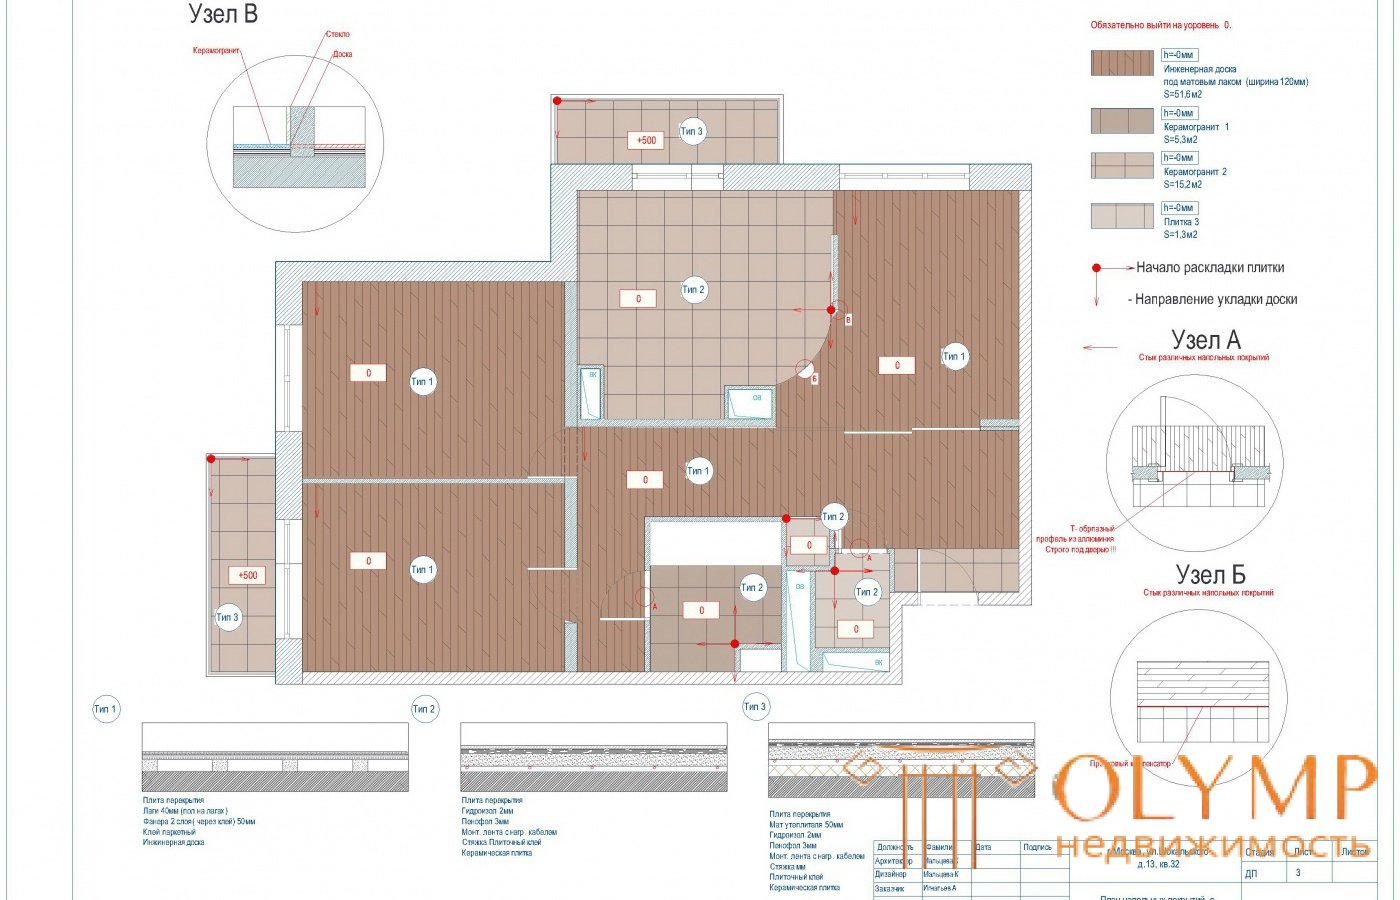
Now go to the correct distribution of floor tiles. Consider a special case in which the length of the wall allows you to place only one whole row. For example, we have a tile with a length of 600 mm, and the section along which we lay it has a length of only 1 m. It is recommended that the same principle be applied: we remove one tile, and the remaining elements are laid out from the center. As a result, we get a row in which there are no whole tiles, but there are two large “trimming” in the corners. It looks much better than in the case of the “village” or “poor” layout.
When installing the toilet with a hidden cistern, the width of the box in some cases should be adjusted in a large direction to eliminate the need for a narrow trim. An additional incentive in this case will be the opportunity to get a wider shelf for air fresheners and other toiletries.
In principle, the floor tile is arranged in the same way as described above: one row unfolds, after which the extreme tile is removed and all remaining elements are shifted symmetrically to the centerline.
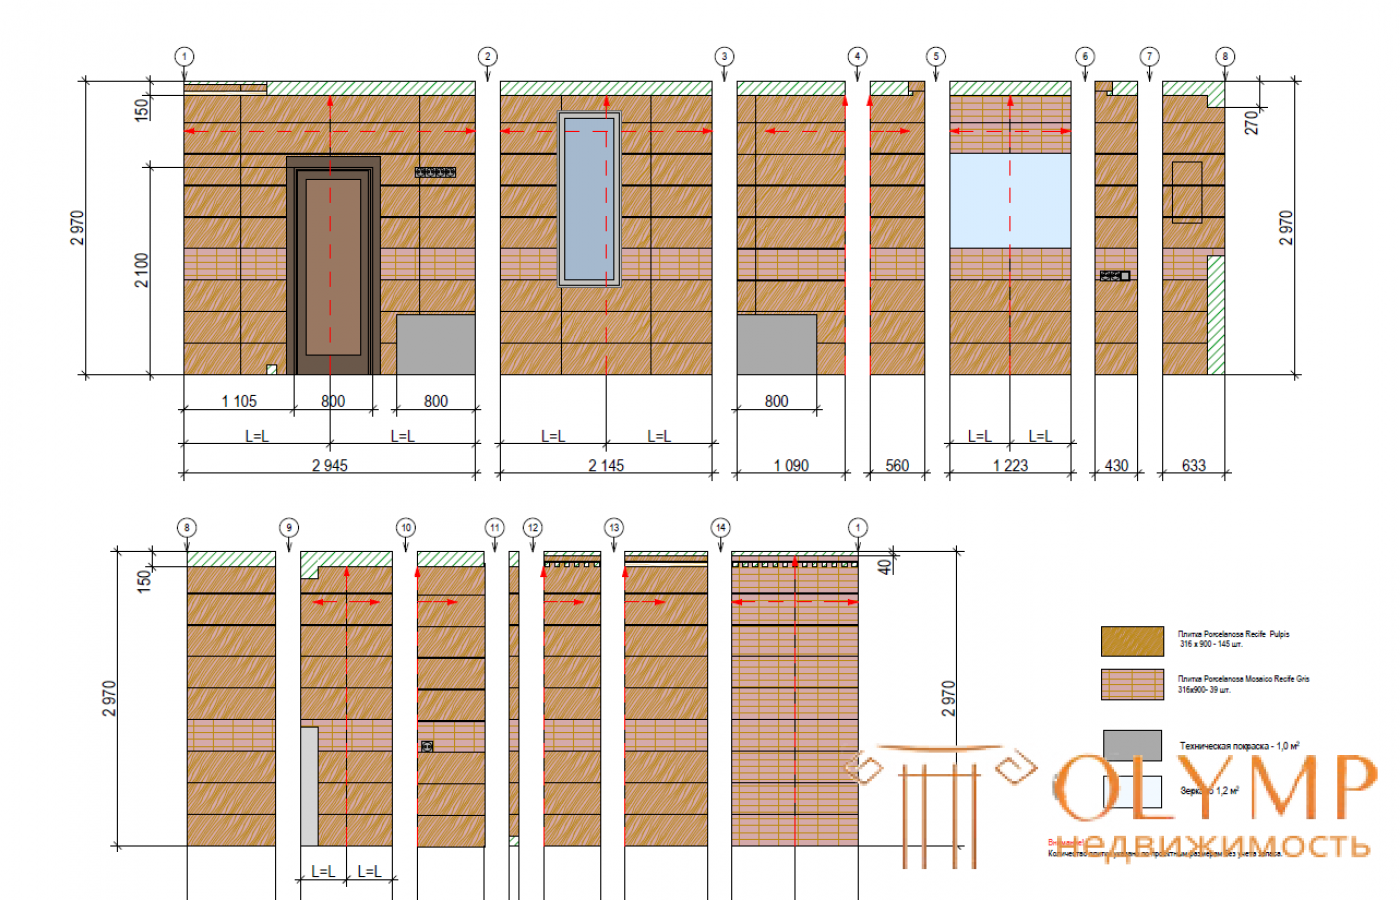
But there are special cases that must be considered. For the shower "classic" method is applicable to the entire area of the room. In the case of a bathroom, it is important to properly distribute the tile between the far wall and the bathroom screen. A narrow "trimming" (if it is formed) along the wall under the bathroom will not spoil the interior of the room, since this section will not be visible after the installation of sanitary ware. If the bathroom has two sections of different lengths, then the “classical” layout is used primarily for the area that is fully visible. For example, a narrow “undercut” hidden under the sink would be a better solution than if it were located in another, open area.
In some cases, it is not necessary to reduce the size of the box (to increase the usable area), which hides communications: it is better to “fit” them so that “trimming” is not necessary next to the box.
Now about the orientation of the tile: vertical is better or horizontal? The answer is unequivocal: horizontal allows you to get rid of the narrow "trimming" of the tile. The vertical arrangement of the elements means that even if the width of the “trimming” will be more than half of the whole tile, we will still see long and narrow fragments. Vertical orientation is allowed only in expensive baths, drawing tiles for which does not allow another location. In all other cases - only the horizontal layout.
Что бы оставить комментарий войдите
Комментарии (0)