Furniture with broken parts can often be repaired so that it will look almost like new. Thanks to durable adhesives, modern electric tools and proper care, the results can be even better. Serrated and deformed parts can return their original shape, and cracks and grooves should be processed so that they match the finish and value of the furniture - the more valuable it is, the more thoroughly the repair should be; If the furniture is of absolute value, it is better to seek the advice of a professional. Whatever measures are applied, the result should always be such that after repair the furniture is no less attractive than before.
Ways to eliminate cracks, holes, bends
1. Applying wax. Used to repair small cracks or other flaws.
2. The use of plugs and fillers for wood. It is used for wide, but shallow (less than 6 mm) cracks. Wood fillers dry quickly and have shades that match many types of wood and can be coated with dyes.
3. Increase the damaged area and the use of new wooden patches. The selection of the patch (styling) takes into account the age, color, pattern, shading and tree structure. Before making a final decision, the planned finish is checked on a piece of wood. In most cases, the patch is cut by hand for a proper fit, but with damaged areas less than 12 mm wide, time can be saved by using a cork cutter (a simple fixture that can be used with many types of drills) to make a plug suitable for the structure of the original product. To make a regular plywood patch, in most cases, complex tools will not be necessary; it is enough to have a trimming knife and roller at home. With a trimming knife, a rhomboidal shape is cut out, removing the damaged area and revealing the underlying tree, the edges of the cut out area are mown inward to join with a similarly beveled plywood patch. Slanted edges and rhomboidal shape hide incision lines. Then the patch is glued in place and pressed, easy grinding with a roller adjusts the patch to one level with the surrounding surface.
4. Removing dents with water or steam.
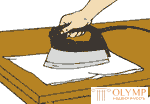
5. Elimination of deformation (warping) of furniture with the help of moisture and heat. If the furniture board is trimmed on one side, deformation (warping) of the furniture may occur. Moisture penetrating the bare side of the board leads to the wrinkling of the edges of the trimmed side. Warping of the wood can sometimes be eliminated by putting the deformed board with the finished decoration with its concave side up on a flat surface and ironing it with a regular iron through a damp cloth. It can be done differently: on a sunny day, lay the board with the deformed side down on the watered lawn. Within one - two days (depending on the weight of the board), the warping should disappear. If this does not happen, the board should be immediately attached to its support and covered with a new finish after the wood is completely dry.
6. The saws for severe distortion. Shallow cuts are made on the underside of the board and slats of hard wood are fastened on them to keep it diverging.
With any method of repair, start with a thorough cleaning of the damaged area. Then, to remove the finish, grind the damage site with a very fine emery cloth. To level the warped surface, it may be necessary to completely remove the trim from it. In many cases, you need to remove the damaged part of the furniture from its frame. Below will be discussed in detail how to eliminate cracks, holes, bends.
Patching with heated wax sticks
You will need a wax stick (exactly the same color as the lightest structure of the tree) and art paint - oil or acrylic (the same color as the darkest structure). You can make your own, melt and mix chips, cut from several wax sticks of various colors, in a spoon or metal lid, then allow them to cool and harden.
The chips should not be melted directly above the flame or electric burner (they consist of paraffin wax, beeswax, oil, paint, and easily ignite). It is better to heat a spoon or a lid, and then put chips into them (at a distance from the fire); they quickly melt and melt before the spoon or lid is cool.
To make a patch using heated wax, you still need a crooked knife, a non-soiling heat source, a fine brush, spray paint and medium-sized steel chips. Professionals use a curved knife called a “burning knife,” but any knife with a thin blade is suitable for this purpose.
 |  |  |
| Patching with heated wax sticks. Surface preparation | Patching with heated wax sticks. Patching | Patching with heated wax sticks. Painting the structure |
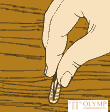
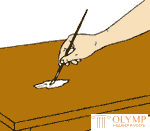
Surface preparation . To repair a damaged area, scrape off the peeling material with a single-sided razor or edge-trimming knife; clean the groove with white spirit. To prepare gouged spots and deep scratches, thoroughly clean them.
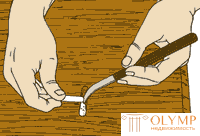
Patching Preheat the knife over the stove or stove and, holding the end of the wax stick near the heated blade, insert the melted wax into the groove. Heat the knife, adding wax to the patch if necessary, until it is slightly higher than the surrounding surface; the wax will contrast as it cools. When the patch has cooled, slide the razor blade over it and finally smooth it with the tip of your finger.
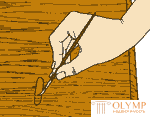
Painting the structure . Dip the brush in art paint, extruded directly from the tube. Wipe the brush off the paper, leaving the bristles almost dry. Then apply light brushstrokes with a brush on the wax patch, connecting them into a pattern that corresponds to the surrounding tree structure. If the lines look too fresh, lightly smear them with your finger or a cloth to give them a more natural look. To secure the patch, seal it with a light overlay of the original finish. Caution: if you apply a spray finish, work with it in a well-ventilated room, away from fire, and do not smoke. When the pollinated area is dry, polish it with medium-type steel chips and apply wax or polish to the entire surface.
Remove dents with water or steam . Using a brush, apply warm water to the damaged wood fibers (see fig. On the left), taking care not to soak the adjacent areas. Apply water to softwood until the fibers are lifted; if the wood is hard, apply water, then put a damp cloth on the dent and place a weakly heated iron on it for 15 seconds. Check the dent and repeat the process if necessary. If the dent does not disappear, pierce it with a pin to introduce steam into the fibers. Try to raise the fibers slightly above the surrounding surface.
 |  |
Removing dents with water or steam | |
If the dents are small or located close to sealed compounds that can loosen under the influence of steam, isolate the evaporation process. Cover the damaged area with a rolled up damp cloth, then place the metal cap from the bottle upside down on this cloth on a dent and lean the iron against the rim of the cap. Let the raised fiber dry completely. After that, polish the area and put on it finish.
Patch on a wooden surface
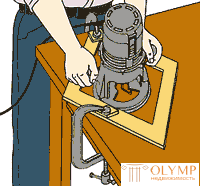
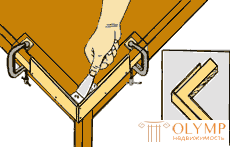
Opening the damaged surface . Connect the four wooden planks to form a jig for the milling machine, outlining the area on which the patch will be applied. Clamp the fixture on the installation site as shown in the figure, or if it is not near the edges of the furniture, clamp the two boards on top of this fixture. It should be located above the damaged surface so that its sides are at an angle of 45 ° to the wood structure. The device must be large enough so that the cutter can remove the damaged tree. Open the surface to the depth of damage and align the corners with a chisel. If there is no milling machine, cut the damaged area with a chisel and a hammer. The edges of the recess should be located vertically, and its bottom should be flat.
 |  |
| Patch on a wooden surface. Opening the damaged surface | Patch on a wooden surface. Patch overlay |
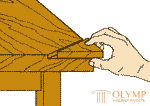
Patch overlay . Cover the cut-out cavity with paper and apply the outlines of edges on it. Cut out this form to get a patch sample; glue it to a wooden patch, aligning the sample so that the patch structure matches the structure of the surrounding groove. Cut the patch to a size slightly larger than the sample.
Using sandpaper and planer, slightly squint the edges of the patch inward (see fig.), Often checking its fit. When it settles tight, but protrudes slightly above the surface, apply PVA glue and secure the patch in the recess. Cover it with a rough wrapping or wax paper; put a load on it or hold it overnight. Then sand it and cover it with trim.
Using filler for repairing edges
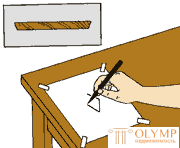
Adding filler to broken edges . Rub a piece of wood long enough to cover the marginal damage area with wax or wax pencil and press the waxed surface to the edge of the furniture using edge clips (see fig.) Or clips with wooden wedges (the wax will keep the filler from sticking to the wood). Place the filler in the damaged area with a spatula. If the area is deeper or longer than 6 mm, lay the filler in layers. Refill the groove slightly to compensate for shrinkage. When the filler is dry, remove the piece of wood and sand the filler so that it is flush with the surface. Apply a dye, then a sealant (sealant), for example, a layer of diluted varnish. Complete the repair painting under the tree.
 |  |
| Using filler for repairing edges. Adding filler to chipped edges | Using filler for repairing edges. Rebuild corner recovery |
Recovery of a broken corner . Using a cork or wood filler and the same basic repair techniques that are used in the repair of broken edges, restore the missing corner by making a three-sided molding (see the figure). If the leg connects the piece of furniture near the corner, leave room for it. Wax all three sides of the molding that will touch the filler. Press it against the furniture and fill the place of damage.
Restoration of a broken corner with a wooden block
Adjustment of the corner element . Using a milling cutter or chisel and a hammer, prepare a flat surface for a new angle, cleaning the damaged wood. Then cut a wooden patch to install it on the aligned side of the corner, making it about 18 mm longer and 1 mm thicker than necessary. Put the patch in place and move it back and forth until the patch structure and furniture are in the best position relative to each other. Mark the patch in this position, then cut it to size, leaving approximately 1 mm on the sides of the overhang.
 |  |
| Restoration of a broken corner with a wooden block. Corner fitting | Restoration of a broken corner with a wooden block. Pinch angle |
Clamping the corner . Apply glue to the horizontal and vertical surfaces of the cleaned corner and reinstall the corner patch. Place a G-clamp over the patch and tilt it slightly vertically until the swivel head at the top of the screw is 3 mm closer to the inside side of the patch than the top of the clip. In this position, the pressure will go inwards and downwards. Tighten the clamp.
If the corner is broken off over the entire area from the top to the bottom surface, make a three-sided bracket, similar to the molding described above. Cover it with wax or wax paper to prevent glue from sticking to it; then press it against the furniture with a clip. Stick a new corner covered with glue into the bracket. Instead of a bracket, you can use two special edge clamps to hold the new corner in place. In this case, you need to do periodic checks to find out if the angle has slipped out.
How to make cuts with strong warping
Bottom saw blades . If the deformed surface (for example, the sliding table of the sliding table shown in the figure) does not straighten as a result of moisture, install it with its bottom up on the goats for sawing firewood, using them as a working table. With the help of a circular saw make on its structure shallow, evenly spaced cuts, called cuts, not reaching 25 mm to its ends. To guide the saw, clamp the ruler to the deformed tree; set the saw blade to half the thickness of the wood. Start with four cuts, placing them at equal distances on the deformed surface. If the deformation persists, make additional cuts, continuing to maintain them at equal distances, but not less than 50 mm one from the other.
Caution: do not make cuts on high-grade antique furniture; they can cause damage and reduce the value of the furniture.
 | 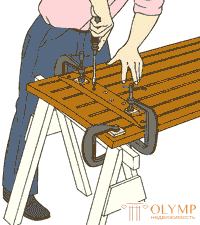 |
| How to make cuts with strong warping. Bottom side saws | How to make cuts with strong warping. Rack mount |
Fastening rails . If sawing by itself does not eliminate the deformation, cut slats or strips (preferably of oak or other hard wood) 20 mm thick, 40 mm wide and equal to the width of the deformed board. Brush the ends to make them less visible, and press the slats to the underside of the board about 200 mm from the ends or in places where they will fall on the legs or frame of the furniture. Drill the guide holes for the screws about 150 mm apart from each other, which will be screwed into the board to a depth of 6 mm from its upper surface. If you make these holes oval in shape (this can be achieved by drilling two adjacent holes with the overlapping of one to the other), then expand and shrink the wood around the screws. Position the holes between the cuts. Screw in new screws in places where the rake touches the highest point of deformation. Then tighten the clips a little on the rail and successively screw the screws closer to the lower edges of the deformation. Continue in the same way until all the screws are in place. Seal and trim the bottom side of the board and attach it to the furniture.
Что бы оставить комментарий войдите
Комментарии (0)