
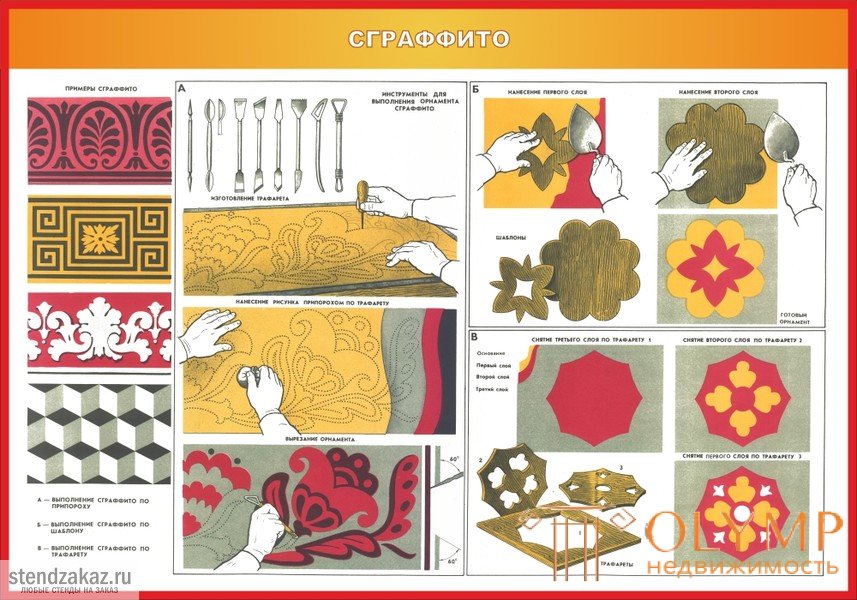
General information . Multi-colored sgraffito plasters are obtained by successively applying thin layers of colored solutions one on top of another, followed by scratching, and carving a pattern on them. This finish is often called carving on plaster because during work one has to cut one or more layers of mortar. As a result, you can get a decorative pattern, ranging from a primitive ornament to a complex artistic composition (Fig.118). The cost of colored plasters is quite high. These plasters are poorly repairable.

Fig. 118. Sgraffito drawings
The solution is prepared as a batter. The color of the solution may be different, for example white, yellow, red, blue, brown. The amount of pigment depends on the desired color of the solution.
The compositions of solutions for colored plasters, volume parts: white (lime paste 1, white sand 3), yellow (lime paste 1, white sand 3.5, ocher 0.2), red (lime paste 1, white sand 3, mummy 0 , 4), blue (lime dough 1, white sand 3, ultramarine 0.3), brown (lime dough 1, portland cement 3, white sand 3.5, ocher golden 0.3, umber 0.1), pink (lime dough 1, white sand 2.5, ground brick 0.3).
Preparation includes cleaning, notching, hauling seams and washing surfaces.
After this, surfaces are fixed, marks and lighthouses are arranged, spray and primer are applied. For the ground apply the same solution, which perform a decorative finish of the entire facade. The surface of the soil is scratched with grooves and, accordingly, is kept and dried. The aged soil is moistened with water before applying the covering layers.
As soon as the water is absorbed into the soil, proceed to the application of the covering layers. The solution is thrown over or spread with a spatula from a falcon, or spread directly from a falcon or a semi-stick. Each applied layer of mortar is smoothed and at the same time compacted to prevent the formation of cavities, shells in the thickness of the plaster. This marriage inevitably leads to a distortion of the picture.
The thickness of the overburden layers should be equal to the total thickness of the applied overburden layer of colored lime-sand, terrazit or stone plaster. In some cases, when this is given an appropriate indication, the thickness of the layers of multicolor plaster is less. The first layer of multicolor plaster applied to the ground should be no thinner than 5 mm, since it can shine through the thinner layer. The second layer can be from 1 to 2 mm, the subsequent layers - the third, fourth, etc. - can be of the same thickness.
Sometimes the third and other layers of the solution are applied not with a spatula or taster, but with a brush, painting the surface on the wet layer with a liquid solution or lime paint. The usual thickness of a layer of this color is from 0.5 to 1 mm. The solution is applied in three to four layers, and the remaining layers are tinted with a lime color on the raw layer.
For example, consider the procedure for applying multi-color three-layer plaster. The first layer, for example black, is applied on the ground and leveled with a scraper; after setting it, in 15-30 minutes, depending on the weather, a second layer is applied, red, and when it dries, the third layer, yellow. The last layer applied from the scapula, rubbed even if it will impose more layers with a brush.
The top layer applied with a brush is best smoothed with a spatula or trowel. In most cases, no more than three layers are applied to the scapula; the remaining layers are applied with a brush. If, for any reason, the applied coating layer dries out, it is well moistened with water, and only after it absorbs the water, the subsequent layers are applied.
Scratching the pattern on the stencil . For scratching plaster use a set of incisors of various shapes (Fig. 119). Some incisors are used to trim the solution, others to select it, others to clean it, etc.
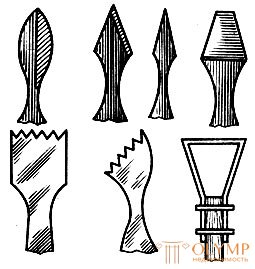
Fig. 119. Sgraffito plaster cutters
A stencil and a tampon for splicing a pattern with priporoche are made as follows.
For the manufacture of stencils used cardboard or thick paper. A picture is put on the cardboard, transferring it through carbon paper or using ordinary drawing in cells to increase or decrease the size of the pattern. The contours of the printed pattern are punctured with a pin or some other sharp object. The distance between the punched holes should be no more than 5 mm, the curves of the contours puncture more often. Since the stencil from the wet plaster is destroyed, for strength, it is impregnated with linseed oil and dried. After that, put it between the boards or plywood and straighten.
For the manufacture of a tampon take a piece of gauze and put it in two layers. If there is no gauze, then use a rare cloth. The gauze or fabric is filled with dry chalk sieved on a frequent sieve or pigment (dry paint), the ends of the gauze or fabric are folded and tied, thus obtaining a nodule. If you strike with this knot, then chalk or paint will pass through the pores of gauze or fabric and leave a mark on the surface. The color of the pigment is chosen such that it is clearly visible on the top layer of colored plaster.
Stencil strengthened on the surface of the plaster, pressed it with his hands and swab striking the contours of the stencil. A pigment or chalk passes through a stencil hole from a swabbing blow, which results in drawing a picture of priporokh in the form of dots (Fig. 120). Then the stencil is transferred further, where the same operation is repeated.

Fig. 120. Stencil and traces of priory
The drawing is scratched on wet soft plaster no later than 5-6 hours after its application; the dried solution is cut with difficulty. Consequently, the covering layers should be applied on an area that can be processed in the specified time. To do this, the surface is broken into grips, taking into account the number of available plasterers.
The cutter is attached to the received contours of the picture - with a prickle and cut a narrow furrow. The cutter is held in the right hand, so that it is inclined to the surface of the plaster at an angle of 60 ° (Fig. 121). After trimming the entire solution along the contour, the remaining between the contours of the solution is removed with scraping. The depth of cut of the solution depends on which layer of the solution has the color needed for the pattern.

Fig. 121. The position of the tool during operation: 1 - tool, 2 - red layer, 3 - blue layer
For example, an ornament consisting of oak leaves with acorns is cut: the leaves are dark green, the acorns are yellow, and the cups in which the acorns are located are light green. The whole ornament is located on a blue background. Thus, four layers are required to complete the pattern: bottom, dark green — for leaves, second, yellow — for acorns, third, light green — for cups, fourth, blue, —the field on which the ornament is located.
When drawing the cups cut through the groove only on the thickness of the upper layer. When doing an acorn pattern, the depth of the groove is greater. The deepest groove will be when teething the leaves. The drawing can be scratched in any order, i.e. it can be started from the leaves, from the deepest drawing, or from the cups, the smallest.
The solution is cut and scraped carefully so as not to make torn edges. Carved patterns are usually given a sandy-rough texture. After scratching, the whole surface is covered with a soft brush.
In the case of small-relief colored sgraffito plaster, not a thick plaster layer is applied to the bottom lining layer, but a usual two-three-calcareous painting on damp plaster. Scratched while drawing has a thin and delicate relief.
The work is performed by units of 4-5 people, consisting of two plasterers of the 6th category and two or three plasterers of the 4th and 5th categories. Under the direction of the plasterers of the 6th category, the entire link prepares the solution, applies it and levels it. Then one of the plasterers of the 6th category deals with the plasterer of the 4th category by pressing on the stencil, the other members of the link scratch the drawing.
Performing sgraffito patterns . This method of making plaster is called imitation. Drawing can be convex and profound - pressed. To perform the pattern, templates are made, which are divided into shapes and patterns. The thickness of the patterns is different, they are made from cardboard, tin, plywood. Finishing this way is more productive than scratching, and can be done by less skilled plasterers. Consider the technique of making patterns on a specific example.
It is necessary to make templates for the implementation of a convex and depressed pattern of a five-pointed star with a hammer and sickle located in the center. To do this, on a piece of plywood draw a star with a sickle and a hammer in the middle. Then using a jigsaw sawn out a star and in the middle of the hammer and sickle. After cutting, a piece of plywood is obtained with a star-shaped cut-out - the shape and the star-shaped piece. The image of a sickle and a hammer, cut from a piece, will also be a piece, and their lumen in a star will be a form. Thus, two forms and two patterns are obtained (Figure 122).
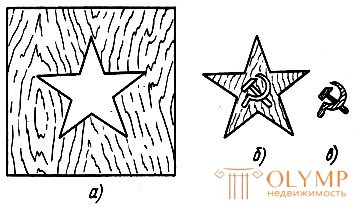
Fig. 122. Patterns for sgraffito: a - the shape of a star, b-scaled stars with the shape of a sickle and hammer, in - a sickle and hammer pattern
The form is used to perform a convex pattern, and the pattern is in-depth. Since one pattern, i.e. a mold or a form, gives only one-layer graffiti, then for a two-layer one should make a second pattern, which should be more or less than the first, and for a three-layer one the third. The shape and pattern for the background have the shape of a pentagon (Fig. 123).
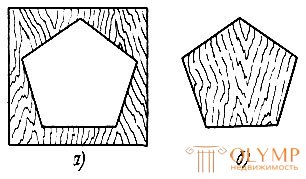
Fig. 123. Form (a) and curve (b) of the pentagon
In order for the mold and the mold to be removed during operation and not to destroy the edges of the pattern being made from the solution, the edges of the mold and the mold are cut into a bevel (or gloss), and the roughness is cleaned. To make it easier to remove the shape and pattern, it is recommended to nail them handles.
To perform the drawing, dry mixes of three colors are prepared: blue, red and yellow.
To get a convex drawing of a red star with a golden sickle and a hammer, proceed as follows. First of all, take the form of the second pentagon pattern and set it on the finished plaster (Fig. 124, a) with a facet to the surface (down). The form can be strengthened with nails, hold it with your hands or primorozit plaster. The prepared blue solution is applied to the space of the template, i.e. into shape, flatten and rubbed. The shape leaves a blue pentagon on the surface, the thickness of which is equal to the thickness of the template.
The star shape is set on the pentagon (fig. 124, b) so that the star is in the center of the pentagon. In the form of a solution is applied red color, level and rub it. After the solution has set, the template is removed, and the form leaves a red five-pointed star on the surface of the blue pentagon.
A sickle and hammer form is applied to the star (Fig. 124, c) so that the sickle and hammer are in the center of the star. A yellow color solution is applied to the mold, leveled and rubbed over. After setting the solution, the form is removed.

Fig. 124. The sequence (a-in) installation forms
To get an in-depth drawing of a star, templates are also used, but only in the form of a piece. Figure perform as follows. First of all, apply a yellow solution, level and rub it. A mold (fig. 125, a) of the sickle and hammer is applied to this solution and a red color solution is applied around it, leveled it at the level of the piece and rubbed. After the solution has set, the sickle and sickle patterns are taken out and the star pattern is installed (fig. 125, b) so that its center is exactly above the sickle and hammer.
Around the established patterns of the star put a solution of blue, level it and rub it. After the solution has set, the mold is taken out and a red star with a golden sickle and a hammer is obtained. A pentagon piece is placed on the star (Fig.125, c) so that the star is at its center. Around the mold smear, level and rub over the solution, which plaster the entire surface. After the solution has set, the pentagon patterns are taken out and a three-color in-depth drawing is obtained (Fig. 125, d).
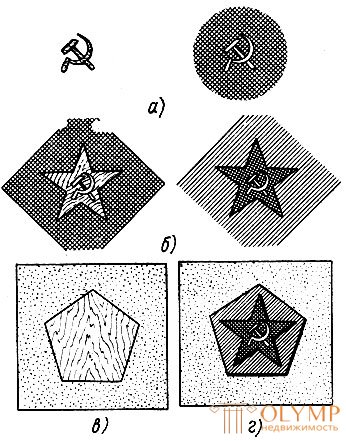
Fig. 125. Sequence (a-d) of installation of the pattern and image acquisition
Under each piece, the solution is applied to an area somewhat larger than the piece itself. This is necessary in order for the template to lay on the color solution for the given pattern. To prevent the solution from sticking to the mold and the mold, it is recommended to coat them with a lubricant. Imitation of such sgraffito can be performed with all solutions and give the design any texture. During the application of the mortar, it is not necessary to fear that the mortar will hit the line of the pattern, since the forms and patterns fit snugly to the surface of the plaster.
Imitation of graffiti is usually performed by two people - plasterers of the 6th and 3rd categories. Plasterer of the 3rd category puts and supports patterns, brings and mixes the material and performs a number of other works.
Stencil stencilled printing . With the help of stencils, you can get any pictures, regardless of the number of colors.
Stencils are made of cardboard with a thickness of 1 mm. On the cardboard, the contours of the drawing are drawn or transferred to it with copy paper. Then put the cardboard on plywood or planed board and cut out the pattern with a sharp knife so that the form does not separate from the piece. To do this, leave bridges between them. For multi-color plaster for each color make your stencil. Stencils are impregnated with linseed oil and dried, then placed between two sheets of plywood or even wide boards and pressed down with a load. Under load stencils straighten. Also stencils should be straightened and dried after work.
In addition to stencils, bristle handbrake brushes of different sizes are necessary for work.
For printing, a solution is prepared from the same materials as for making graffiti by scratching, but only less thick.
Before starting work, the prepared surface is moistened with water and, after allowing the water to soak, the main colored layer is applied onto it with scrubs, followed by grouting or simply with a brush twice. A stencil is laid on the newly applied and slightly set solution, the brush is moistened in the solution, and the printing is started. The stencil is set on the line broken by the cord.
Drawing is better to fill together. One worker holds a stencil, pressing it to the surface, the other fills the pattern. Before each wetting in it, the solution is mixed with a brush, and the wetted brush is pressed in such a way that the solution does not flow under the attached stencil. Kirtyu should apply weak butting strokes, filling the cut-out space with colored solution. 'After removing the stencil, an exact copy of the cut-out pattern from the colored solution remains on the surface.
During the printing of a multi-color pattern, each color of the solution is applied with its brush and only after the previously applied layer of the solution grasps. After the pattern has been stuffed under the bridges, there may be open spaces that are not filled with mortar, which are manually corrected with small brushes.
If multicolored sgraffito is printed using several stencils, stencils are applied so that the contours of the patterns coincide. In the manufacture of stencils on their front sides make cuts, which are guides when moving stencils during the printing of the pattern. These cuts should match exactly with the broken lines.
The drawing cannot be painted over with a solution, as the solution will flow under the stencil. If solution streaks appear, they are scraped off with a cut or knife.
After stuffing the entire picture, it is sometimes corrected by its edges, cutting them with a knife - this makes the picture clearer.
Что бы оставить комментарий войдите
Комментарии (0)