Plastering layers . Simple plaster consists of two layers - spray and soil, improved and high-quality - of three: spray, soil and covering.
Splashing - the first layer of stucco. Its thickness when applied manually is 3-5 mm, with mortar pumps on wooden surfaces - no more than 9 mm, on stone, concrete and brick - no more than 5 mm. For splashing use a liquid solution. The thickness of the solution applied by the manual method should correspond to immersion of a standard cone by 8-12 cm. Before applying the spray, stone and concrete surfaces are moistened with water in the warm season.
The solution of the sprayed layer, flowing into all the pores and surface roughness, firmly adheres to it and keeps the subsequent layers - the ground and nakryku. The more properly prepared and applied spray solution, the better it will fill all the roughness, the stronger it will bond with the surface and the stronger the plaster will hold.
Soil - the second layer of plaster. The solution for the soil is prepared somewhat thicker than for splashing. The mobility of the strained plaster mortars at the time of their application should correspond to the immersion of the standard cone: for soil without gypsum - 7-9, with gypsum - 8-10 cm.
Soil is the main (by volume) layer of plaster. It forms the required thickness of plaster and levels the surface.
If the thickness of the plaster is large, then the primer is applied in several layers. The thickness of each of them should not exceed 7 mm with lime and lime-gypsum mortars and 5 mm with cement mortars. The soil is very well aligned.
Coat - the third layer of plaster. Its thickness is 2 mm. The coating solution is prepared on fine sand, sifting it through a sieve with 1.5 × 1.5 mm mesh openings. The density of the coating solution should correspond to the immersion of a standard cone of 10-12 cm.
The coating solution is applied to the surface manually and by machines on the ground (seized), carefully leveling. The lining forms a thin soft film that is easily rubbed over or smoothed out.
Plaster layers are applied to the surface by various methods - throwing and spreading. The solution of the spray and the first layer of soil is thrown so that it penetrates better into all the roughness and thereby adheres more firmly to the surface. The second and following layers of soil can be smeared. Nakryvku throw or smear. The solution is leveled also in different ways. Consider the technique of applying and leveling the solution.
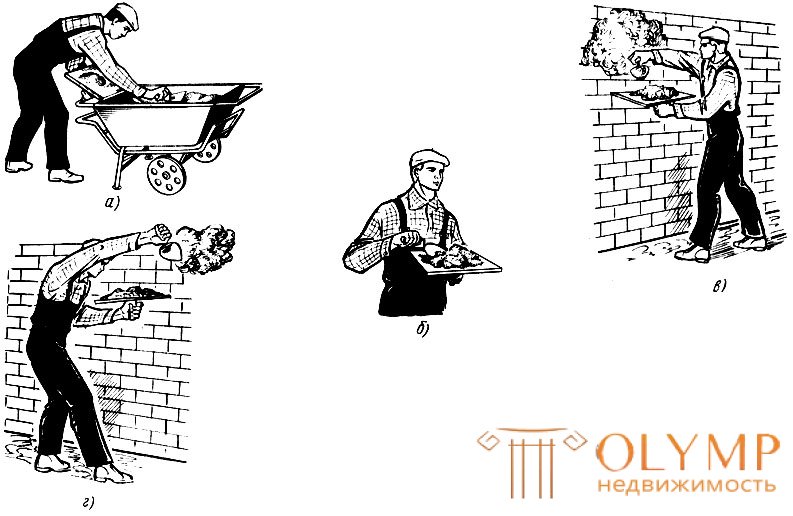
Throwing . Use a spade with a falcon to throw a solution like this. To work needed mortar box, plaster shovel and falcon. The box is installed as close as possible to the surface to be plastered.
The solution from the box is applied with a plastering trowel on a falcon (Fig. 22, a). For this, the plasterer takes a falcon in his left hand, and in the right plastering blade, approaches the box and becomes so that his right leg is closer to the box and the left foot is laid back. The falcon is placed at one end on the side of the box, and the other is lifted up about 10 cm. If the solution is liquid, the falcon is held almost horizontally. The side of the falcon, raised up, rests on the arm, which gives it stability, and the arm is less tired. With a spatula, take a portion of the solution from the drawer and put it first on the raised side of the falcon, and then in successive rows towards the lower side. After collecting the required amount of the solution on the falcon, remove the surplus from the edges. With a mortar on a falcon, the plasterer comes up to the place of work, takes a portion of the mortar with a spatula (Fig. 22, b) and throws it on the surface to be plastered. Hitting the surface, the solution fills the seams, shells and roughness, forming a dense layer.
Plastering the wall, the falcon is kept slightly inclined towards it: it is not only convenient for work, but also protects the hand from hitting the mortar. A portion of the solution is taken from the falcon by the right edge or the end of the blade, so that the blade moves from the edge of the falcon (from itself) to its middle, while ensuring that the solution does not run off the falcon and does not fall to the floor.
When performing a throw, the whole hand does not work, but only the hand. To do this, you should swing the blade and stop it abruptly. The stroke should not be very strong, because the solution is strongly sprayed from a sharp jolt. The sharpness of the stroke depends on the thickness of the solution and the required thickness of the applied layer. For example, when a solution is applied with thin throws, the sweep of the scapula must be sharp, the solution disperses; when thick throws are required, the swing should be slack.

Fig. 22. Spreading the solution with a plastering blade on the walls: a - the solution is collected on a falcon, b - a portion of the solution is taken from the falcon with a blade, c, d - the solution is thrown at head level from left to right and right to left, respectively
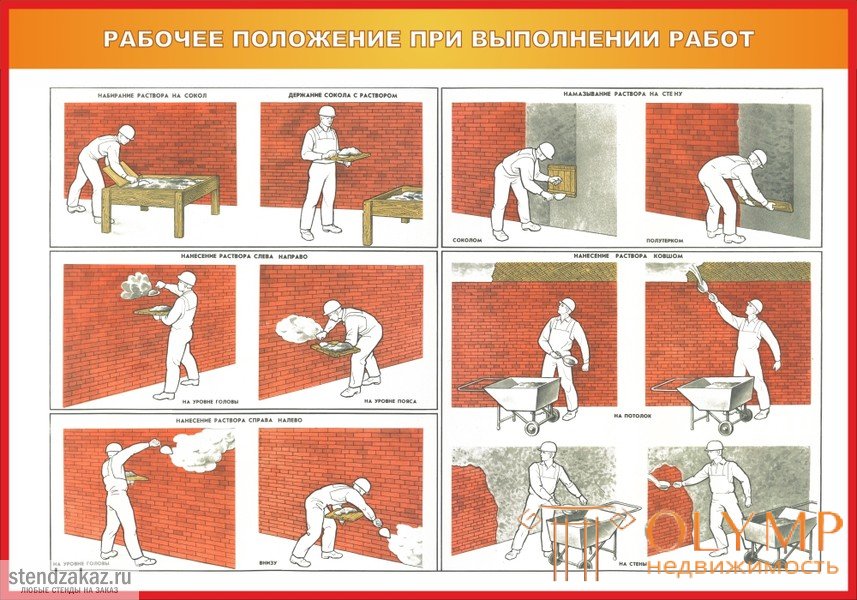
Plastering walls, the solution is thrown at the level of the head or slightly higher at the level of the belt and near the floor or scaffolding.
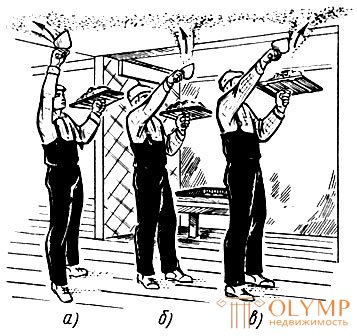
Fig. 23. Throwing mortar plaster on the ceiling: a - through the head, b - above itself, in - away from you
When applying the solution should always choose a position in which the spray would not fly in the direction of working near plasterer.
With a spade from a box, the solution is thrown in the same way as from a falcon. At the same time, a lightweight mobile box and an oversized blade are used. The work is organized as follows. If the plastered surface is located below the level of the box, then it is installed at a distance of 1 m from the wall. Plasterer takes a portion of the mortar from it with a spatula and sprinkles it onto the wall. If the solution is thrown above the level of the box, then it is placed next to the wall. This avoids unnecessary movements, and the solution flying off from the wall falls into the box and is then used in the case. During operation, the box is periodically pushed to the place of throwing the solution.
Falcon solution is applied as follows. The solution is collected on the falcon plaster shovel, shovel or bucket. A falcon with a portion of the solution is taken with the right hand and with a strong, sharp wave from bottom to top, it is dropped onto the plastered surface of the wall. The solution is spread over the surface of a wide stripe. The position of the worker’s body when making a throw is the same as when applying the solution with a spatula from a falcon.
Bucket solution is applied on vertical and horizontal surfaces, and. also on eaves, platbands, slopes and other parts of buildings. The bucket is more convenient to apply lime, lime-cement and cement mortars; lime-gypsum mortars quickly set, stick to the bucket and make it heavier. It is better to apply a box for solution mobile on wheels. It is placed near the place of work near the walls and under the place of application of the solution on the ceilings.
The solution is taken from the box directly with a bucket and applied with various throws in position from left to right and from right to left. The grab of the bucket (fig. 24, a) when applying the mortar (fig. 24, b, c) differs from the grip of the blade. During the throw, the bucket is turned out and the solution, splashing out, is scattered on the edge of the bucket, covering a large surface area in the form of a pear-shaped smear. The sharper the swing of the bucket, the wider and thinner the solution roll, and vice versa.
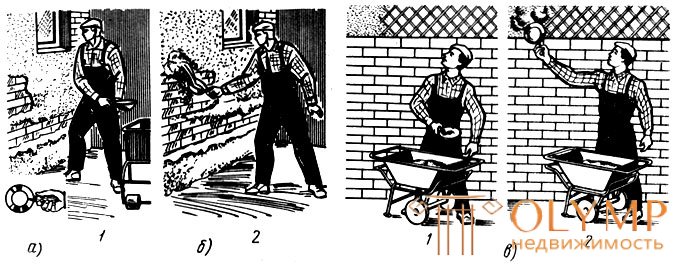
Fig. 24. Bucket throwing of the solution: a - grab of the bucket, b - throwing of the solution on the walls, c - on the ceiling; 1 - swinging the bucket, 2 - throw
Smearing . The spreading solution should not be very thick. When using a thick mortar, you should strongly press the tool, otherwise the plaster layer is less dense than with a sprinkling, and with a large number of internal sinks. When applying the solution to the walls, the drawer with the solution is placed at a distance of 1 m from the wall; on the ceiling - under the place of spreading.
The solution is smeared with falcon, spatula, trowel.
False solution smear so. A scapula is taken in the right hand, a falcon with a solution is taken in the left hand (Fig. 25, a, b). Falcon is attached to the plastered surface so that one side of it is separated from the surface by 50-100 mm, which depends on the amount and thickness of the solution, and the other - by an amount equal to the thickness of the applied layer of the solution. To create the necessary pressure on the solution, the falcon is pressed to the surface by the end of the blade, resting it under the key. As the falcon moves, the solution is smeared on the surface, and the raised side of the falcon gradually presses against it. Press the blade on the falcon evenly to get a flat surface.
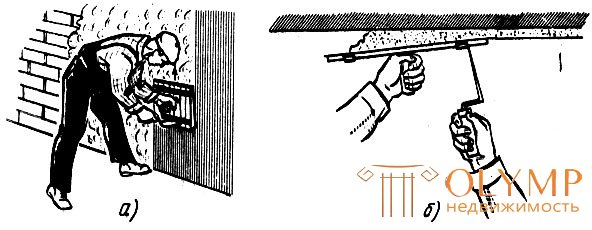
Fig. 25. Salting the solution with a falcon: a - on the wall, b - on the ceiling
While smearing the solution on the wall, the falcon is moved upwards. With a straight movement of a falcon, there are straight stripes, with a curvilinear - curvilinear.
When spreading the solution on the ceiling, depending on the thickness and amount of the solution on the falcon, and the thickness of the spread layer, the plasterer either stays in one place, or slowly moves forward, applying a series of short straight lines, or moves one step further. solution.
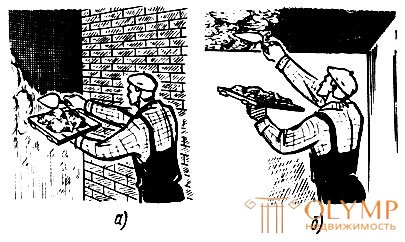
Fig. 26. Spraying the mortar with a spatula onto the mesh surfaces: a - on the wall, b - on the ceiling
Leveling . Falcon solution spread out the same way as smear. The only difference is that when leveling on the falcon do not gain solution. Usually, when spreading a solution from a falcon, it is leveled simultaneously.
The scrolls work like this. They put a trowel on the surface with the applied solution, lift the upper edge and with pressure lead along the wall from bottom to top, along the ceiling to themselves (Fig. 27, a, b). Where there is a lot of solution, it is cut off and a trowel is collected on the canvas. Where it is missing, the excess solution removed is smeared. Mostly it is necessary to apply the solution additionally
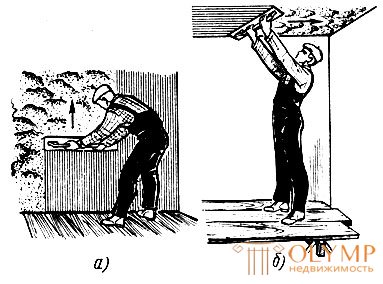
Fig. 27. Leveling the mortar with a scraper: a - on the wall, b - on the ceiling
To more accurately align the solution, sometimes do so. First, the trowels are led on the walls in a vertical direction, then horizontally, and on the ceilings first along the ceiling, then across.
The evenness of the resulting plaster depends on how hard they press on the scraper or other tool. Where the pressure is stronger, the solution layer is thinner and vice versa.
At the same time, the rule checks whether the surface is even and align it additionally. The rule is applied to the plaster in all directions and irregularities are immediately corrected. In those places where there are notches, put the solution and dub it, and where the bulge - cut.

Что бы оставить комментарий войдите
Комментарии (0)