General information . High-quality plaster on the walls should be strictly vertical, on the ceilings - horizontal. The difference in the width of the slopes is allowed no more than 2 mm.
Consider the sequence of plastering the room with the eaves stretching.
Surfaces are usually prepared. After preparation, they start to fix the ceiling, then the walls, nails, make marks and lighthouses. Hanging is performed using a plumb or level with the rule, in the corners arrange for two beacons for the formation of husks.
Plastering is performed in this sequence. First, plaster the ceiling: spray and apply the soil, level the solution. Then plaster the upper parts of the walls. After that, hang the rules, pull out the eaves, cut the corners. Finally, a covering solution is prepared, the ceiling and the top of the walls are covered, smoothing or grouting is performed.
Soil and nakryvku check and correct. After that, plaster the upper slope and the dummy. Scaffolding dismantle and plaster the lower parts of the walls.
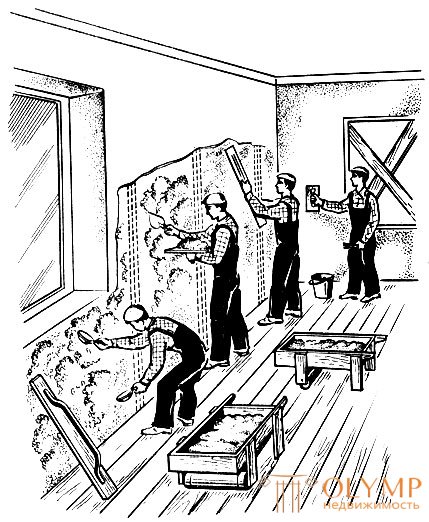
Work is organized in different ways. When performing plaster with a link of four people (fig. 35), one plasterer applies the spray and primer solution with a ladle, working alternately with two hands, smoothing the solution with beacons with a scraper or rule. The second plasterer cuts down the lighthouses, covers the remaining places with mortar with them, levels it and applies a covering solution. The third plasterer smooths out the cover, adds the missing solution in some places, rubs the husks, usenka, chamfers. The fourth plasterer is engaged in grouting.

Fig. 35. Plastering the walls with a link of four people
Surface fixing . Smooth strictly vertical or horizontal surface of the plaster can be obtained only by beacons. Lighthouses suit on all types of surfaces: walls, pilasters, columns, ceilings, beams.
For the device beacons surface hang. Before starting to check, the surfaces are inspected and pre-leveled - the bumps are cut down. You can check the surface and after nailing at extreme beacons.
Walls hang in the following sequence (Fig. 36). In the upper corner, at a distance of 30-40 cm from the ceiling and husk, nail 1 is hammered so that its cap is separated from the surface of the wall by the thickness of the plaster. They attach a cord to the head of this nail, lower the plumb line and hammer the nail 2 at the same distance from the floor, but so that its head is exactly under the cord, it touches it slightly or does not reach it by 0.5-1 mm. If the walls have a height of up to 2.5-3 m, then you can do with two nails. If the height of the wall is greater, then hammer three nails. The third nail set on the cord, stretched on the first and second nails. Thus nails are stuffed under the first lighthouse. Then proceed to the packing of nails under the second lighthouse. To do this, in the opposite corner of the wall, in exactly the same order and at the same distance from the corner and the wall, the thickness of the plaster is hammered with a nail 4, the cord is lowered from its head, the nail 5 is hammered at the bottom of the wall, and then the intermediate nail 6. Having nailed the nails under the outer beacons check the accuracy of the wall. To do this, on a packed nail, horizontally, tighten the cord, i.e. from nail 1 to nail 4, from nail 3 to nail 6, from nail 2 to nail 5, then diagonally from nail 1 to nail 5 and from nail 2 to nail 4. If there is a wall bulge under the cord, i.e. the cord touches the wall, then on one side of the wall it is necessary to extend the nails to such a length that there is a space between the convex side of the wall and the cord equal to the thickness of the plaster. Stretched nails set on a plumb line.
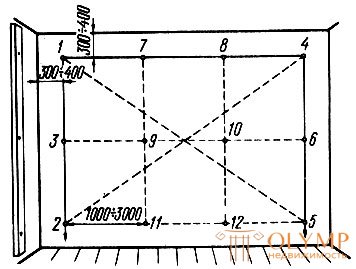
Fig. 36. Hanging the walls with a plumb (1-12 - nails)
The average distance between the beacons is considered 2 m, but it can be less or more. Many masters put lighthouses at a distance of 3 m. Thus, with a large length of walls, it is necessary to arrange several lighthouses, stuffing nails under them. To do this, on the previously hammered in nails, they tighten the cord and on it intermediate nails. Nails 7 and 8 are hammered on the cord tensioned on nails 1 and 4. Then the cord is tensioned on nails 3 and 6 and intermediate nails 9 and 10 are hammered, and on the cord tensioned on nails 2 and 5, intermediate nails 11 and 12 are hammered. Intermediate nails should be hammered so that they are on the same straight line, i.e., one under the other.
Game: Perform tasks and rest cool.6 people play!
Play gameWhen hanging with a level (fig. 37) at the top of the wall, nail 1 is driven in by the thickness of the plaster. The second nail at the bottom of the wall is driven in arbitrarily. Rule 2 with level 3 is applied to the hammered nails. If the level finder is incorrect, then its air bubble will be shifted away from the central risks. In this case, the lower nail should be hammered or pulled out to such an extent that the target air bubble is established exactly between the risks of division. Then a third one is driven in between these nails, the head of which should be in the same plane as the nails previously hammered in, that is, the rule should lie on exactly three nails. In the next corner of the wall, the second row of nails 1 is filled with a level. Using it, tension the cord, check the surfaces and hammer in intermediate nails.
Game: Perform tasks and rest cool.6 people play!
Play game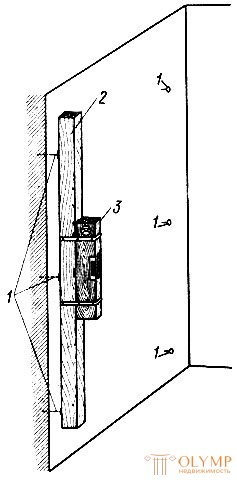
Ceilings are hung with a level with a rule of up to 3 m, water level or water level. Prior to mounting, check the accuracy of the ceiling plane. To do this, four nails are driven into the corners of the ceiling, the caps of which should be at a distance equal to the thickness of the plaster from the plane of the ceiling. On the nail caps tighten the cord. If a bulge is detected at any point on the ceiling, it is cut down. If this cannot be done, the nails are pulled out to such an extent that in the most convex place the distance from the cord to the bulge is equal to the minimum permissible thickness of the plaster. Hanging should begin with the most convex place. Before starting to hang on the ceiling, it is best to beat off the line of the location of the lighthouses, which is then filled with nails.
When fixing ceilings with a level at a distance of 2-3 m from a nail hammered on a bulging point (depending on the length of the rule), a second nail is driven in and a rule with a level is established on the nail head. If the level visor is exactly in the center, then the nails are left; if the sight shows deflection, then the second hammered nail is hammered or pulled out by the amount necessary for the level finder to be installed in the exact position without deviations. Then a third one is driven in at the same distance from the second nail, the rule with the level is put on the second and third nails; the accuracy of the installation level regulate only the third nail. After the third nail, the fourth one is slaughtered, etc. In the same way, ceilings are fixed with the help of a spirit level.
At a flexible level, ceilings are fixed like this. First, nails are driven into the corners of the ceiling for the assumed thickness of the plaster. Then the diagonals tighten the cord, checking the horizontal ceiling. If anywhere the cord touches the ceiling, it means that there is a bulge in this place and there it is necessary to hammer the first permanent nail on the thickness of the plaster and lead from it. After that, with the help of a cord, lines are punched across the ceiling, outlining places for lighthouses, and along these lines nails are filled at the required distance from one another. Then proceed to staking. One end of the level or its glass tube is pressed against a permanent nail, and the other end is attached to nails driven under marks. If the water in the tubes will be at the same level or the same divisions, then the nail is clogged exactly. When the level shows abnormalities, the nail is pulled out or hammered. Since the nails are filled in advance, the end of the level is always kept at the right height and the water does not pour out of it. The nail has to hammer or pull out, working only with one hand (Fig. 38).

Fig. 38. Suspended water level ceilings
If the ceilings are not nailed, you can prepare small pieces of ceramic tiles or wood, find a fixed point, put one brand on the plaster and place others on it. The stamps are embedded in the applied gypsum solution, placing a glass tube for testing. In this case, the three have to work. Two work level, and one puts the mark.
The device beacons . Lighthouses are arranged from the solution, which is done plastering, or from plaster. Wooden and metal lighthouses are mainly installed on wooden, brick and other nailing surfaces. These beacons are fastened with nails or clips. When using wooden beacons under them, metal (steel) marks are pre-installed on a plumb line. Metal or wooden beacons are recommended for use in mechanized application of the solution. Gypsum beacons are stronger than mortars, they are less susceptible to abrasion during leveling of the mortar by the rule. However, these lighthouses have to be completely cut down. Mortar beacons are weaker, but they can not be cut down completely, but only cut off a layer 5-10 mm thick or simply incise.
It is almost impossible to make a rule on the heads of hammered nails and it is necessary to arrange mortar or gypsum areas around the nails, called marks. Then rule 1 will steadily hold on marks 3 and 4 (fig. 39). Stamps around nails do this. Put hillocks of mortar or gypsum with a diameter of 50-70 mm above the level of caps by 3-5 mm. As soon as the mortar sets, the top is cut to the level of the caps so that the plane of the mark is parallel to the plane of the wall. The sides of the solution are cut from four sides, getting squares measuring 30 x 30 or 40 x 40 mm. Often the sides of the grades are cut slightly into a cone. The front sides of the stamps should be cut as accurately as possible, since the accuracy of both beacons and plaster depends on their accuracy.
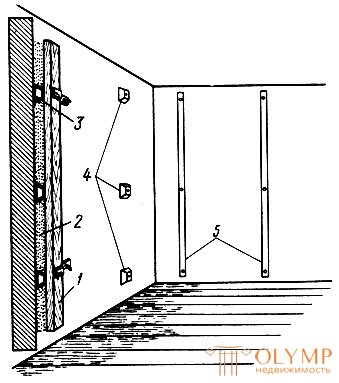
Fig. 39. The device of mortar stamps and lighthouses on the walls: 1 - rule, 2 - the space between the rule and the wall, 3,4 - marks, 5 - lighthouses
After completing the marks, they proceed to the arrangement of beacons 5. To do this, take rule 1, which is 10-15 cm shorter than the height of the room, is applied to marks 5, fixed to them with nails, clamps, or frozen with mortar, plaster. The rule can not be fixed, in this case it is held by the hands of one of the plasterers.
Game: Perform tasks and rest cool.6 people play!
Play gameIt is very convenient to fasten the rules with clips (Fig. 40, a, b). In this case, under the rules, they enclose a piece of brick, plank or bar, so that after the beacon installation these linings can be removed and a wedge hammered in their place. A wedge is hit with a hammer and thus lifts the rule, without tearing off the solution deposited under it.
Game: Perform tasks and rest cool.6 people play!
Play game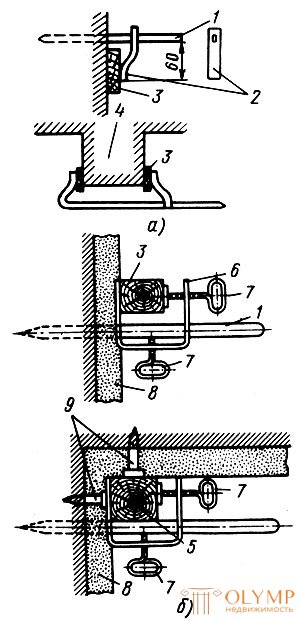
Lighthouses can be performed, not only throwing the solution under the rule, but also rubbing it over the brands. Between brands throw a solution of such thickness that it was slightly higher than them; they put a rule on stamps, press it and move it up and down, rubbing the solution at the level of marks. At the same time make sure that the solution does not get on the mark, which reduces the accuracy of beacons. In this case, you have to cut the solution, add fresh and re-rub, which reduces productivity.
It is much easier and faster to arrange beacons using a special rule (Fig. 41). The rule is made from a dry board of the desired length, 35-40 mm thick, 100 mm wide or more. So that the rule does not warp, it is impregnated with hot drying oil or dyed for two times with oil or other waterproof paint. Two bolts 1 with a length of 175 mm or more with a thread at the end of a length of at least 70 mm are inserted into the rule. Bolt head can be any. It is better if it is bent at a right angle (in the form of a hook). This makes it possible to turn the bolt without a key. The bolt diameter can be from 7 to 15 mm. The bolt nut is best applied in a square shape, because it will hold more firmly in the wood. The bolts are fixed at a distance of 500-700 mm from the ends of the rule, drilling holes for a slightly larger diameter than the bolts so that they rotate freely. Nuts are cut from the front side over their entire thickness and are well fixed. The rule is attached to the surface with two clamps or steel crutches 2. If the rule is attached with crutches, wooden wedges are placed between the crutch hook and the rule 3.

Fig. 41. Fastening a special rule for the installation of mortar beacons: 1 - a bolt, 2 - a crutch, 3 - a wedge
The rule is applied to the surface, crutches are driven in, wedges are inserted, and a plumb or level rule is established. The accuracy of the installation rules are achieved by adjusting the bolts 1. While adjusting the bolts, the wedges have to be somewhat removed or hammered. The final rule is fixed by the same wedges 3.
After installation in the corners of the two rules prepare a solution that is applied between the rule and the surface of the wall, thus arranging beacons. As soon as the solution seizes, the rules are removed, and cords are tied along the top and bottom of the arranged beacons. The cords in the right places set the rules for the device intermediate beacons.
To make the rule universal, two identical brackets are attached to it at a distance of one meter. A plumb line is tied to the upper bracket, but so that it does not reach the lower bracket by 10-15 mm at its end. If during the installation of the rule the sharp end of the plumb line is exactly opposite the bracket, then the rule is set correctly.
Wooden lighthouses are installed faster than mortars, however, soaking and drying, they warp. Wooden lighthouses have a large cross-section, for leveling mortar on them and obtaining plaster of the desired thickness, small ones are required.
Wooden lighthouses are installed like this (Fig. 42, a, b). Steel grades are driven into the surface to the thickness of the plaster or mortar grades of the same thickness are made. Lighthouses are attached to the marks and fastened with nails, clips, crutches or frozen with gypsum. Between the lighthouses, a solution is applied, a pulley is applied to the lighthouse and the excess solution is removed at the level of marks. On the walls, pulp leads from the bottom up. Sliding pulley (see. Fig. 42, b) do 120 cm long with two retractable ends, which makes it possible to level the solution between the beacons installed at a distance of from 1.2 to 2 m.

Fig. 42. Installation of wooden lighthouses: a - under a simple pulley, b - under a sliding pulley
Inventory metal lighthouses (Fig. 43) are simple in design, quickly and easily installed. The solution is spread on them by the rule or by a rater.

Fig. 43. Inventory metal lighthouse
Game: Perform tasks and rest cool.6 people play!
Play gameGame: Perform tasks and rest cool.6 people play!
Play game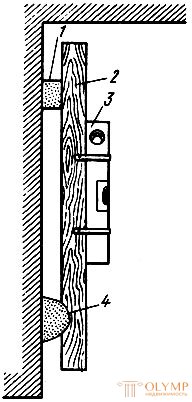
Fig. 44. Устройство маяков из раствора на бетонных поверхностях: 1 - марка, 2 - правило, 3 - уровень, 4 - раствор для устройства марки
После того как правило установлено на марках или клиньях, под него наносят раствор и таким образом устраивают первый маяк. Точно так же устраивают маяк во втором углу стены. Вверху и внизу натягивают шнур, по которому точно устанавливают правило для устройства промежуточных маяков.
Маяки любых видов (растворные, деревянные, металлические) можно располагать не только вертикально по высоте стен, но и горизонтально по длине стен. Для этого нужны два маяка: один вверху - около потолка, другой внизу - около пола. Принцип установки горизонтальных маяков такой же, как и вертикальных.
Оштукатуривание по маякам производят после того, как устроены маяки на всех отделываемых поверхностях.
При нанесении раствора он часто попадает и на сами маяки, которые приходится очищать. С деревянных и металлических маяков раствор снимается легко. На растворных или гипсовых маяках наносимый раствор быстро схватывается, твердеет, и его не всегда удается снять. Если его не снимать, то он прикатывается правилом, увеличивается высота маяка и нарушается точность оштукатуриваемой поверхности. Снять раствор с маяков при легком нажиме на них правила не всегда удается, при сильном нажиме часто срезается раствор или гипс самих маяков и тем самым нарушается их точность.
It is recommended to move the rule along mortar and plaster beacons "to the gloss", i.e., slightly raising the edge of the rule that is ahead. The solution is removed or smoothed by the second edge. You can put a rule on the lighthouses with a plane and with a little pressure to lead it. In this case, the solution from the beacons is well cleaned. One should not lead the rule forward "by sdir", ie, with a sharp edge. In this case, the solution is often cut off from the beacons themselves. It is also possible to clear the beacons with a small scraper or cut-off before leveling the solution.
Раствор наносят обычным способом: сначала один слой обрызга, затем грунт в несколько слоев. Каждый слой грунта разравнивают. Если применяют тонкослойную штукатурку и при обрызге поверхности остаются сгустки, которые выше уровня маяков, то их разравнивают соколом, полутерком, правилом или малкой. Чем ровнее раствор грунта, меньше на нем дефектов, тем тоньше можно наложить накрывочного раствора.
При нанесении раствора машинами его разравнивают по маякам (рис. 45, а, б) правилом, малками или правилами, укрепленными на ручках (рис. 45, в, г), которые дают возможность разравнивать раствор вверху стен и на потолках, стоя на полу.
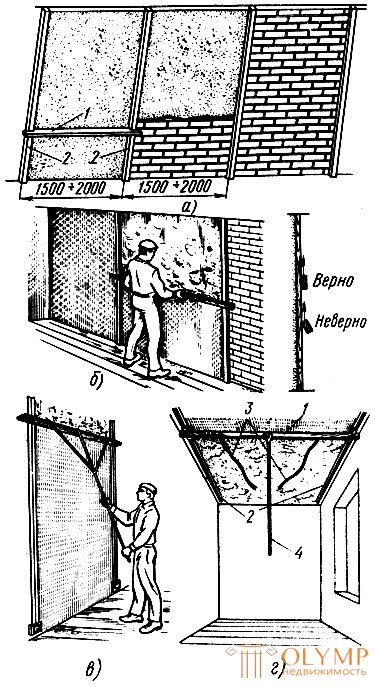
Fig. 45. Разравнивание раствора а, б, в - на стенах по вертикальным маякам соответственно малкой, правилом, правилом на ручке, г - на потолке малкой; 1 - малка, 2 - маяки, 3 - веревка, 4 - ручка
После нанесения и разравнивания грунта деревянные и металлические маяки снимают, места под ними замазывают раствором, разравнивают и притирают его, проверяют поверхность нанесенного раствора правилом, прикладывая его в разных направлениях, и исправляют все неточности, срезая или намазывая раствор. Затем наносят накрывочный раствор, разравнивают его и затирают. Если грунт хорошо выровнен, то на него можно нанести самый тонкий слой накрывки.
Гипсовые маяки вырубают полностью, растворные - полностью или наполовину. Оставшиеся места после вырубки маяков также замазывают раствором, проверяют поверхность грунта, исправляют неточности, накрывают и затирают.
Для устройства лузгов используют ранее установленные маяки (рис. 46). Для этого концы ранее устроенных маяков доводят до потолка (набрасывают раствор и натирают полутерком). К маякам у самого потолка приставляют правила 1и укрепляют его. Затем приготовляют не очень густой раствор и наносят его под правило. Как только раствор схватится, правило снимают, а на поверхности стены и потолка остается ровный горизонтальный маяк 2. На потолке из сборных железобетонных плит лузг получается сразу.

Fig. 46. Устройство лузгов по маякам: 1, 4 - правила, 2 - горизонтальный маяк, 3 - маяк или марка
Game: Perform tasks and rest cool.6 people play!
Play gameGame: Perform tasks and rest cool.6 people play!
Play gameHusk lighthouses are best suited from the same solution that plaster surfaces. After the installation of luzgovyh beacons proceed to plastering, trying not to spread the solution on these beacons.
Что бы оставить комментарий войдите
Комментарии (0)