Thin layer plaster . Thin-layer plaster is applied only on stone, brick, concrete, reinforced concrete, cinder concrete and other stone-like surfaces. On wooden, straw, reed and fiberboard surfaces the thickness of the plaster must be at least 20 mm, regardless of the type of plaster.
When the thickness of the tint is up to 7 mm, a plastic solution is prepared and applied in one layer at a time, carefully leveling it. With a thickness of 10 mm, the solution is applied in two layers: spray and primer. Before applying the solution of the surface is moistened with water. If thin-layer plaster is high-quality, they arrange lighthouses.
Plastering on mesh surfaces . Mesh surfaces prepared for plastering are painted with a creamy cement mortar or cement paste. The staining is repeated two or three times in 4-8 hours with a slight pressure on the brush. Sometimes a creamy solution is performed on the grid with a spatula spray from a falcon. Spray applied in two or three doses in two to three hours after each application. The solution covers the grid with a thin layer, giving it the necessary rigidity, and it stops vibrating. Then plastering lead in the usual way. The solution is more often smeared with the back of the scapula.
Cement mortar is prepared in this sequence. First make up a dry mixture of cement and sand, add fibrous additives there and mix everything thoroughly, then pour the water. Cement-lime mortars are prepared first, as well as cement. After that, the lime dough is diluted with water, stirred and get thick lime milk, which shut the mixture.
After the cells of the grid are smeared or covered with a solution, after a day they start applying the solution in the usual way - by sprinkling or spreading.
If the plastering is carried out according to the beacons, then after the grid cells are closed with the mortar and its setting (one day or later), they start the fixing, making the marks and the beacons, which are used for plastering in the usual way. Lighthouses are best arranged in the same way as on concrete surfaces, using a level rule. Often, lighthouses are arranged like this. First, nails are frozen into the solution, the surface is checked on them and marks are made on the nails to which the rule is attached, and a solution is applied under it. After applying the plaster beacons are cut down, their installation sites are cleaned of gypsum, moistened with water, sprayed and smeared with a solution, which is then leveled. After this, the coating and grouting are performed.
Rust decoration between the floor slabs . Before starting to finish, prepare the seams. They are brushed with a steel brush or cut with a chisel. Then the gap between the plates is filled with tow, compacting it, but so that it does not reach the front surface by 15-20 mm.
The seams between the floor slabs are smeared flush with the slabs with mortar, level it and rub it. To make the sediment cracks between the plates less visible, a small semi-circle is arranged for the solution — rust. This whole process is called finishing rust.
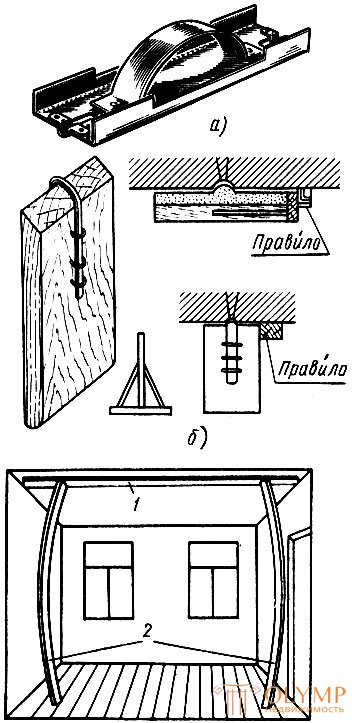
There are two ways to finish rust. The first is that, by the rusting up of a slightly clutched solution, the cut is cut by a rusticate (Fig. 47a). The second way is that the rust is pulled over a fresh, non-set solution, using the simplest template for this purpose (Fig. 47b). It is made from the board of the desired width, cut at an angle of 45 ° on one side.
To make the rusts straight, they are performed according to the rule, which is attached to the ceiling with the help of two or three thin rails 10-15–15 cm longer than the height of the room (Fig. 47, c). Reiki put obliquely on the floor and first they press the ends of the rule, and then an additional rail the middle of the rule. At the same time, the slats slightly bend, spring and firmly press the rule to the ceiling. Rustovka lead by the rule, cutting through the rust. If the rust is not clean enough, it is corrected by a rater. Sometimes a scrub with a lath, nailed to his canvas in the form of rust, is carried out on the rust, after having moistened everything with water. From this the rust becomes cleaner.

Fig. 47. Rusting: a - rusting, b - patterns, c - fixing rules on ceilings with flexible slats; 1 - rule, 2 - rake
The stretching of rust by the template is carried out in several stages, the solution is applied in thin layers. After cutting through the rust or stretching, the rules are removed and the sweep and grouting are performed. Rust should be strictly against the seam or gap between the plates.
Что бы оставить комментарий войдите
Комментарии (0)