Works related to electricity, including the installation / disassembly of outlets, of course, are among those that require a professional approach. Today, the connection of sockets is made in one of the following ways: using a separate line for each place or connecting several points to one source (loop).
The first option requires a large financial cost, in addition, it raises a number of additional difficulties if the installation is carried out with the already completed decoration. However, all this is more than offset by reliability.
When it comes to servicing high-power appliances, it is recommended to use only sockets with a separate line. It should be remembered that the chain formed in a similar way is designed for a certain total load, and in case of non-compliance with the operating conditions, problems may arise at any time.
This article is intended to help those who have decided that connecting the outlets with a cable is the best option for his home.
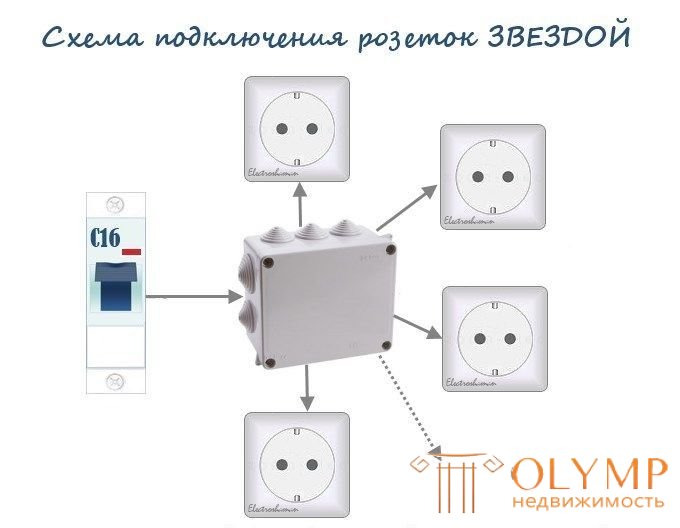
So, connecting the loop is a parallel connection of all elements (in our case, sockets) to one line of electrical wiring. The cable from the power shield goes to the socket, where it is connected to the first outlet, the second is added to the second, the third to the second, and so on.
The disadvantage of this scheme is that if one of the wires is damaged at the point of contact, then at a certain point of the chain, at least all elements going further will stop working. Hence the conclusion: the smaller the outlets included in the system, the more reliable it will be.
Wiring can be hidden in the walls or run along their surface. The open version is simpler and more convenient, however, it does not always look good from an aesthetic point of view. If there is no desire to constantly touch the cable, then it makes sense to put it into small previously made furrows (grooves), then carefully seal them up.
The downside of the hidden wiring is the need to once again "peel" the walls when the need arises to produce any work. Each of the options for laying has its pros and cons, so the choice here is individual.
Currently, there are two basic schemes for arranging electrical wiring in an apartment:

To carry out installation work when connecting sockets, of course, you will need tools. Their set is fairly standard:
Last purchase is not necessary, you can just borrow it or rent it. Still, the tool is not cheap and there is no point in wasting time if there is no special need for it. With all the other inventory problems do not arise exactly.
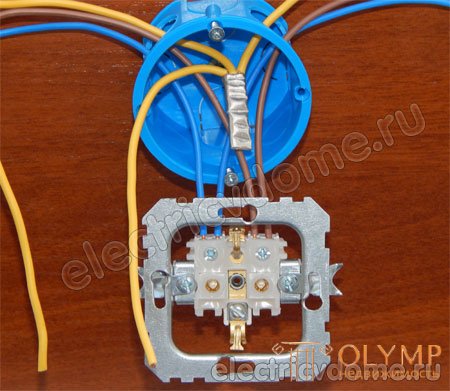
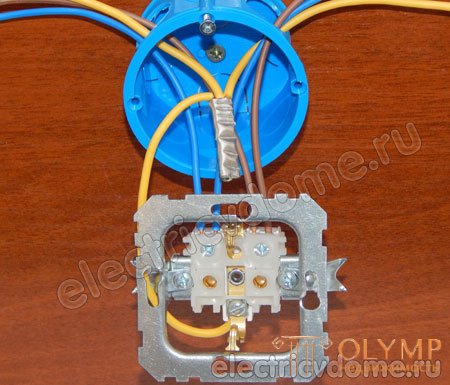
Screws are used to fasten the wall mount to the wall surface. If it is located inside, it will be necessary to make a cavity in the surface. We will consider the standard situation in which only one cable is supplied to the socket from the shield.
It’s not worth worrying about whether all the cables fit in the box already occupied by the socket. The standard 42mm podzetnik calmly accommodates everything you need.
After the plug-in has been installed, it is necessary to prepare a jumper cable. We measure the cable with a margin for each unit, but do not make the jumpers too long. Their length should be such that after connecting the outlet, it can be installed in the socket. I used for jumpers cable of the same brand and section as the power supply.
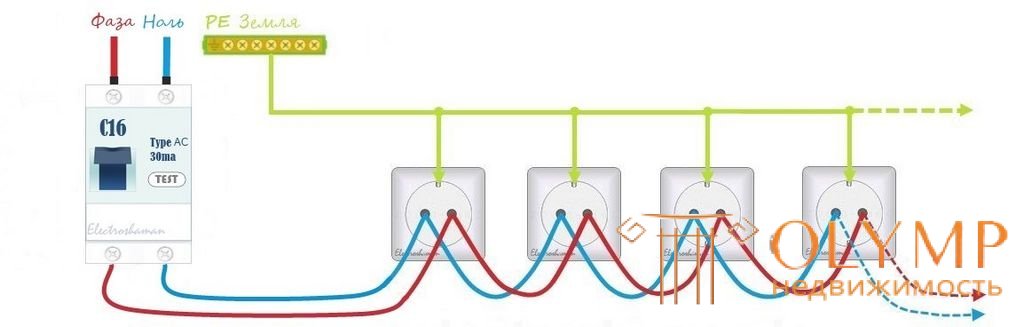
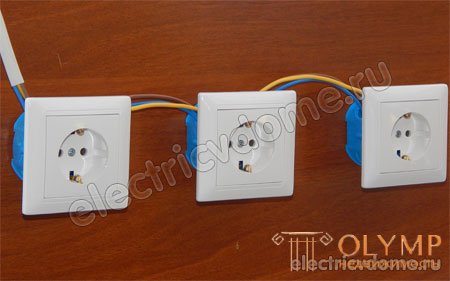
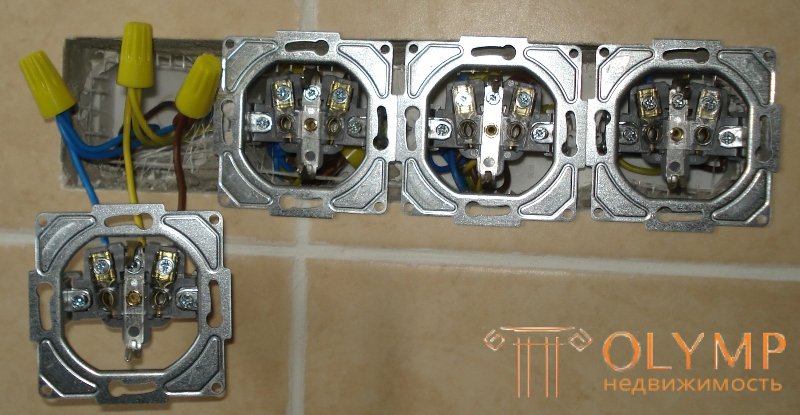
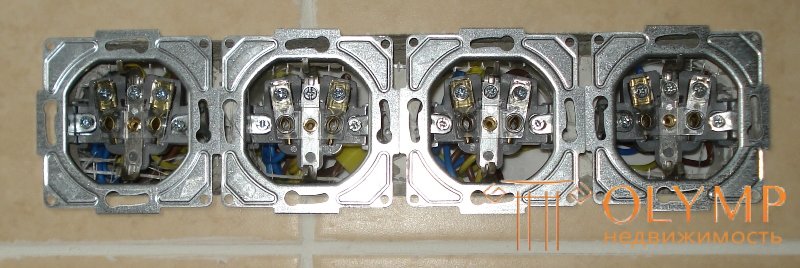
Connection of sockets by a loop provides for the connection of several electrical sockets to the same wiring line. To implement this method, it is necessary to connect the incoming and outgoing cables directly on the contact part of the outlet. All wires: phase, zero, grounding - are connected in parallel.
When the outlet is connected on one side, the cable from the power shield is connected to it, on the other side the wire of the next “loop” is output. In this example, a cable with three conductors is used: the “phases” are brown, the “scratches” are blue, and the “ground” is yellow-green.
In one contact of the socket we connect the phase wire of the power cable and the phase wire of the loop going to the second outlet. In the second contact we connect the neutral wires of the power cable and the loop of the second outlet. Similarly, we perform the connection in the second, third, etc., until we connect all the sockets.
The peculiarity of such a connection is that all the wires are connected directly to the contacts of the outlet. The quality of the connection also depends on the type of contact.
Experts recommend using models with a flat spring contact, which is considered the most reliable. It is more or less tolerable if it is made in the form of a plate pressed by a bolt. Worst of all, when the role of contact is performed simply by a bolt.
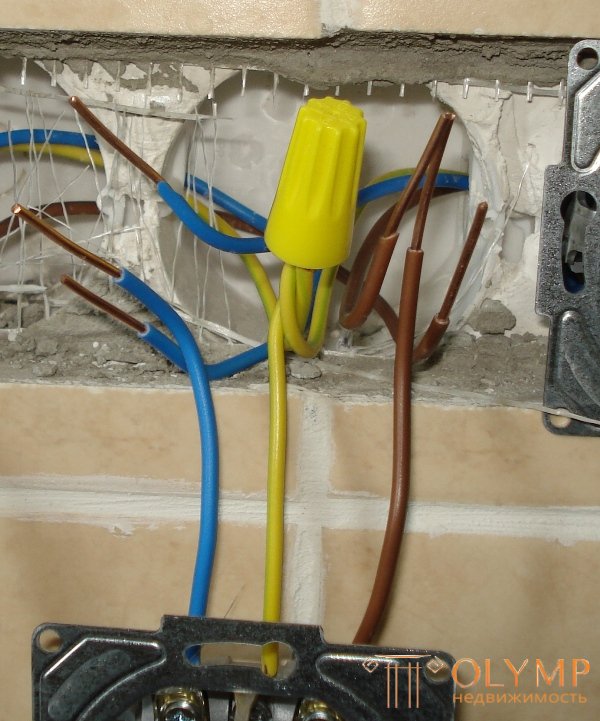
However, in order to comply with electrical safety standards, when connecting sockets with a loop, it is necessary to preserve the continuity of the grounding conductor. To do this, we connect it using a branch, rather than stitching. This method of connection will increase the reliability of the contact and will avoid its ruptures throughout the entire length of the conductor.
The branch of the grounding conductor is made by one of the most tried and true connections - crimping. Thus, after the usual twisting, connecting the wires by the method of crimping the sleeve and insulating, a constant reliable contact is maintained along the entire length of the conductor.
Important note ! Connecting sockets with a loop is permissible only if the integrity of the protective conductor PE is guaranteed. That is, each outlet is connected to the ground network not by stitching, but by a separate branch. |
According to clause 1.7.144 of the rules for electrical installation, to connect the open conductive part of the element to the ground or neutral conductor, a separate branch must be made. Serial connection of protective conductors is not allowed. At the same time, in clause 2.1.26 it is indicated that such branches should be carried out in boxes designed for this purpose, as well as inside the cases of electrical products, which also include sockets.
This scheme of connecting sockets with a cable that does not violate the conductor of the ground, to avoid the load on the terminals. After all, grounding is a protective zero. In order to remain so, it is imperative to ensure its constant and reliable connection throughout the entire line. In no case on the mechanisms of the outlet. Since if the grounding contact is lost (for example, it will blow) in the power outlet, all the rest will lose a protective zero and will have a two-wire power supply system (lose the entire grounding system).
During installation, it is important to carefully ensure that the connection is carried out as accurately and accurately as possible.
Naturally, if the vein is poorly cleaned or defective, then you can expect problems with it in the very near future. If the connection was made in full compliance with the technology, then everything should be fine. The main thing is to ensure that the load does not exceed the permissible norms.
Choosing a method of connecting sockets through a junction box or a cable is, above all, an opportunity to significantly save on the electric cable. However, it is necessary to take into account that each additional “contact” of conductors is an extra “weak” link.
The rated current for which the socket is designed is within 16 A. If one of the sockets in the unit is connected to such a load, nothing will happen to it. But if you turn on such a load in all sockets, the power cable may not withstand the power cable or the machine will turn off, as the total current that is higher than the rated value will flow through them.
Connection of sockets with a loop is suitable for electric receivers of small power. If we are talking about connecting not very powerful devices (audio equipment, computer, etc.) located in the same room, then of course there is no special reason to draw a separate line for each point. The use of a loopback connection is also justified in cases when you need to quickly add one or two additional sockets.
If we take the situation as a whole, it is better to spend more money and effort, but to make each outlet autonomous. It is much more reliable and you will not have to wrestle once again over whether it will be possible to use it for a particular instrument. Moreover, every year the amount of electricity consumed for household needs increases, and consequently, the requirements for reliability of sockets will increase.
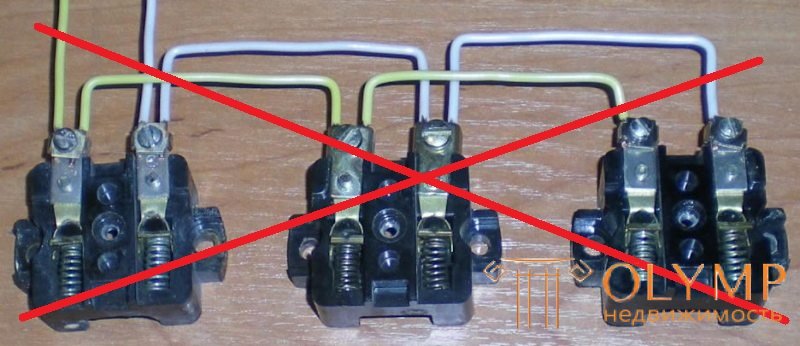
Without experience and knowledge, many electricians simply connect such sockets with a cable, connecting them through the socket contacts (see figure below), the entire load in this case passes through the terminal contact of the first socket, which in the process of work weakens and burns out.
To connect this type of assembly, it is necessary to make an electrical connection in each installation box (socket). It is necessary to begin with the last socket to which the final cable comes, connect three single-wire wires to the socket contacts (phase, zero, ground), install the socket in the installation box (sub-socket), first pull the ends of the cable into the adjacent socket.
In the next sub-terminal and following, you must make three connections with three wires each (phase, zero, ground), as a result, the load current will pass through the connection in the PPE cap, and not through the socket contacts
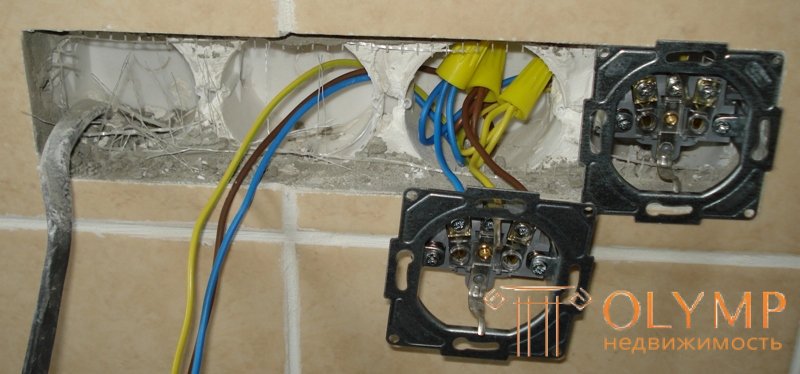
As a result, we get a reliable connection inside the box that allows connecting various household appliances to the power grid
Что бы оставить комментарий войдите
Комментарии (0)