Strengthening loose joints can be simple (reapplying glue to loose joints) and difficult and time consuming (making duplicates of broken parts on a lathe).
The choice of wood glue and its use
An effective adhesive compound consists of five layers: a thin film of glue, two sections (one on each side) impregnated with glue, and adjacent wood into which glue does not penetrate. The weakest of them determines the strength of the clutch. In earlier times, the glue itself was the weakest layer, but modern adhesives are so strong that they can destroy wood.
To make a well-bonded joint, it is necessary to clean the two abutting surfaces of old glue, dirt and finish. If the tree is smooth, it must be roughened, with a knife. If the tree in the process of removing the old glue is moistened, it is necessary to dry it. Give the joint a shape that fits firmly and has no gaps.
In addition, squeeze the compound so that the glue enters the wood fibers. Usually, the joint is dried and assembled before assembly to ensure that the surfaces of the wood fit one another and have sufficient grip. After that, disconnect the compound and apply a thin layer of glue to both adjacent surfaces. Apply a thicker layer of glue to the end structure than to the side structure, which has less adsorbing properties. Reassemble the compound, squeeze and wipe it - first with a wet, then dry cloth. Immediately check the correct positioning of the joint surfaces.
The choice of glue depends on the type of furniture, the place of its application. Professionals sometimes disagree on which adhesives are best for joinery work on furniture. The following are the most popular types of glue.
The main types of glue used in the repair of furniture
Polyvinyl acetate (PVA). A good general purpose adhesive for basic types of room furniture. It is used in finished form; seizes in 30 minutes after compression; however, it takes two days to reach full grip strength. Apply this glue to both glued surfaces. PVA badly resists moisture, so it does not need to be used for bonding outdoor furniture.
Aliphatic resin. This glue is an advanced version of PVA. It is stronger, more moisture resistant, more viscous and less fluid. However, it dries faster than PVA and therefore requires faster compression. The clamps can be removed after 30 minutes, but the joint must remain stationary until the full adhesive force of the adhesive is reached (this usually occurs within 18 hours). Yellow glue is used to fill gaps and bond poorly fitted connections.
Animated (animal) glue. It is obtained from the skin of animals, nerve tissue or bones. From the time of Egypt until 1900, it was the only glue for furniture. As the restorers of antiques declare, this glue is reversible: steam and sunlight destroy its sticky properties, as a result of which the compound is separated. In addition, there is enough time - almost 20 minutes to squeeze the glue, until it starts to set. However, it can be applied only at a temperature of about 20 ° C; it hardens at temperatures below 10 ° C and thinner at temperatures above 33 ° C. Compounds collected by animal glue should remain compressed for 6-12 hours. It can not be used in the repair of outdoor furniture.
Plastic resin glue ( urea formaldehyde ). Very strong glue used in compounds subject to unusual impacts. It is produced in the form of a powder that must be diluted with water; however, after it dries, the glue becomes extremely moisture resistant. Apply it at temperatures above 20 ° C. It begins to set in 5–15 minutes, and after compression should remain under constant pressure for 5–12 hours (depending on the ambient temperature).
Resorcin glue . It is sold in a ready-made (mixed) form, but it can be prepared by mixing powder with a liquid catalyst. This is a very strong adhesive, it has a high heat and moisture resistance: it is used even in the construction of boats. This is the best glue for repairing outdoor wooden furniture. Apply it at room temperature and leave in a compressed position from 10 to 12 hours.
There are a large number of other synthetic adhesives used in woodworking. New types of glue are constantly appearing, but furniture repair professionals more often use the above-mentioned adhesives. Epoxy adhesives are known (there are various types, including those that harden very quickly), they act on chemical principles, forming a strong bond between pieces of wood, as well as between non-porous materials like metal or glass. Epoxy glue has a high adhesive force, but is expensive. In the repair of furniture used some less expensive adhesives with similar properties. Contact adhesives seize the fastest. Their disadvantage is that they do not give time for corrections after being applied to the joints.
EXAMPLE: Repair of a shaky table
Of particular concern are the connections on the upper parts of the legs. Being under great pressure, they can weaken and even fall off. Often there are problems associated with folding boards, which sag, and retractable extension mechanisms that jam or break. Many faults can be easily fixed.
Most of the tables, intended for private use, consists of a table top, attached to the frame and representing a rectangular base of narrow horizontal straps, tightly connected to the upper sides of the legs. In some cases, the frame is connected to the upper part, and the legs are bolted to the frame. In the tables of a simpler design, the legs are attached directly to the lower side of the upper part. Such compounds are held together in various ways: with glue, which can lose strength; spikes and dowels that can break; plates, screws or bolts that may loosen. Glue ligaments, which have lost their grip, can be easily restored by applying a new layer of glue. However, in order to repair more serious gaps between components, it may be necessary to disconnect the joints and then replace the broken parts. To complete the repair and make it better, you can strengthen the connection with metal corner plates or wooden locks.
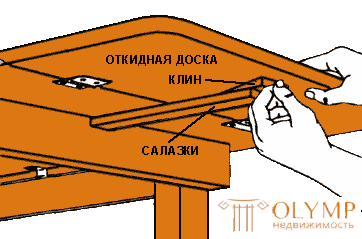
For the repair of tables with moving parts require other measures. The damaged mechanism of the sliding table can be repaired by cleaning and lubricating its sliding parts; if they are broken, bent or lost, they will need to be replaced. The easiest way to repair a bending folding board is to knock it down and glue this wedge to its underside.
Good to have a glue injector. With it, you can enter glue into hidden places. Clamps are also an important tool. To close the cracks you will need G-clamps (clamps), and to maintain the same pressure on the glued joints - “frame-leg” - encircling clips. Using clamps, place thin pieces of cork or soft wood under their grips to avoid damage to the surface of the clamped element. To close the glued sections, apply the minimum necessary effort, because excessive pressure can cause all the glue to squeeze out, the connection will remain weak, dry.
If you need to reinforce the part with a butt joint, you will need a key clamp (to direct the drill) and metal key centers. These tools provide precise placement and alignment of key holes. Tabs with special grooves that make adhesive ligaments more durable are also useful.
How to get to the damaged area
Unplug countertops . To gain access to the damaged joint, turn the table over and place it on a folded cloth or on a rug. Remove the countertop. If it is attached with metal squeezing plates inserted into the groove on the frame's trim, remove the screws and these plates and detach the table top. If it is attached with screws or bolts to the frame or corner blocks, remove these fasteners. In case the repair requires disassembling of the connections, you can use the following methods.
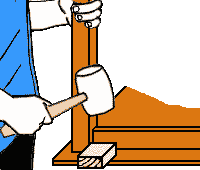
Label each part of the table for assembly. Break the glue bond that holds the pieces. To protect the striking area, use a wood or cork block; Raise this area a little.
 |  |
| Using a mallet to loosen joints | Leverage system for disconnecting connections |
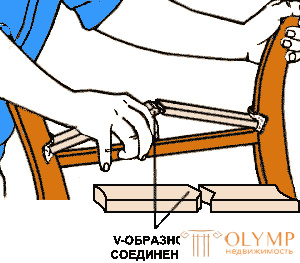
Separate the parts of the table, first separating the assembly element legs from the tabletop, use a system of levers. To do this, cut two wooden bars with a total length slightly larger than the distance between the parts to be divided. Cover one end of each bar with a cup. Trim the other ends in the shape of a letter V and an inverted letter V to connect these bars. Position the lever so that its outer ends are as close as possible to the connections that need to be opened; Place the cork pads between these ends and the table. Press down with hand, straightening the connection in the middle of the lever. To apply force to the short joints of the parts to be divided, make another two-part lever, or apply a reactive clamp.
Frame-Leg Compound Analysis
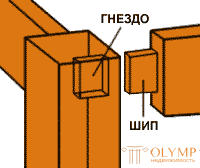
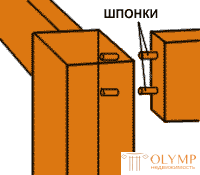
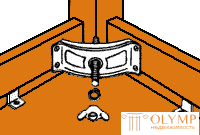
Three types of connections. The most typical joint is the “nest-spike” connection, in which the spike on the frame is glued into the socket on the leg. Possible damage with such a connection - splitting the socket or splitting the spike.
Typical is such a butt-joint, which is usually reinforced by keys, glued into the corresponding holes in each of the two elements. If the keys are broken, drill them out and replace or make a new connection. Butt joints with keys (or without them) are sometimes even more reinforced with a corner plate or a lock.
 |  |  |
| Spike Nest Connection | Butt joint | Screw connection |
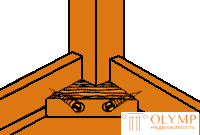
If the legs are attached to the frame with bevelled joints, the frame is covered with glue and fastened with screws to the outside of each leg. The heads of the screws are installed below the surface of the frame in the holes drilled in the opposite direction and filled with plastic bushings. If the screws fall out of the leg, pull or drill the bushings out of the frame, remove the screws, re-seal the connection and use new screws of the same length, but with a diameter one order more. You may need to enlarge the upper parts of the holes drilled in the opposite direction for the heads of the screws, but do not re-drill the lower parts that are commensurate with the thread of the screws.
How to close the crack at the top of the table leg
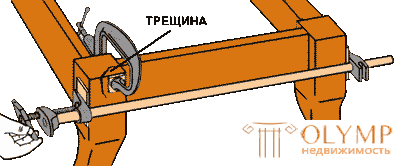
Pasting of the cracked nest . If a crack has formed around the nest in the upper part of the leg, inject glue into the crack, as well as into the hair hole between the nest and the spike. Crush the connection with two clips. First install the G-clamp onto the top of the leg to close the crack; then put a tubular or shingles clamp, stretching it from the outside of one leg to the outside of the other to keep the spike in the socket. Let the glue dry overnight; then remove the clips.
 | Pasting of the cracked nest |
Repair with a broken spike
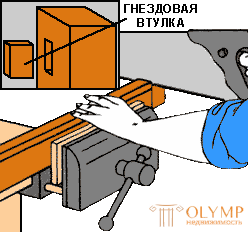
1. Preparing to attach the keys. If the spike is badly cracked or broken, redo this connection into a butt joint with the keys; first trim the spike and fill the nest. Cut the spike on the same level with the detail with a finely serrated saw; even better with a tenon saw. Clean the nest from glue and pieces of a broken spike with a chisel; Mark and cut a wooden sleeve the same size as the socket. Cover this sleeve with glue and hammer it into the socket. When the glue is dry, saw off and trim all pieces of wood protruding from the nest.
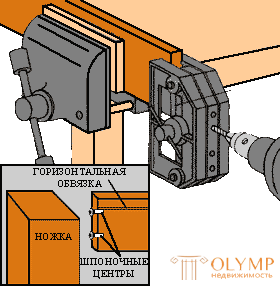
2. Drilling and aligning the key holes. Draw two lines across the end of the horizontal strapping about one third of the distance from the top and bottom. Place a key clamp in one line and drill a hole in the harness with a diameter of 8 mm and a depth of 30 mm. Repeat these steps on the other line.
 |  |
| Repair with a broken spike. Preparing to fasten the keys | Repair with a broken spike. Drilling and aligning key holes |
Insert the keyed centers into the drilled holes, carefully align the strapping on the upper part of the leg, knock on the other end of the strapping with a rubber hammer, applying sufficient force to drive the tips of the keyed centers into the leg and leave marks. Use these marks to install the clamping fixture and drill two holes in the leg with a diameter of 8 mm and a depth of 30 mm.
Apply a thin layer of glue to the end of the horizontal trim and to the two keys 8 mm, each of which has a length of 55 mm. Beat the keys into the holes on the harness with a rubber hammer, insert them into the holes on the leg and nail the harness to the installation site. While the glue dries, squeeze the connection with the girdle clamp.
Corner mount
Attach a metal corner plate (fig. Bottom left) to the leg and, holding in place against the frame, attach one screw on each side. Drill a guide hole in the stem through the central hole in the plate. Remove the screws holding the plate and the plate itself. Screw the bolt into the leg, clasping it in the center with pliers and turning it until all the thread at the end of the bolt enters the leg. Put the plate back in place by inserting all end screws to attach the plate to the frame. Install the washer and wing nut on the screw bolt, tighten it.
 |  |
| Fixing the angle with a metal plate | Fastening the corner with a wooden corner bracket |
To attach a wooden corner bracket (fig. Bottom right), cut a triangular bar out of hard wood (so that its structure goes from the harness to the harness) and cut it so that it joins with the leg. Attach the bar to the frame with two screws N 8, screwed through the bar into the leg perpendicular to the frame - one screw on each side of the leg.
Leveling the folding board, putting up a sliding table
Jamming flap . To align the hanging flap, mark the farthest point at which the support rails or table leg touch the underside of the board; scrape off the old glue and trim and attach the tapered wedge to the board. Cut a wedge from a piece of hardwood, apply glue to its upper side and push it between the sled and the board, correcting it until the board is level. Place a load on top of the board until the glue dries.
 |  |
| Flap pinch | Restoration of the sliding table |
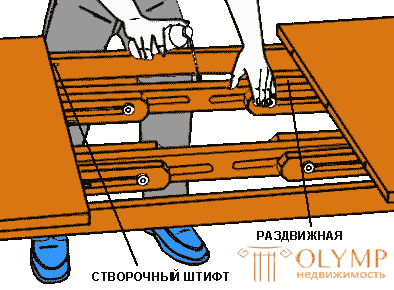
Restoration of the sliding table . To glue the sliding table with jammed wooden straps, unfold it to full stretch and scrape off the deposits and hardened grease from the inside of the strapping with a chisel. Apply fresh lubricant to all available moving parts using silicone spray and wax.
If there are metal straps in the sliding table, clean the sliding parts with a pointed key or wand. Then sprinkle them with powdered graphite. If the wooden sash pin is broken on the edge of the sliding board, drill a bit and replace it with a hardwood key. Glue one end of the key into the cleaned hole and sharpen the other end so that it freely enters the sash hole, grinding it to round off the ends and reduce the size.
Что бы оставить комментарий войдите
Комментарии (0)