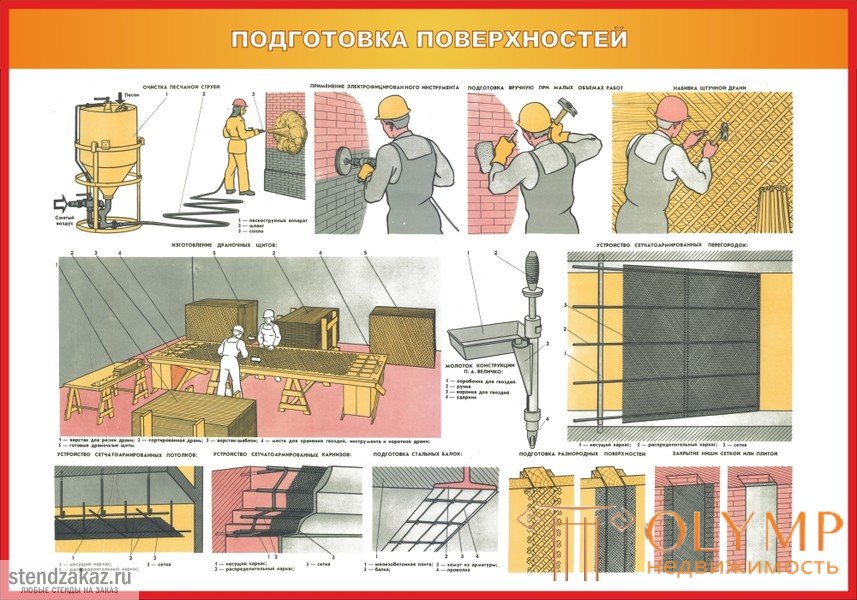
General requirements. One of the most important factors determining the quality of plaster is its strong adhesion to the surface on which it is applied. With insufficient adhesion, the plaster peels off the surface, and then disappears. To ensure good adhesion of the solution to the surface, it is prepared, i.e., it is roughened, cleaned of dust and other contaminants.
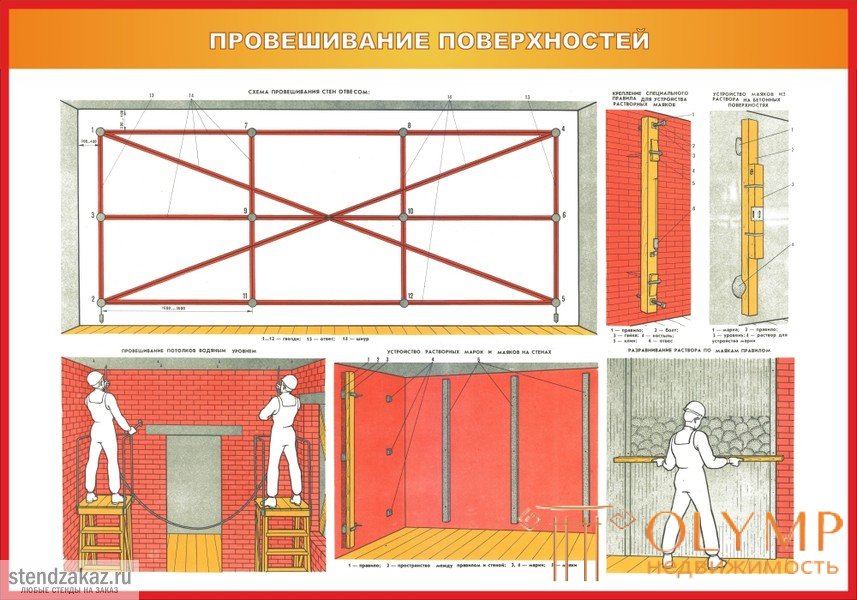
Prior to surface preparation, check the verticality and horizontal structure, as well as the strength of their installation. If during the verification process it turns out that the deviations exceed the norms given in SNiP III-21-73, eliminate the defects. The permissible deviations of the corners of the masonry from the vertical to one floor of the brick walls should be no more than 10 mm, and not exceed 30 mm to the entire height of the building. Irregularities on vertical surfaces intended for plastering are allowed for brick walls up to 10 mm. Deviation of the masonry rows from the horizontal per 10 m of the wall length is allowed up to 20 mm. For concrete and reinforced concrete surfaces, deviations from the horizontal are permissible for 1 m length up to 5 mm, and for the whole plane no more than 10 mm. For wooden walls of frame buildings, deviations in all directions are allowed no more than 10 mm, for shield panels 5 mm. For plank partitions and walls, deviations per 1 m of height not exceeding 3 mm are allowed, and no more than 10 mm in length.
After preparing the horizontal surfaces (ceilings, beams), the scaffolds installed for this work are not removed; They are used in the future during plastering. The floorings on the scaffolding and the floors beneath them sweep so that the mortar falling during the plastering process is not contaminated and can be used again without sieving.
Stone, brick, concrete, slag concrete, wood, solomite, reed, mud surfaces prepare for plastering in different ways. The complexity of surface preparation depends on the degree of its hardness. Gypsum, slag concrete, brick surfaces are the easiest to handle, and concrete is very difficult to process.
Stone-like surfaces . Walls of rubble stone prepared as follows. The masonry seams, if they are filled with a flush mortar, are chosen to a depth of at least 15 mm, and the masonry surfaces are cleaned with steel brushes.
If, during the laying process, pieces of wire are inserted into the seams, wire weaving is done in order to better bond the plaster with the base. If wooden stitches (corks) 15 mm thick, 100-150 mm long, are embedded in the stitches of the masonry, nails are driven into these stitches, and wire weaving is also made into them. Instead of a wire, you can attach a grid with holes of any cross section.
Brick walls , folded into the wasteland and having sufficient roughness, are cleaned with a metal brush and watered before plastering. If the seams of the brickwork are completely filled with mortar, they are chosen to a depth of at least 10 mm.
Slag-concrete surfaces poorly adhere to plaster, therefore, in the manufacture of slag-concrete products, grooves are made on their surface. When plastering they get a solution that firmly holds the plastering layer.
If no furrows are made on the surface, the surface is cleaned with a steel brush, cut with an ax or chisel, and holes are drilled through the notched and cleaned surfaces — sockets with a depth of 20 mm and a diameter of 10-12 mm. Nests are placed at a distance of 50-70 mm from each other in a checkerboard pattern. Mortar is held in these holes, and the plaster adheres well to the surface.
Partitions made of plaster or gypsum concrete slabs are brushed with steel brushes. The partitions that have been left unplastered for more than a year are cut, treated with steel brushes, then cleaned of dust and pieces of gypsum and washed with water. Oils, paints, resins and other similar materials are removed from the surface, since even with small residues of these materials stains appear on the plaster.
For the processing of stone, brick and concrete surfaces used hand and electric tools. For example, electric (pic. 15) and pneumatic breakers serve as notches and hauling seams. To improve performance, an electric hammer is inserted into a bush or a gear. Pneumatic and electric tools, such as electric grinders and electric drills, are used to clean surfaces from irregularities, sagging, projections. To do this, in the electric drill chuck, instead of the drill, fix the disc with steel brushes. Successfully perform this work and troweling machine, to which, instead of graters attach steel brush.
Work with an appropriate instruction is allowed to work with an electrified instrument.

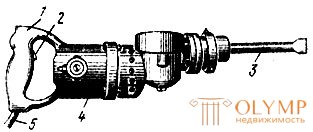
Fig. 15. Electric jackhammer: 1 - handle, 2 - switch, 3 - gear, 4 - body, 5 - electric wire
Large surfaces are cleaned with a sandblaster (Fig. 16), which works as follows. Dry sifted sand of medium size (1-3 mm) is poured into the cylinder 2 of the apparatus through the hopper 1. Wet sand cannot be used for the sandblaster, since plugs are formed which block the hoses. Under pressure of compressed air, sand from the conical part 3 of the cylinder is fed to the nozzle 4, and from there to the rubber hose, at the end of which a mouthpiece-nozzle with two tubes is arranged. A hose for supplying sand is supplied to one of the tubes, to the other - compressed air from a compressor. The sand is picked up by a stream of compressed air and is ejected from the nozzle to the surface with force. A stream of sand, directed at an angle to the surface, hits it and cleans dust, dirt, paint, resin and at the same time gives it a roughness.
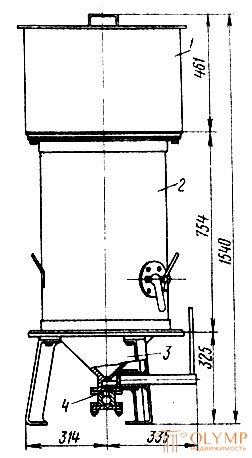
Fig. 16. Sand blasting unit: 1 - feed hopper, 2 - cylinder, 3 - conical part, 4 - nozzle
During operation, the sandblaster should wear a cloth cover with a respirator and goggles on his head. Place of work protect.
Wooden surfaces . When preparing the surfaces of the board with a width of more than 10 cm, they puncture and wedges into the holes, so as to form gaps 5-12 mm wide. Wider boards can not be used, as they warp. To get rough surfaces, stuff is stuffed on the boards (Fig. 17, a). In order to reduce the thermal conductivity and sound conductivity of wooden partitions, walls and ceilings, they are put on a mat, sackcloth, felt before they are stuffed with a jerk. With these materials, the mortar adheres well, and the boards get wet less and do not warp, which largely keeps the plaster from cracking.
The felt is pre-antiseptic with 3% sodium fluoride solution and then dried. The prepared material is applied to the wall so that one end touches the floor, and is nailed to the bottom with nails, then it is straightened and tensioned to the top so that there are no folds, and along the edge it is also nailed. Panels of thin materials (mat, burlap) impose overlap, thick butt and nailed. Nails are hammered only half their length, and the remaining half is bent.
Slightly felted felt, which is easily torn, is pre-rolled onto a round wooden rod or metal pipe. As nailing, the roll of felt is rolled upwards, pressing against the surface. It is more convenient to work together: one worker rolls and pulls on the material, another nails.
Soft felt closed with glass mat. If this is not done, the gaps between the surface and the output tear will be filled with felt, which will make the bond with the drag even worse. In addition, the felt, pressed against it, is squeezed out of the cells in the form of pads, over which the plaster is easily pressed.
Dran is a piece and shield. Piece dran apply at insignificant amounts of work.
Depending on the method of manufacturing, the trane is plucked and sawn. A pinch dran is an ordinary, selective and veneer. The width of the ordinary drani 12-30, thickness 2-5 mm; width of selected drani 15-25, thickness 3-4 mm; width of shponovy drani 14-30, thickness 2-5 mm. Sawn sawdust is made from wood waste. Such a drang is worse than a pinch, because she has shear year layers. The width of the splint is 25-40, the thickness is 5-7 mm. The length of all types of cutting is 1000-2500 mm. Dran should be multi-layered. There should be no rot, mold, short drains in the ground. It is packaged in bundles of 50-100 pcs.
Prior to the beginning of the packing or weaving of the shields, the sorts of dran are sorted into a prostyle (for packing the lower, progest rows) and an output (for the stuffing of the upper, exit rows). For the lower prostyle rows, use a curve and a narrow tear of at least 3 mm thickness. Between the outlet and the surface, voids are created, under which the applied solution falls and firmly adheres to the filled outlet dust (Fig. 17, b, c). With a thinner drani clutch solution with the surface is insufficient. For the output row, a straight, even, thick (no more than 5 mm) cut of 15–20 mm wide is selected, since the cut of 10 mm is already pricked when the nails are driven into it, and it is wider than 20 mm.
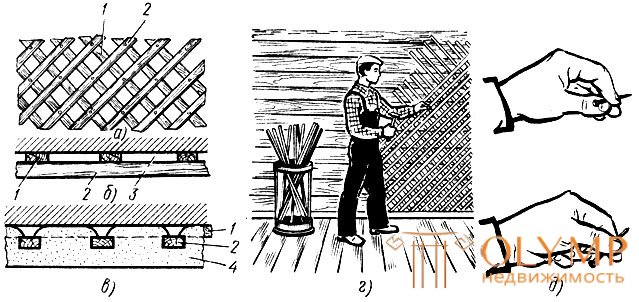
Fig. 17. Preparation of wooden surfaces: a, b-stuffed dran, v - dran with plaster, g - drani packing, g - nail grip; 1 - a proprietary dran, 2 - an exit dry, 3 - a gap between the exit drag and the surface, 4 - plaster
If all the walls, partitions and ceilings are wooden, then they start packing from the bottom of the walls. Reaching the top, go to the stuffing jib on the ceiling. The rows of the room and exit fragments are arranged at an angle of 90 ° to one another, and in relation to the floor - at an angle of 45 °. The arrangement of the blade at an angle of 45 ° with respect to the boards additionally fastens them and gives them rigidity. According to the SNiP, it is necessary to maintain a distance of 45 mm between the laundry and outlet rows in order to form cells in the light of 45 x 45 mm.
When stuffing dranche, it is only baited in the middle with one mounting nail or at the edges with two nails. They slaughter them lightly so that they can only keep the dran.
Having filled one or two rows of the spacious fracings in height on the walls and fully on the ceilings, they start packing the final fracings. First, each output dranit is completely nailed with two nails only at the ends. One of the nails is hammered straight, and the second with a stretch at an angle of 45 °, directing the tip of the nail towards the end of the digging. This nail stretches tightly. Then they hammer in intermediate nails: on the walls through two prostylny drains into the third, and on the ceilings - through one.
The ends of the stackable drains are not jointed, but with a gap of 2-3 mm. Butt joining without a gap when wetted causes warping of the ends of the splitting and swelling, which causes the plaster to rupture.
On the ceiling, stuff is stuffed the same way as on the walls. First, the whole ceiling is filled with a room dran, and then the output. The output drang is placed near the seating room at an angle of 90 °.
When stuffing drani at the bottom of the wall stocks put it on the floor or placed against the wall. When the dran is nailed at chest level, the tuft of drains is placed in a stand (fig. 17, d), which is recommended to be used when stuffing drani on ceilings.
Dranica pressed to the surface with his left hand, in which the fingers are clamped nails. Putting a nail to the jaws, a light blow is struck on it with a hammer in order to hold the nail. Then the hand is removed and a stronger blow is struck on the nail and completely clogged it. Stuffing the output dran, consistently remove the mounting nails from the stool cutting and use them again. The ends of the output splitting must necessarily be nailed, since, when moistened, they will warp and tear off the plaster.
During work, plastering nails are poured into the left pocket of workwear and taken from it at once in several pieces, clamping them with three fingers (Fig. 17, e).
It is necessary to hammer in nails quickly, from two blows, inserting them only in the center of the sponge.
Dane shields are made on a workbench-template (Fig. 18). Workbench-template 5 is a table with a width of 0.7 and a length of 3.2 m. At the edges of the workbench, square bosses are nailed between which the ends of the drains are laid, laid at an angle of 90 °. On the edge of the workbench at the intersection of drains there are holes with a diameter of 30 mm.
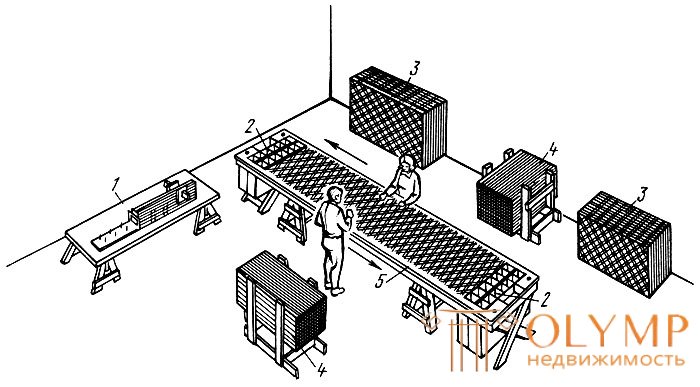
Fig. 18. The manufacture of grating boards according to the method of P. A. Velichko: 1 - a workbench for cutting drani, 2 - places for storing nails, tools and a short cut, 3 - ready-made draining boards, 4 - sorted dran, 5 - workbench-template
Boards 3 are made of ordinary Drani, sorted into the prostyle and the output. Part of the cut is cut into pieces, which are laid on the corners of the shields.
At the workbench have at first a prostyle row, then a holiday. Drang slightly knocked down with plaster nails so that their ends extend to the outside by 4-5 mm. Nails hammer hammer design P. A. Velichko (Fig. 19). Drummer 4 hammer can be adjusted and hammer nails to the desired depth. Nails drive through one or two intersections of drains.
Shields are prepared by two workers who are on both sides of the workbench. The manufactured shield is removed, compressed to 1 -1.2 m and placed in stacks.
The boards are nailed to the vertical surface so that the drains are directed at an angle of 45 ° to the floor. If the partition boards are installed with a slope, then the shields should be placed straight, i.e. the drains should be directed vertically.
Shields nailed in this sequence. A pre-stretched shield is attached to the surface and nailed, ayut those nails that were hammered into it during assembly. Piecework or shields are fastened with plaster nails 25, 30 or 40 mm long. Shields are attached to vertical surfaces through two crossings of drains, to horizontal surfaces through one intersection. Unfortified ends of drains are nailed additionally.
Fiber, reed and solomite surfaces . Fiber, reed and straw boards have a rough surface that adheres firmly to the plaster. The frame between the slabs (pillars, pillars, girders) is prepared for plastering: it is filled with dran, or nails are hammered and braided with wire or tightened with a grid. Wire and mesh should overlap the seam between racks and plates by 40-50 mm. In order to avoid warping and buckling, the ends of the inserted drani must not find more than 10-20 mm on the plates.
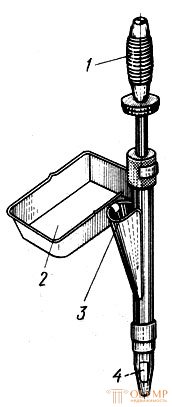
Fig. 19. Hammer design P. A. Velichko: 1 - handle, 2 - a box for nails, 3 - a funnel for nails, 4 - drummer
For wire weaving, nails 75-80 mm long through 40-70 mm are driven into racks. Drang or willow rods are placed under the net and fastened with nails so that the net does not fall close to the tree. In places where there will be thick plaster (over 25 mm), traction and eaves hammer in nails and braid them with wire or strengthen metal mesh.
Nails are driven into the surface so that their caps are sunk into the plaster to a depth of 15-20 mm. This protects the plaster from rust. Nails are hammered by placing them in square or staggered order at a distance of 100 mm from one another; they must be twice as long as the thickness of the plastering gauge.
Nails should not pass through in the walls of the saw. Nails are knocked over with soft wire 1.5-2 mm thick. For convenience, the wire is pre-wound into a ball. While working, the ball is held with the left hand, and the right one is taut with wire and twisted around the nails 1-2 times around the cap.

Что бы оставить комментарий войдите
Комментарии (0)