Metal mesh . When preparing the surface for thick layers of plaster, metal mesh with cells no larger than 40 x 40 mm or nails are stuffed onto it, and then they are braided with wire.
The mesh is attached to the surface so that a layer of plaster is formed at least 20-25 mm above it. To do this, under it enclose wooden slats, prostvennuyu Dran not less than 3 mm thick, willow rods 5-6 mm thick, wooden slats of the same thickness or reinforcing wire of a corresponding thickness.
They are stuffed 40-50 mm apart in any direction.
The mesh is cut into pieces of the required size, nailed first from one end, then taut and nailed from the other end, and then nailed to the middle, placing the nails in square or in chessboard order up to 100 mm from each other. Nails apply thin 50-70 mm long. They are hammered into three-quarters of the length, the rest of them are bent, tightly pressing the grid to the surface.
To prevent the grid from rusting when plastering it with lime-gypsum mortar, it is painted with cement milk, oil, enamel nitrokraski, asphalt or coal lacquer. Cement milk is painted with a tensioned mesh, you can coat the mesh with paints and varnishes before installing it in place. The mesh can be pulled in any direction.
All work with the grid workers must perform in gloves.
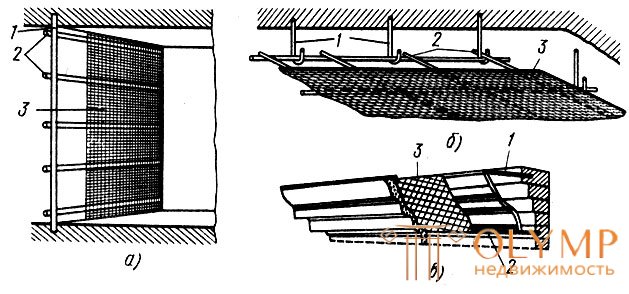
Mesh reinforced constructions . Mesh-reinforced structures (Fig. 20) are used to construct suspended ceilings, thin reinforced concrete partitions, cornices, corbels, and socles. Mesh-reinforced constructions are varied in shape, lightweight, and a little material is consumed on them. For the construction of such structures, reinforcing wire of various sections and a grid with cells up to 10 x 10 mm are used. Through the grid, the plaster slips less, which contributes to a more rapid formation of the plaster layer.

Fig. 20. Mesh-reinforced structures: a - partitions, b - ceiling, c - cornice; 1 - bearing frame, 2 - frame, 3 - grid
Mesh tensioned on the frame of reinforcing steel. The frame is divided into carrier and distribution. Bearing frame 1 holds the weight of the plastered structure (ceiling, eave, beams), and the distribution frame 2 only supports the grid frame so that it lies tightly and does not sag. Sagging in some places increases the thickness of the plastering of the entire plastered surface. The distribution frame and the shape of a future structure, for example, a cornice, are attached to the supporting frame. If the frame does not give the exact form, it is necessary to increase the thickness of the bent.
The ends of the supporting frame in the walls and ceilings are fixed, for which they drill with an electric drill or bolt through holes, into which they insert the ends of the frame and fix with metal wedges. If the device of mesh-reinforced structures is provided for by the project, then the ends of the reinforcing wire are inserted into the walls and ceiling in advance, the hooks are folded on it, for which the supporting frame is subsequently attached.
When arranging a suspended ceiling, the ends are bent with hooks and reinforce the supporting reinforcement, and the distribution armature is tied onto it, tying it with several turns of soft wire or welding. So that the frame does not swing, the ends of the distribution armature are fixed in the walls. Arranging from the reinforcement frame, cut the grid into the canvas, which is attached to the frame. First, tie one end of the web with a wire, then stretch and tie the other end. After that, an intermediate fixing of the mesh to the frame is performed. Nodes are staggered at a distance of 100-150 mm. For the first canvas attached second, followed by the third, and so on.
When the device eaves, reinforced with a grid, first bend in shape the supporting frame, arrange holes under it, insert the ends of the supporting frame into the holes and fix it with wedges. After fixing the distribution frame, the grid is cut, applied to the main frame, tight and tied.
Joints of heterogeneous surfaces . When the plaster dries on the abutting surfaces made of different materials, such as concrete and wood, cracks are formed. This happens because the plaster applied to dissimilar materials dries out at different times. To avoid cracks, the joints are tightened with a grid with cells from 10 x 10 to 30 x 30 mm.
The mesh is cut with scissors into strips of different widths, but so that they go on both sides of the junction not less than 40-50 mm. When cutting the mesh, hands should be held above its edges in order to protect them from damage. The woven mesh is unwound, for which one hook of the wire is unbendable, grasped with tongs and pulled out. Woven mesh can be cut only in width.
Precast concrete slabs . Prefabricated reinforced concrete slabs have a smooth surface, but they have nodules, bumps. They are cut down or ground with an emery wheel. The edges of the plates in the place of their junction form grooves, which penetrate, having immersed in them tow dipped in gypsum dough, or other materials to a depth of at least 15-20 mm.
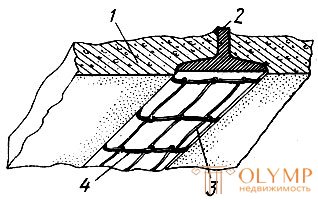
Steel beams (fig. 21) are wrapped or braided with wire or tightened with a grid before laying. If this work is not done before laying the beams, then it can be done after. The distance between the turns of the wire do not more than 50 mm.

Fig. 21. Preparation of steel beams for plastering: 1 - reinforced concrete slab, 2 - beam, 3 - wire. 4 - rebar clamp
When the lower part of the beam, the shelf, is plastered, then 2-3 bars of 4-5 mm thick are placed under the wire or mesh to form a gap. In cases where a wooden roll is laid on the lower shelf of the beam, and the shelf must be plastered, nails are hammered at the edges of the beam, braid them with wire or tension the net. To form a gap at the bottom of the shelf, two or three bars of reinforcement wire are also attached.
When the wooden reel is laid flush with the bottom shelf, it is recommended to close the prosthetic and exit rows when packing the grating. Dran nails at the very edge of the beam. Sometimes the shelf of a metal beam is covered with insulating materials: first with felt, then we ply it - and after that they strike dran.
If the metal beam is placed overlaid from precast concrete slabs and only one shelf is plastered, then nails are hammered in the gaps between the shelf and the laid plates, they are braided with wire or the shelf is welded with pieces of reinforcement.
Before laying reinforced concrete slabs 1 for a shelf of the beam 2, it is recommended to hook metal clamps 4 from reinforcing wire and squeeze their ends with hammer blows. Then the clamps are pushed along the beam at a distance of 100-150 mm from one another and braided with wire 3 or tie a grid to them.
Channels . Heating pipes, electrical wiring, ventilation are installed in furrows and channels. After installation, the furrows and channels are closed with plaster or concrete slabs or tightened with strips of mesh that are 100-150 mm wider than the groove or channel. The mesh is tensioned along a channel or groove and nailed to the edges of the masonry along the edges.
In concrete surfaces, channels and grooves are recommended to be embedded with plates. The plates are cut to size, set on a plaster test (freeze) and plastered.
While working with percussion instruments, pieces of brick, concrete, and stone fly off the surfaces. Therefore, work should be in protective glasses and gloves.
Что бы оставить комментарий войдите
Комментарии (0)