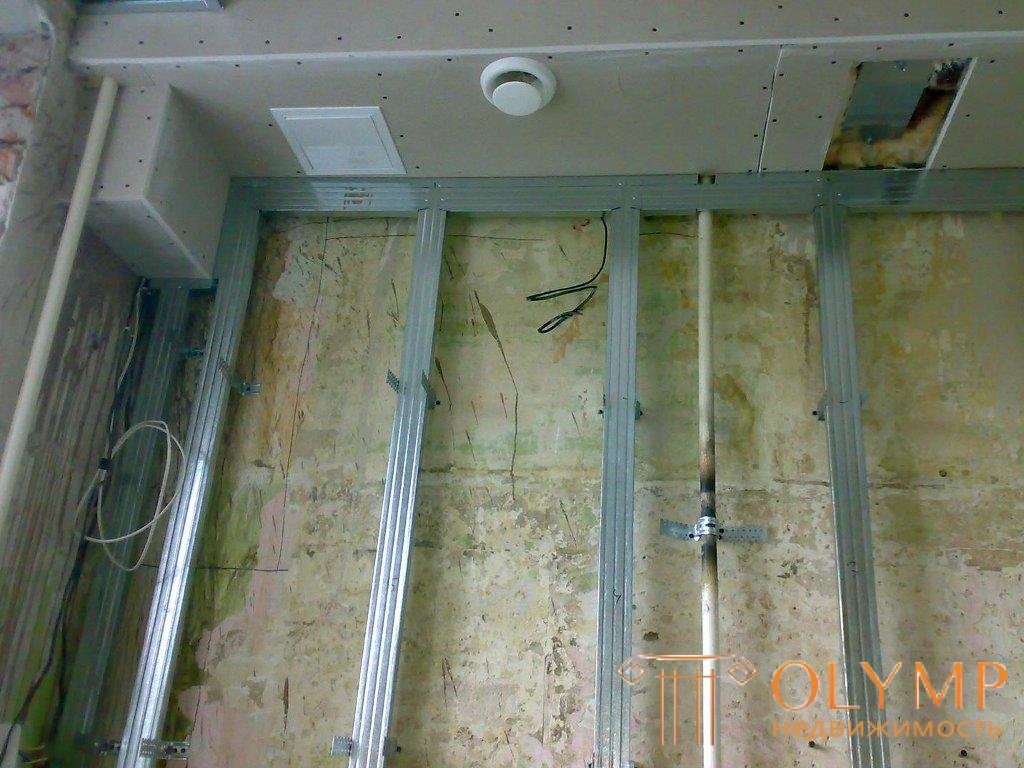
Everyone thought about changing their apartment at least a little. We'll talk about such a small change, like creating a fake wall. This design slightly deviates from the real wall and performs certain functions. A false wall of plasterboard can be used in several cases, but regardless of the situation, it will be built according to the same principles.
Content:
Many people mistakenly believe that a false wall is a regular partition that is created for the purpose of zoning a room. We are talking, above all, about the wall, so its purpose cannot be reduced to the functions of a partition or a niche.
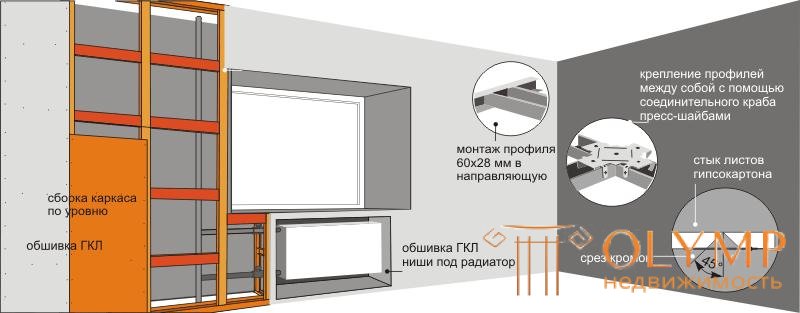
After mounting the false wall will be indistinguishable from the present
In new buildings there is a plan with rooms of a very large area. Some prefer to divide them into two parts, for which they use a false wall. Even in one-bedroom apartments use a similar design. It is usually necessary in order to make the growing up a separate room from the parents. She will be small, but it's better than sleeping in the same room with her parents. However, we still consider a slightly different situation.
A false wall made of plasterboard for a battery is not a bad idea when it comes to creating a niche for a radiator. Although some masters are pushing into the masses the idea that behind such a wall you can hide not only the pipes, but also the battery itself. Of course, this is a mistake, because the loss of heat due to this design will be significant.
A fake wall is also made in the toilet when the pipes are hidden behind it. In general, any pipe can be hidden behind such a structure, leaving a small hatch for access if necessary. A fake wall may be required to hide communications in the bathroom.
Often this design is used to align the main wall, which is very curve. They also hide the heating pipes that spoil the appearance of the room, not forgetting about the proper covering of the niche under the radiator.
When creating a false wall made of plasterboard with your own hands, you need to have the entire tool at hand. This can be very problematic, because there are not so few of them:

No tool will help if your hands grow from the wrong place.
Ideally, work with a full set of tools so that there are two batteries in the screwdriver, so that there is a puncher, a cutter cord, a laser level, etc. However, this does not mean that without all these devices, a false plasterboard wall will remain only a project. The main thing is the desire and minimum of tools. Of course, still need some materials.
Before you make a false wall of drywall need to stock up on tools and materials. If in the first case, everything is clear, then with the fasteners there is always the question of its necessary quantity. To do this, you need to know the dimensions of the wall being created.
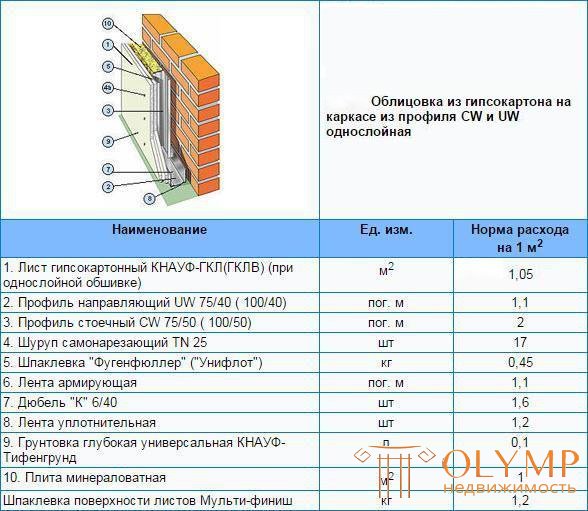
It’s almost impossible to buy just as much material as you like from the first time.
The area of false walls should correspond to the area of drywall sheets. Usually, the dimensions of the GKL are 1.2x3 meters, 1.2x2.5 meters, 1.2x2 meters and 0.8x1.5 meters. The first two options are used to create the walls. It is easy to calculate the area of one sheet and determine how much they need. It would be useful to draw a diagram with the designation of how the sheets will be attached to the frame. In this case, it will be clearly seen that the material will need a little more than originally planned (it all depends on how the sheets will be cut).
The guide profile will be mounted on the floor, wall and ceiling. Therefore, we find out what the perimeter of the future false wall of plasterboard. The number of meters of this profile should correspond to the received perimeter. If the dimensions of the wall are 4x3 meters, then 24 meters of guides are needed. The rack-mount profile is inserted inside the frame with a pitch of 40-60 cm. Therefore, its number is also easy to calculate.
When calculating the profile footage, you must consider the presence of openings in the structure. Niches in a false wall are not uncommon.
Dowels frame is attached in increments of 60 centimeters, so it is easy to calculate how much they need, if the perimeter of the wall is known. With screws a little more difficult, because they take a lot and all in different ways.
Sealing tape need as much as rack profile. Mineral wool will be laid inside the wall, so that its quantity is also easily counted. The amount of putty and primer required can be found on the manufacturer's packaging.
Total frames are of two types: wood and metal. It doesn’t matter with which frame a false wall of plasterboard will be made with your own hands. This will not affect its quality. However, it is easier to work with a metal profile. It does not need to be treated with special protective compounds like wood. Yes, and get wooden bars with slats much more difficult. Therefore, it is used extremely rarely. Do not invent a bicycle, use a metal profile, like everyone else.
For marking a false wall is best to use a laser level. He will immediately show the places where the profile should go. Then in these places with the help of chopping (painting) cord make the line. According to her profile will be mounted. So we get the markup on all walls, floor and ceiling.
If a false wall is made where there is a window opening, then creating a markup, you need to focus on it. It should be marked where the profile will stand opposite the window opening so that the slopes remain unfolded.
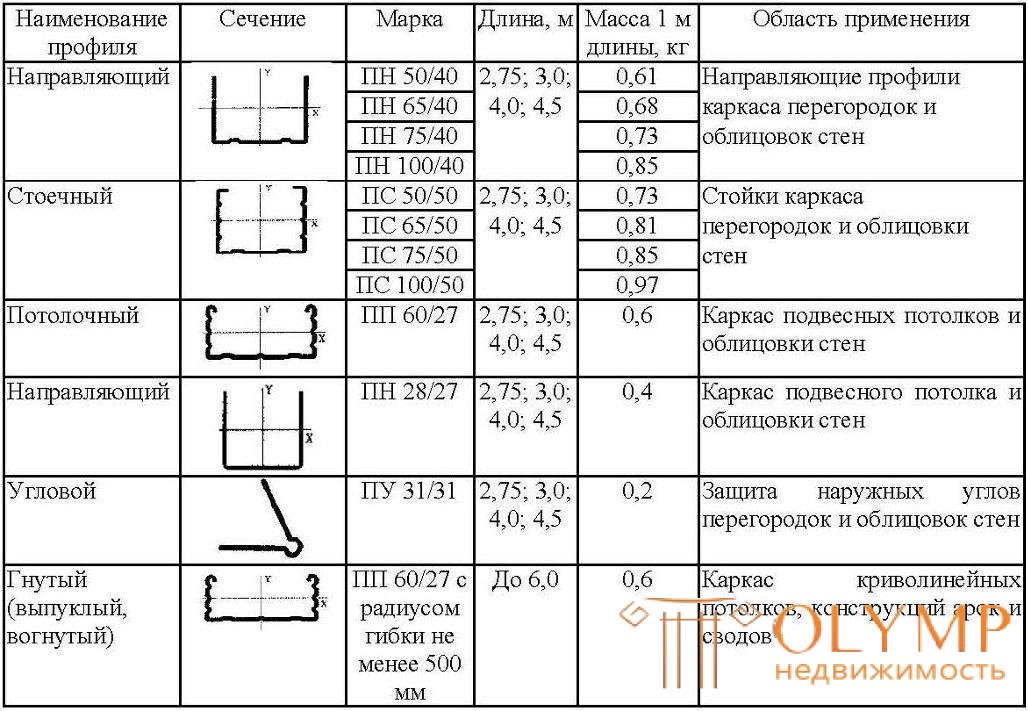
The dimensions of the rack and guide profiles must match each other.
The frame is a regular rectangle with bridges inside to strengthen the structure. If false walls are made of plasterboard with niches, then this should be immediately envisaged in the framework structure. To do this, in places niches install additional jumpers so that you can properly perform the plasterboard plaster.
First, it is necessary to fix the profile on the ceiling along the marked line. To do this, in the ceiling with a pitch of 50-60 cm, drill holes for dowels through the profile. Then the dowels are inserted and the screws are hammered.
If you work yourself, then you need to raise one end of the profile upwards and support it with another profile. After this second end is attached to the ceiling with a dowel, and then the first. Now the profile is held on the ceiling and can be carefully fastened along the entire length.
Similarly, the profile is attached to the floor. Working on the floor is much easier than on the ceiling. Do not forget about the sealing tape, which must be placed under the metal profile for additional noise insulation. With such a tape, the false gypsum wall will be “less noisy” when exposed to it.
If a plinth is attached to the wall, then a wooden mortgage is inserted into the bottom profile. This is necessary in order to have something to fix the plinth. Similarly, come with the top profile, which also inserted a wooden mortgage, if you plan to create a stretch ceiling.

In some cases, the so-called crabs are used for additional fixation of the frame to the wall.
Now the profile is mounted on the wall. The scheme of work is similar, especially since already two profiles are attached and we have a direction. In order to avoid the incident, you need to constantly check whether the installation of the profile is even. When it is secured on all four sides, the box is ready. It remains to insert jumpers.
The rack-mount profile is inserted vertically and parallel to each other in increments of 60 cm. At the junction of the profiles, they can be fixed with a sifter or with metal screws. It is advisable to use the prospectus, because drywall is curved because of the screws, because they create bumps. Yes, and fixing tightly not needed, because after plastering plasterboard nothing will not move. Now the frame is ready for further work.
Immediately before this process, it is necessary to lay mineral wool, if necessary. Wiring is also done if needed. After that, you can start plastering plasterboard. Before starting this stage of work, you need to learn a few rules.
If you follow all these recommendations, a false wall of plasterboard will be reliable and easy to maintain.
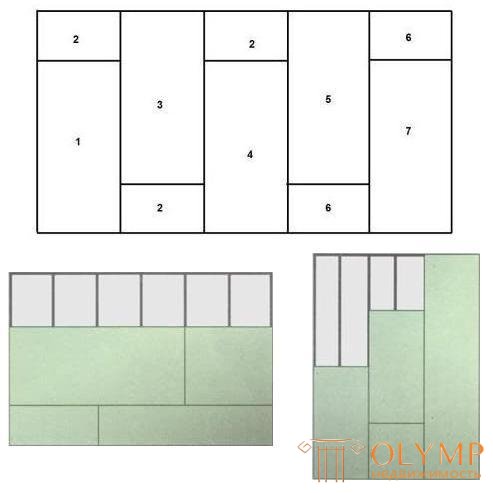
Laying of drywall on the frame
The process of plasterboard cladding itself is nothing complicated. If the vertical guide profile was inserted into the frame in increments of 60 centimeters, then you need to attach the first sheet, starting from the wall in a vertical position. In this case, the sheets will not need to be cut, as their width is 1.2 meters, and they will be joined on the profile.
If the rack profile was installed in increments of 50 cm, then a drywall sheet is best laid horizontally, because its length is a multiple of five (2.5 or 3 meters) and the joints will fall on the profile. Again, you do not need to prune anything. Sheets of drywall 1,2x3 meters can be mounted horizontally, regardless of the step profile of 50 or 60 centimeters.
After the sheet is attached to the frame, it is pressed with screws in all places where it touches the profile. After that, the next sheet is fixed, and so on, until the GCR is sheathed.
You can not leave a false wall of plasterboard in the form in which it turned out. It should be prepared for finishing, whether it be wallpaper, tile, painting or something else. The first step is puttying the caps of the self-tapping screws and the joints of the sheets of drywall. Hats shpaklyuyut, including in order to make the color of the wall uniform. Also, this procedure protects them from rusting, which of course is unlikely in normal conditions.
The joints between the sheets are primed if they are cut. It will not be a mistake to prime all the joints so that the putty will hold well. After the primer dries, a putty is applied to the joints, and then a reinforcing tape (paper or serpyanka) is applied to the joints. Smooth the tape with a spatula so that it is stuck, as well as to remove excess putty. This tape makes the joints more durable and does not appear cracks.
Ambassadors for drying putty twice primed the entire false wall of plasterboard. After that, it is completely putty (it is permissible to apply two layers of putty to get a perfectly flat surface). After the mortar has dried, the false wall is treated with sandpaper, which helps to remove the remaining irregularities. That's all, false walls ready for finishing.
See the video on how to make a false wall of plasterboard.
Что бы оставить комментарий войдите
Комментарии (0)