Due to the fact that gypsum plasterboards at the final stage of construction are of great interest among the majority of domestic citizens who prefer to carry out all the processes on their own, it is worthwhile to dwell in greater detail on the construction of the frame for the gypsum board. Properly assembled design, using the necessary elements and techniques, will be the key to its durability and reliability.
Content
Galvanized profile for drywall and installation of prefabricated partitions, suspended ceilings and facings are inextricably linked with a number of components that make up a single structure.
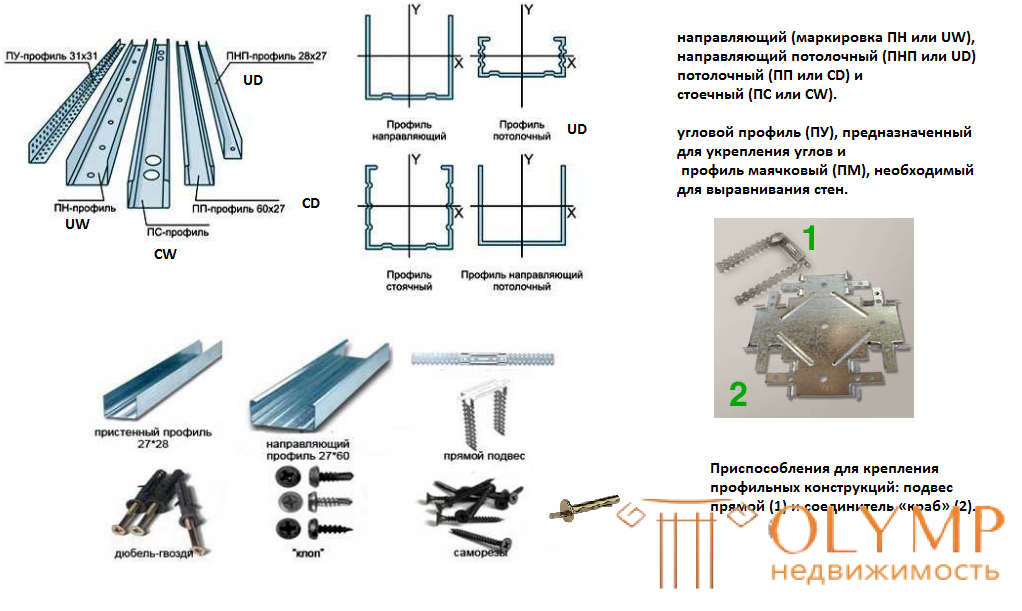
At the moment, the industry produces four main types of profiles :
The standard profile length is 3 meters .
Rack and ceiling elements have special sides for rigidity, the guides do not have this.
There are two more types of similar products, beacon and angular ones , but now we are not talking about them, but about what fasteners will be needed to assemble the frame.
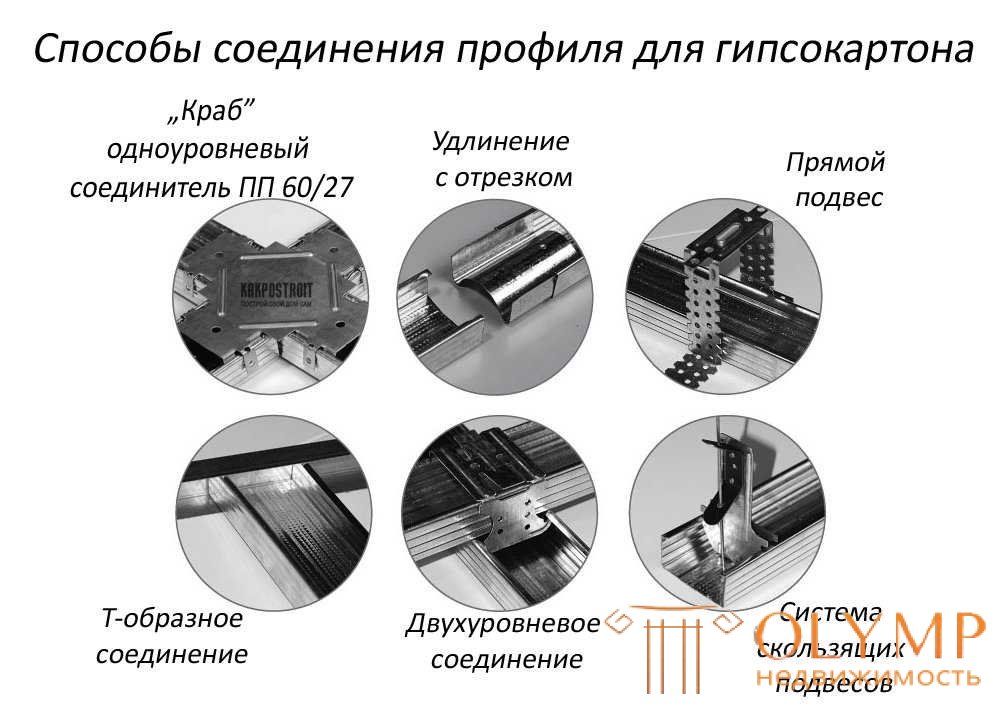
As already written, the length of the rails is three meters, but this is not enough and they have to be assembled. This can be done not only in length, but also at a certain angle. Let us consider in more detail all the available methods.
There are three ways to make a rack detail of the desired length:
Before you connect the profile for drywall with the indicated methods, you should purchase special self-drilling screws of the LN action or LB Build 9.5 mm self-drilling . Alternatively, you can use a prosekatel for the same purpose, if, of course, there is one.
 This type of 60x27 mm profiles is grouped with a special connector. It is inserted directly at the junction of two metal strips inside the CD. In order to provide additional rigidity, you should fix the part with screws using the side.
The features of some ceiling frames require joints at an angle of 90 °, and according to the design they can intersect at different levels.
Anyone who watched the ceiling mounting of a drywall profile on video could pay attention to special connectors, which the masters call “crabs” in everyday life. With their help, docking bars in the same plane. In manufacturers' catalogs, this part is listed as “single-level PP 60/27 connector” .
Cross-fixing of frame elements in different levels is possible not only at an angle of 90 °, but at any desired angle. This is possible using the following components :
This method is often necessary when assembling not only ceiling, but also floor structures and partitions of gypsum boards. The principle of reception consists in trimming the sides of one of the core components with metal shears, cutting is carried out by 30-50 mm. It should be noted that the bumpers are not removed, but are bent at a right angle and screwed to the main link.
 Many developers prefer to go to the nearest hardware store and buy a special corner connector before connecting the metal profile for drywall at the right angle. However, this is not always possible, and there are no problems with doing it yourself - the principle is simple:
Since the dimensions of the rack link are somewhat smaller than the guide, the two rack profiles will freely become a homemade connector. The node is fixed with screws. If you need to create an acute angle, the sides are also trimmed at an angle.
To carry out the fastening of the metal bars of the framework to the wall, direct suspensions are used, which are screwed through special holes with screws . Suspensions are attached to the concrete wall with anchors or dowels , holes for which are made with a perforator. The frequency of installation of suspensions is 600 mm . When installing, you should monitor their line of attachment.
 In exceptional cases, as an alternative, you can use sections of the profile of 60x27 mm, bending them in the shape of the letter "G" . Some experts argue that this method is even better - it fixes the bar more rigidly.
Sometimes when installing a frame from a metal profile for drywall, it is required to lower it to a much greater distance than standard hangers allow. What to do in this case?
For these purposes, a system of sliding suspensions is used , which consists of three elements:
One needle is attached to the ceiling, and the second is the adjustment of the desired height. The bracket is inserted directly into the profile and fixed.
Important! It is advisable to mount the suspensions to the ceiling with anchors, because the load is distributed to a smaller number of points. On average, the distance between the suspensions should not exceed 800 mm.
Что бы оставить комментарий войдите
Комментарии (0)