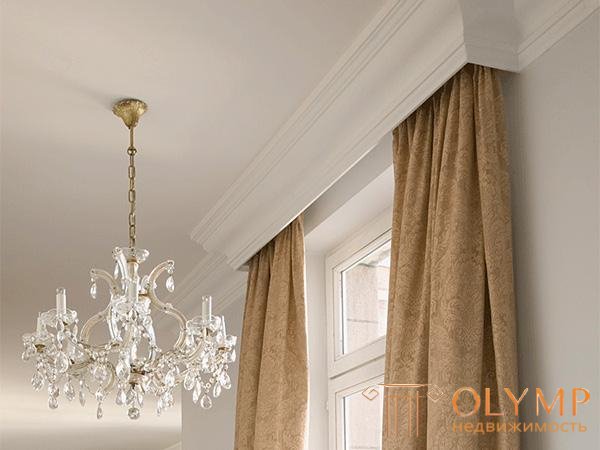
Beautiful view acquires a room in which you can not see where the curtains are fixed. When they descend directly from the ceiling, this clearly makes the interior more beautiful. Aligning the ceiling with drywall, it would be logical at the same time to resolve the issue with the eaves. Of course, you can resort to the classic version with curtains, but the curtain rods made of plasterboard look much more beautiful.
Content: [hide]
When they talk about creating a cornice with the help of drywall, they often mean the box. If, in the case of a niche, the top of the curtains is hidden in the recess, then in the case of the box it hides behind the newly published design. At first glance it may seem that the creation of the box will spoil the look of the room, especially if the ceiling is single-level. But it is not, although everyone has different tastes.
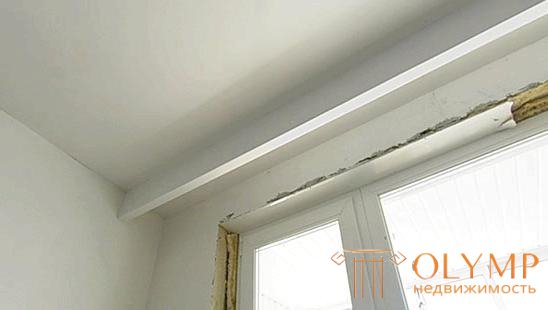
Plasterboard eaves do not have to be attached to the suspended ceiling
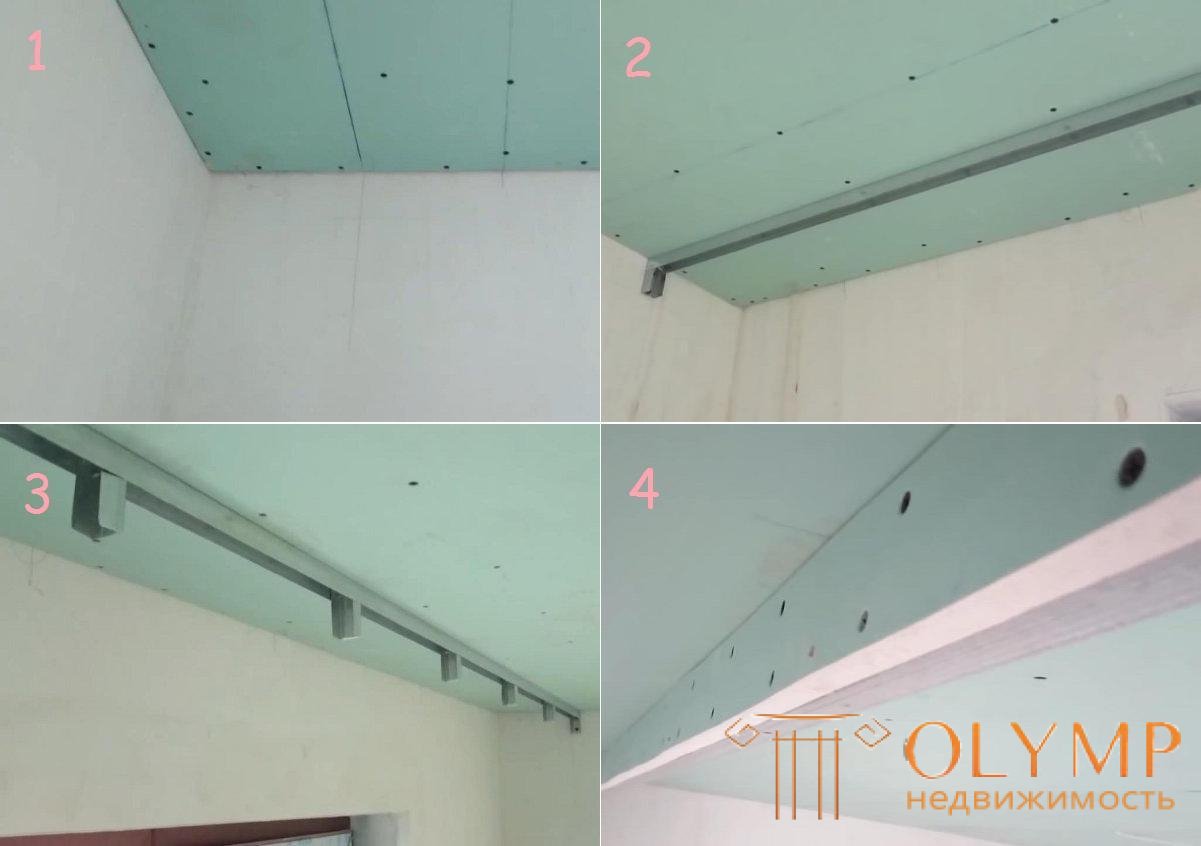
GKL cornice can be attached to the already finished suspended ceiling, and to the bare ceiling. The second solution can be used only if the ceiling is flat, and this happens infrequently. Sometimes when creating a suspended ceiling in advance are preparing to create a box. Therefore, the profile is added to the construction, to which the eaves of plasterboard for curtains will be attached later.
A niche is always provided for at the time of creating the framework for the suspended ceiling. In the case of the box is not necessary. Although pre-think its use does not hurt.
We will consider the process of creating a box that plays the role of a cornice.
Before you make a drywall curtain rails for curtains, you need to prepare all the necessary tools to work.
The result depends on the correct performance of measurements. They are carried out equally regardless of whether the box is fastened to the ceiling of plasterboard or to bare concrete.
 A sill or a battery usually prevents the curtains from moving freely. Therefore, we look what of them moves away from the wall to the maximum distance and determine the line of removal. This can be done with a tape measure or plumb. This distance must be marked on the ceiling and draw a line parallel to the window. The most convenient way to do this is with a paint cord.
In parallel to the first line at a distance of two centimeters from it, you need to hold the second line (it will be further from the window than the first). This line will indicate where the curtains will hang. If you plan to use tulle and curtains, the second line from the window is a guideline for tulle. Then for the curtains will need to hold another, already the third line. The distance between the second and third lines is 3-6 cm (usually tulle and curtains are hung at such a distance from each other).
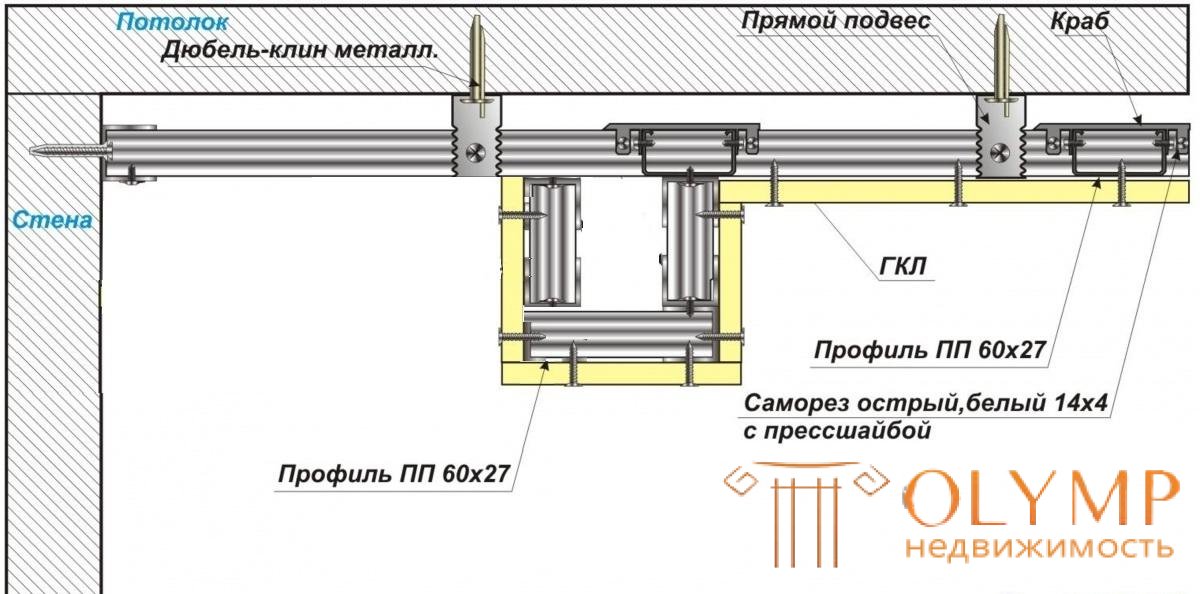
It now remains to mark the place where the ceiling box of plasterboard for the cornice will be mounted. Its edge should be at a distance of 2 cm from the last line made (for some curtains this is the second line, for tyuly and curtains this will be the third line). Therefore, you need to add 20 mm (2 cm) plasterboard thickness (it is 9.5 mm at the ceiling) and half the width of the ceiling profile (at 60x27 PP, half the width is 30 mm).
| Table of the weight of ceiling profiles | ||
| Profile Features | 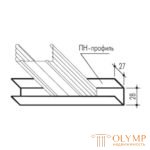 Mon 28/27 | 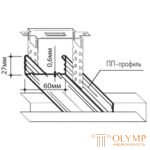 Mon 60/27 |
| Standard length | 3 meters | 3 meters |
| Width | 28 mm | 60 mm |
| Height | 27 mm | 27 mm |
| Thickness | 0.45 mm | 0.60 mm |
| Weight 1 meter linear | 0.290 kg | 0.430 kg |
In our example, almost 6 centimeters are coming out. At this distance from the last line, another parallel line is made. It indicates the place where the profile will be attached. You can not add half the width of the profile, and then we get the distance to the line, which will indicate where the edge should be.
If the drywall cornice is attached to the suspended ceiling, then all these calculations are best done in advance. In this case, a profile can be set at a specified distance parallel to the window. Then the frame will be attached to this profile, which is much more reliable than to attach it to the gypsum board.
There are no rules about the size of the drywall cornice.
This method is suitable for people who decide to make a box on a bare ceiling. It can also be used for mounting the box on the ceiling assembled from gypsum board. Sometimes there are cases when the ceiling was made, but they started to think about the cornices later. For these two cases, this method is suitable. It has the following advantages:
A small cornice on the ceiling of plasterboard is not always well combined with the simultaneous use of tulle and curtains. Also for him must be used baguette that glued around the perimeter of the room at the junction of the walls and the ceiling.
Profile UD fastened to the ceiling. Here will help previously made measurements and lined lines. There can be three situations in total.
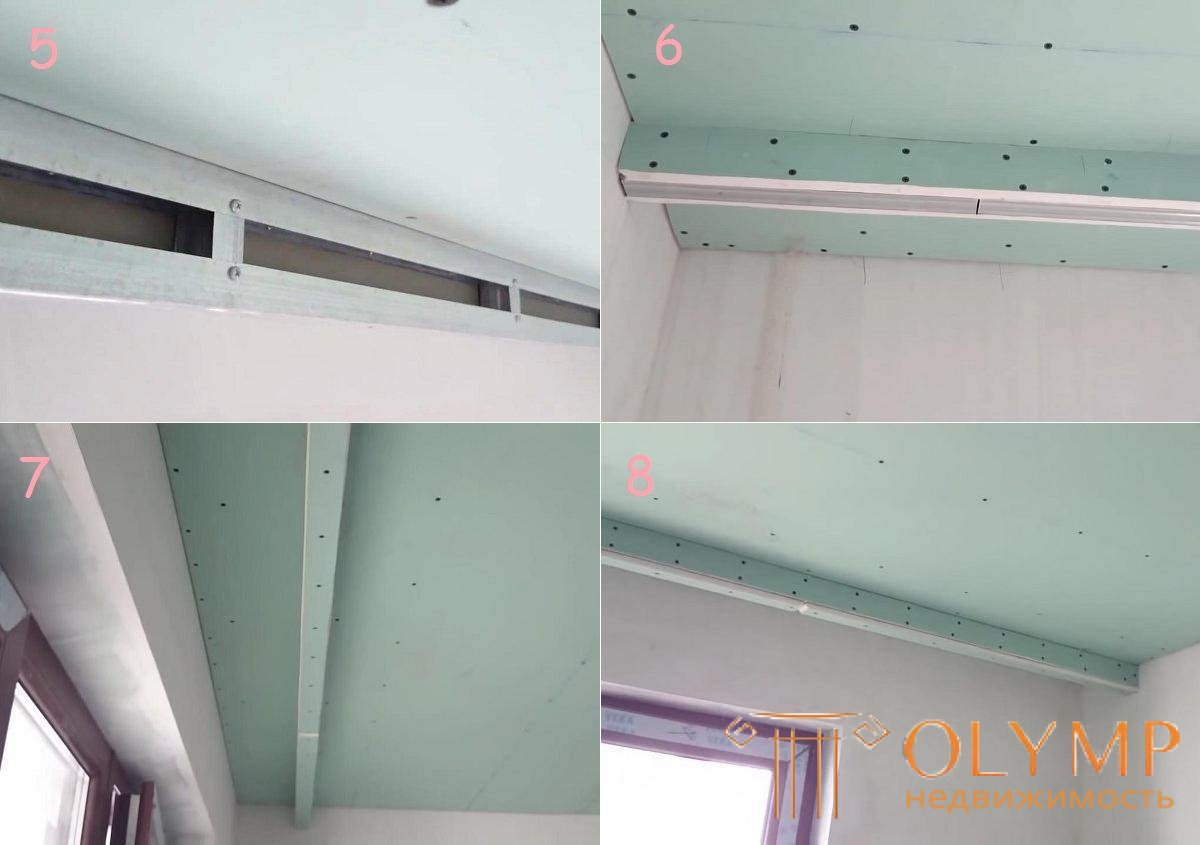
This creates the upper part of our frame. We make it 8 cm high, that will be enough. Cut from the same profile jumper 8 cm.
If the length of the profile is not enough for the entire ceiling, then there is nothing to worry about. No need to engage in building, connecting the two guides together. Simply, they are both attached to the ceiling close to each other, as if this is one profile. The drywall cornice will not make it worse.

Without a laser level will have to beat the line
Fasten two jumpers to the wall, as if they are a continuation of the profile. By the way, you can cut the profile for 8 cm to its end, bend at a right angle and attach a smaller part to the wall. After that, we insert into the guide jumpers with a step of 40 cm. It is desirable that they be equidistant from each other, including from the two extreme jumpers that are already attached to the wall. In general, it is recommended to make the distance between such edges from 30 to 50 cm. So you can independently calculate how much they need and what step should be, so that all of them are equidistant between themselves.
From the side of the window we attach the jumpers with small metal screws to the main profile (1 screw per jumper). It is not necessary to fasten from two sides, because we will squeeze everything so tightly and not the fact that the ribs were perfectly aligned vertically.
After that we sheathe the side of the frame nearest to the window with drywall. For a beginner, it is better to take drywall with a margin (a height of 10 cm should be enough). When the jumpers are put on, it will be necessary to repel the line again to mark the strip for fixing the lower profile ud. This will help make our cornice smooth.
When the line is broken, the second guide is put on the bottom of the jumper. It is pushed up and secured with metal screws to the ribs above and below (one screw is enough). After that, the GCR from the window is stitched to the lower profile, and in places where there are jumpers, metal screws are used. The drywall that extends beyond the bottom of the frame is clipped. The front part of the frame is sheathed with plasterboard sheets, and then the bottom is also stitched.
The use of moisture resistant drywall can only make sense in the kitchen
The resulting box will have a width of about 5 cm, and its height will be slightly more than 8 cm. And now the most important thing: after all the finishing work, you will need to glue the baguette. Ideally, you need to make the baguette fully lay down on the entire height of the eaves. In this case, it will not be noticeable; baguette hide the front side, and the width of 5 cm, and so unobtrusive. The result will be a hidden cornice for drywall curtains. Therefore, the height of the box can be taken and the other, most importantly, that it completely lay baguette .
At the end I would like to add that the sequence of steps may be different. If a laser level is used in the work, then you can fasten the upper profile, insert and fasten jumpers on top, and then insert the lower profile and screw it to the same jumpers. After that, everything is sheathed with plasterboard, the sheets of which are immediately cut to the desired size. But it is worth repeating that such a method is good when the laser level is working and you can always see where it’s exactly and where it’s crooked.
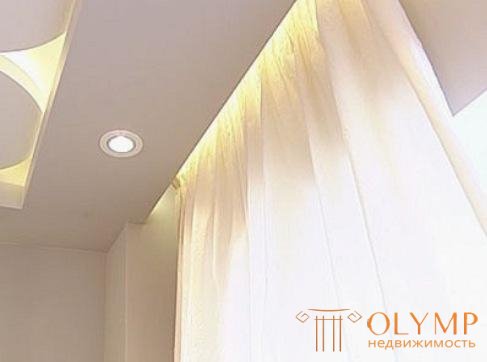
In most cases, the frame on one profile is enough. However, some like to pomp their room. But in most cases, it is thanks to a large box that you can make a curtain rod made of drywall with light. Consider how to create such a cornice and how to highlight.
A guide ceiling profile is fastened to the ceiling (the lower part of the frame is made of it), and the jumpers are made of a rack profile. Both frames are assembled in the same way as in the case of the duct on one profile. Only plasterboard until you do not need to sheathe. The result should be two identical constructions, each of which is a rectangle with edges along the entire length inside.
Ideally, you need to collect all the elements of the metal frame, and then sheathe them GCR
The distance between the frames each chooses based on their own beliefs. For jumpers, there should be a step within 30-50 cm. When both structures are fully secured, they are sheathed by gypsum boards.
The box on two profiles comes out weighty, so it should be thought out at the stage of mounting profiles for a suspended ceiling. For the future frame under the eaves, you need to put two guides to which the future structure will be attached.
On the tab profiles at the stage of forming the frame for the ceiling of plasterboard and the further creation of the cornice under the curtains can be viewed on the video.
Those who want to make a drywall cornice with backlighting should think about this moment at the stage of creating a suspended ceiling. The fact is that the backlight needs electricity, which is supplied with wires in advance. All wiring is done during installation of the suspended ceiling.
For the supplied cable a special sleeve is used to protect it from dampness and mechanical damage. So that it does not hang out, the cable is fixed with special clips to the ceiling. The cable is led to the line where the frame will be. Then the ceiling is sewn up with gypsum plasterboard and a hole is made in the place of the future box for the eaves of plasterboard through which the cable is drawn. Now he is in the box.
The width of the cornice should depend on the size of the lighting.
Next, the wiring is done, and the wires are brought to the places where the lamps will be installed. In drywall holes are made under the lamps, which they are installed and connected to electricity. To make lighting in such a way is convenient when one or two sides of the box are not yet sewn up with a gypsum board. Therefore, the eaves are usually made large so that it is comfortable to work, and there is a place for wires and fixtures.
Что бы оставить комментарий войдите
Комментарии (0)