Types of plasters . Decorative plaster is divided into three types: lime-sand colored, terrazitovye and stone.
Lime-sand colored plasters are used to finish brick walls, as well as surfaces made of materials having a grade of 50 or lower, such as lightweight concrete, tuff, shell rock, porous ceramic blocks. These plasters are applied on soils with a small amount of cement. They can not be applied to surfaces of dense concrete, as they may peel off over time.
Terrazitovye plaster is used for finishing walls, columns, plinths and other parts of capital buildings.
Stone plaster imitate facing natural stone (granite, marble, limestone, tuff). These plasters are used to finish surfaces of heavy, dense concrete, bricks, i.e. materials with a grade not lower than 100. When applying stone plasters on surfaces made of a less durable material, they exfoliate. Stone plaster applied to cement primer.
The sequence of execution . Decorative colored plaster made from mixtures prepared at the factory or on the construction site. The mixture is prepared from binders, fillers and pigments.
Mixtures are fed to workplaces in the boxes for solutions, fenced in half. In one half of a box pour dry mix, in other half part solution is diluted. The solution can be diluted in the whole box, but in such an amount that must be used within an hour, that is, before the cement begins to set.
The solution is prepared as follows. The dry mixture is stirred. Then measure the dose of this mixture and milk of lime and mix them until a homogeneous mass. In order not to change the color of the solution, neither water nor milk of lime should be added later. In the preparation of colored solutions, the accuracy of dosing of all components is of great importance; improper dosing not only affects the quality of plaster, but, as a rule, leads to a violation of its specified decorative properties.
The soil of cement-lime or cement mortar is applied by machine or by hand. To improve the adhesion of the covering layer to the surface on a fresh, well-leveled soil solution, the saw section is scratched by wavy grooves 5 mm deep at a distance of 20-30 mm one from the other. 2-3 hours after scratching the furrows, the soil is moistened with water from the eye. After 10-12 hours, when the solution sets, it is watered heavily with a diffused stream of water for 5-7 days, 3-5 times a day (depending on the weather).
After the application of the soil, the surface of the facade is broken into grippers so that in open places there are no joints formed at the junctions of the overlay layers applied at different times. This happens because when a fresh coating solution is combined with a previously applied and already dried, water from the newly applied solution is absorbed by the dried solution. Thus, due to the additional amount of paint in the joints of the first and second grippers, a strip is formed, which is darker compared to the color of the rest of the facade plaster. If the facade has pilasters, protrusions, belts, then it is divided so that the joints of the seizure are in the corners near the protrusions, then they will be hardly noticeable. If there are inter-floor drafts or cornices on the facade, the joints may be under these drafts. If the facade is completely smooth, the clamps are broken so that their borders run along window slopes where the joint is less visible.
Captures can be broken both horizontally and vertically. The edges of the gripper should be smooth and smooth. A smooth, smooth joint can be obtained by setting rules along the entire length of the gripper, which is removed after applying and leveling the colored nosing solution.
If white spots appear on the ground in places where it has dried, then every 4-5 hours they are abundantly moistened with water, and the entire surface is moistened 1-1.5 hours before the application of the coating. It is not recommended to wet the surface with water later in order to avoid slipping of the covering solution. 7-12 days after applying the primer, a colored solution is applied to it - a covering (decorative nakryvochny layer).
The thickness of the colored decorative layers in stone and terrazit plaster depends mainly on the size of the aggregate (crumbs) and the nature of the finish. The total thickness of the decorative nakryvochnyh layers averages 6-15 mm with medium size aggregates. With larger aggregates, the thickness can be up to 25 mm. The solution is applied in two or three or more layers, which depends on its thickness and thickness of the coating. Usually, a layer of spray and a primer from a decorative mortar are applied first, but sometimes it is necessary to apply another layer of decorative covering for leveling. This is done when the ground is made carelessly.
The procedure for applying the solution is as follows. First, a layer of spray is applied from a decorative solution, which is given the opportunity to thicken, to grab, so that it stops crawling off the surface, which takes 1-1.5 hours.
Then apply the soil in one or several layers, level it and compact it with a scraper. After the applied and leveled decorative solution thickens, it is again compacted with a scraper, trowel or edge of the rule until cement milk appears on the surface, and then it is finally smoothed with a plaster spatula. These operations are carried out to ensure that there are no voids in the plaster, which, when processed, can sink and form shells, as well as make the surface smooth so that it is easier to process and get a cleaner finish.
When solutions with fine aggregates are used, a decorative coating is applied over the grasped soil, leveled, smoothed (rubbed) with a scraper, and then rubbed with a float.
Cracks formed in the plaster, close up the same solution and be sure to rub it. This should be done before the solution dries. If the cracks are not repaired, the solution at their edges will fall off during drying, and if such cracks are sealed, after the coating dries out, stains will form.
To make the decorative covering layer the desired strength, after setting, it is moistened with water for 6-8 days. On the first day, they are moistened only with a brush-small stone, so as not to wash off the solution, and after a day they pour it from watering cans or a hose with a spray. The surface is moistened 2-4 times a day depending on the outdoor temperature.
Plaster in the joints must be kept wet all the time. To do this, the joints with a width of 200-300 mm are sprayed with a small haze with water and covered with wet matting or burlap. The joint must be repaired before proceeding with the application of a coating on the boundaries of the previous seizure. Until this time, the joint is moistened. This helps to eliminate traces of joints, because wet plaster absorbs less water from the fresh solution.
Organization of work . The organization of works on plastering with colored solutions and the breakdown of facades into grips will be considered using examples.
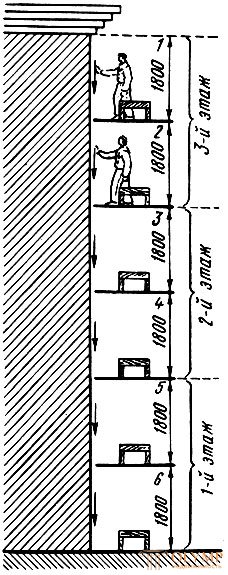
Example 1 The facade with pilasters across the entire height of the building, but without interfloor belts, is divided into hooks (Fig. 105), which run from the corner to the first pilaster, from the first pilaster to the second, etc. Each hitch is divided by forests into maps 1-6, two per floor. When plastering, after stretching the eaves, a covering is applied to the rest of the facade, but in such a way that visible joints do not work out.

Fig. 105. Plastering of the facade with narrow grasp vertically between the pilasters: 1-6 - maps
Having plastered the map 1, the plasterer moves to the map 2, where the dry mixture should be installed in advance and water should be prepared. If the finished solution is supplied, the boxes must be filled with it 5 - 10 minutes before the arrival of the plasterers.
When the plasterer applies the solution on map 2, the dedicated workers remove 1 boxes from the map and rearrange them on map 3, etc.
Window and door slopes are recommended to plaster immediately over the entire surface of the grab. If windows are provided with platbands, sandriks in the form of rods, they can be pulled out after finishing the entire surface. In this case, the slopes trim simultaneously with the device thrust.
Pilasters can be finished before or after plastering two grabs adjacent to them. In both cases, the joints will not be visible, as they are combined with the husks.
Example 2 If there are no pilasters on the facade, but there are interfloor belts, then the grapples are made by floor (Fig. 106). Floor divided by height of the forest in half. Captures are divided into maps on the floor. Dividing lines II, II-II, etc., are carried out with chalk. To perform work on each card is allocated link.
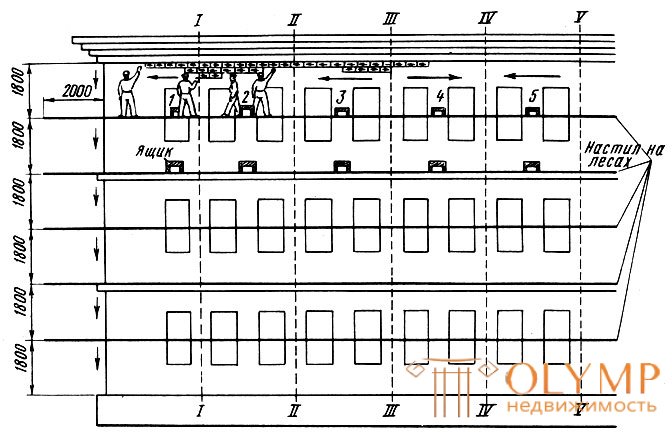
Fig. 106. Plastering of the facade with grasp by floor: x - ⋅ - ⋅ dividing lines; 1-5 cards
To avoid visible joints, the links organize the work in this way. The first link applies the solution to the left of line II, the second to the right of this line towards the line II-II, the third link goes from line III-III to the left, the fourth from this line to the right. With this procedure, the solution is applied to the joints simultaneously.
Interroom belts pull or trim by hand. To perform this work there are several plasterers.
If the facade is broken into stones with rustles, it is desirable to plaster it so that each portion of the solution is applied to the stones in different parts of the facade (for example, in a checkerboard pattern). If between individual portions of the solution there is an inconspicuous difference in color, then in this case the joints will not be visible and the facade gives the impression of being made of stones of different shades.
When it is required to plaster a narrow grab at one time, the plasteer's workplaces are placed one below the other, and the solution is thrown as shown in fig. 105
When working on scaffolding, boards are laid close to the walls on which bouncing mortar will fall. Every 20-30 minutes it is collected, added to the next portion of the solution and mixed.
Surface preparation, primer application . Prior to surface preparation, they are inspected, then cut, choose seams, clean with a broom, removing dust, dirt and all broken off, but not falling off particles. Surfaces for decorative plasters must be prepared especially well, because stone plasters are treated with percussion instruments and, if the preparation is of poor quality, the surface may fall off during the treatment of the covering along with the ground. After fixing the broken places there are spots that spoil the facade.
After preparation, they proceed to staking, nailing, making stamps and lighthouses. In places of thick stonework, nails are filled and twined around with wire.
Two to three hours before applying the spray the surface is moistened with water. After spraying, apply the ground to the level of the beacons, leveling and scratching the cells with a cut, nail brush or rake. If the beacons are made of the same solution as the ground, then they are not cut down, but left in the ground. Lighthouses from plaster cut down, clear the base under them and plaster it with the same solution, which was used for the ground.
Spray and primer under terrazitovye plaster applied with cement-lime mortar composition of 1: 1: 6. Under the stone plaster used cement mortar composition of 1: 3 or 1: 4, under the colored lime-sand - the same composition as the plaster itself, i.e. 0.1 parts of cement, 1 part of lime dough and 3 parts of sand.
To put the solutions do not dry quickly, they are moistened with water 3-4 times a day for 3-5 days.
Lime-sand colored plaster . Lime-sand plasters are prepared, used as a binder limestone dough. 10-15% of cement and the corresponding pigments are added to it. The filler is pure quartz sand. For covering layers of lime-sand colored plasters with a smooth texture, quartz sand with a predominance of grains of 0.3-0.6 mm, not containing grains larger than 1 mm, is needed. For textures performed by sprinkling, use coarse sand, in which about 50% of grains ranging in size from 0.6 to 2 mm. Quartz sand for light tones of plaster should be white. For dyeing binders, no more than 7% of dry construction paints are added based on the weight of lime dough and cement. For shine, you can enter mica, no more than 5% of the volume of cement. The compositions of lime-sand plasters are given in table. four.

Table 4. The composition of lime-sand solutions for colored plasters, parts by volume
Plasters in semi-hardened or unhardened (plastic) state are treated to obtain the desired texture with cycles, stamp, roller.
Cycles - steel plates with teeth, no more than 2-3 mm high. The teeth are wide, narrow, arranged in a row or at a certain distance from each other. Before starting work, the surface is divided into rectangles, squares, or stone axes are marked on it. Then the rules are applied in the right place, according to which the cycles are conducted, by pressing on them with such force that the teeth hit the surface of the plaster (Fig. 107, a, b).
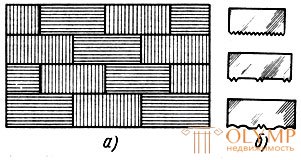
Fig. 107. Surface treated with cycles (a) and cycles (b)
Finishing by a stamp and the roller gives the chance to receive identical repeating figures on plaster. Stamps and rollers are made of wood, rubber, metal, they can be cast from lead, babbit. Their sizes are determined by the pattern. The depth of the relief pattern should not exceed 5 mm. The handle is rigidly fixed to the stamp, the roller is fixed loosely on the axis. When rolling a picture with a roller (Fig. 108), a rule or trowels are applied to the smoothed solution, which serves as a guide for the movement of the roller. To prevent the solution from sticking to dies and rollers, it is recommended to lubricate them with soap emulsion or liquid engine oil.
Spray trimming is performed in this sequence. The surface, designed for this type of finish, is leveled with primer, and then scratched on it grooves. For spraying prepare a creamy consistency solution. Coarse sand, fine gravel, crumb are added to prevent it from flowing off the surface. To obtain a colored spray, alkaline-resistant, dry paint is introduced into the solution.
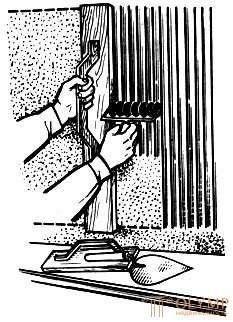
Fig. 108. Rolling the texture
Splashing through the net is performed as follows (Fig. 109, a). A metal grid with cells from 2.5 x 2.5 to 10 x 10 mm (depending on the size of the required texture) is tensioned and nailed to a wooden frame measuring 1 x 2 m. To prevent the grid from vibrating, two or three rows are pulled onto the frame wire and attached to the grid. At the corners of the frame, strips of length from 100 to 200 mm are nailed so that the grid can be set at exactly one distance from the surface to be treated.
The solution is thrown over the grid with a shovel from a falcon. Passing through the grid, the solution is cut and distributed over the surface of the bumps; Depending on the grid frequency, a fine or coarse-grained texture is formed. Throw a solution of uniform throws, one or more times. The solution box requires a light, small, better on wheels, as it has to be moved frequently. Spray can be obtained by applying the solution with a spray pump nozzle.
Spray from a broom (Fig. 109, b) perform as follows. Before you put a solution on a broom, mix it up so that large particles do not precipitate. In the right hand take a chopped off broom, in the left - a stick or a piece of the rule. Broom with a solution brought to the wall and hit on a stick, shaking off the solution. On the surface, a large or medium texture "under the fur coat" is formed. At the same place the solution is applied one or several times.
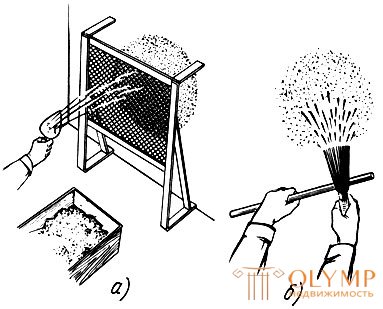
Fig. 109. Drawing the texture by spraying: a - through the grid, b - from a broom
Combined textures (Fig. 110) are obtained by applying colored lime-sand mortars and further surface treatment: cutting in different directions with a plastering shovel, stamping and spraying.
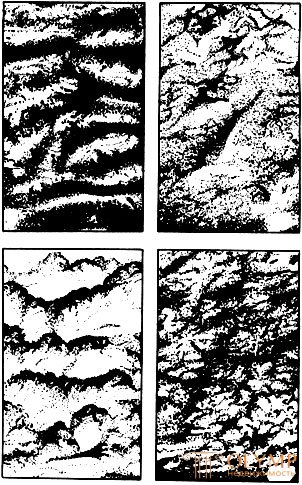
Fig. 110. Combined Invoices
Terrazitovye plaster . Terrasite is delivered to a construction site in the form of a finished dry colored mixture, which is shut off at the work site with water. The color and texture of terrazite is the same as that of sandstone or tuff, but with brilliance, which is achieved by the introduction of mica. Binder in terrazitovye plasters is lime-fluff with the addition of 20-30% cement. Marble chips and quartz sand are used as aggregate. For coloring terrazit pigments are injected, and sometimes only colored mineral flour (marble, stone, granite).
The produced terrazit mixtures are divided by numbers or spells: No. 1, or M (fine-grained), with aggregate grains of 1-2 mm, No. 2, or C (medium-grained), with aggregate grains of 2-4 mm and No. 3, or K (coarse-grained), with 4-6 mm aggregate grains. Thus, using mixture No. 1, a small texture is obtained, No. 2 is medium and No. 3 is large.
For pulling the terrazit with fine aggregate.
The mixtures for terrazitovye plasters are given in table. five.

Table 5. Mixture compositions for terrazitic plasters, part by volume (For solution K, large chips (4-6 mm) are taken, for solution C - medium (2-4 mm), for solution M - small (1-2 mm). )
Терразитовые растворы наносить несколько труднее, чем известково-песчаные, так как первые приготовляют в большинстве случаев с крупной крошкой. Иногда терразитовый раствор делают жидким и наносят на поверхности в 3-4 слоя штукатурной лопаткой с сокола, имеющего бортики.
При оштукатуривании поверхности сначала на подготовленный грунт наносят обрызг из жидкого терразитового раствора и после того, как он схватится (через 1-1,5 ч), 2-3 слоя грунта в зависимости от крупности терразита и толщины слоя штукатурки. Грунт разравнивают, уплотняют ударами полутерка или ребром правила. Если на поверхности грунта окажутся раковины, их исправляют раствором; затем наносят накрывку и разравнивают ее.
После схватывания нанесенного слоя терразитовой штукатурки ее иногда затирают. В большинстве случаев затирка нужна, если поверхность оштукатурена мелким терразитом, а обрабатывать ее будут циклями с мелкими зубьями. Затирать поверхность надо осторожно и быстро.
После схватывания раствора (обычно через 3-6 ч) приступают к циклеванию. При легком нажиме на циклю мраморная крошка и песок осыпаются, оставляя гнезда большего или меньшего размера и тем самым образуя шероховатую поверхность. Поверхность штукатурки обрабатывают в полузатвердевшем состоянии. Если начать циклевание раньше, то раствор будет прилипать к цикле. Такое циклевание только ухудшит вид обрабатываемой поверхности. Если же штукатурка чрезмерно затвердела, то циклевать труднее.
Фактура при циклевании терразитовой штукатурки зависит от величины зубьев цикли или гвоздевой щетки, а также от крупности заполнителей.
В процессе циклевания (рис. 111, а, б) штукатур держит циклю, в зависимости от ее размеров, одной или двумя руками и скребет ею по поверхности штукатурки. Сильно нажимать на циклю не рекомендуется; она должна двигаться плавно, без рывков. Цикля зубьями врезается в поверхность и снимает затертую пленку; при этом обнажаются слюда и крошка. Циклевать нужно в одном направлении, иначе на поверхности останутся пятна, портящие вид штукатурки (это особенно заметно в солнечные дни), и по правилу; в этом случае получаются ровные полосы, а циклеванная поверхность напоминает фактуру "под шубу". Фактуру "под шубу" можно получить и более простым способом - механизированным нанесением цветной накрывки непосредственно на оштукатуриваемую поверхность.
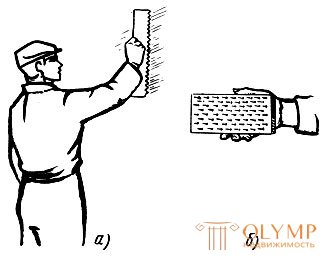
Fig. 111. Циклевание терразитовой штукатурки (а) и хватка гвоздевой щетки (б)
Для получения фактуры "под тесаный песчаник" с поверхности толстого слоя терразита скалывают зубилом верхний слой штукатурки. Чтобы получить фактуру "под рваный камень", в свеженанесенный слой грунта втапливают в различных местах щебенку и забрасывают ее терразитовым раствором, который затем обрабатывают циклей или щеткой.
После обработки поверхности обметают веником или жесткой волосяной щеткой.
Plastering without terracites is as follows. After the surface has been sprayed, a primer is applied to it from a conventional solution so thick that it does not reach the lighthouses by 5-7 mm, and then colored soil is applied to this fresh soil to the plane of the lighthouses. After the colored primer, a broom is applied in the form of a spray with a creamy nakryvku 5-7 mm thick, in even layers, without gaps, so that no bulges and bumps can be obtained on the surface. After the coating dries, the surface is flattened with a trowel or a rule, beating out protruding and weakly contained particles. Then the surface is swept with a broom, exposing the mica, and get a sort of looped surface. After applying the coating, it is necessary to cut down the lighthouses, since even with its thickest layer, they will protrude from the main plane.If a thin layer of soil is applied over the beacons, then the particles of the crumbs will weakly adhere to the solution of the beacons and will easily peel off at the time of the rule or when sweeping with a besom. The need for terrazite when plastering in this way is reduced by 25%, i.e. on the amount of waste that is formed during cycling, and increases productivity.
It’s broken down, it’s clear that it’s true to it. sealing them with terracite, the fifth - processing cover.
It is a matter of
Stone plaster . These plasters (fig. 112) are called marble, because they contain aggregate in the form of marble and granite chips or crumbs of other rocks, which, when cracked, give a sparkling chip. The color of the crumb, as well as marble or stone flour, is matched to the color of the plaster. The main binder is cement, sometimes with the addition of 10–20% lime dough, which is injected to give plasticity to the solution. The grains of the crumbs occupy the predominant part of the surface and, after forging, create mainly color and texture of the plaster. Painted cement thus complements the color of the crumbs.
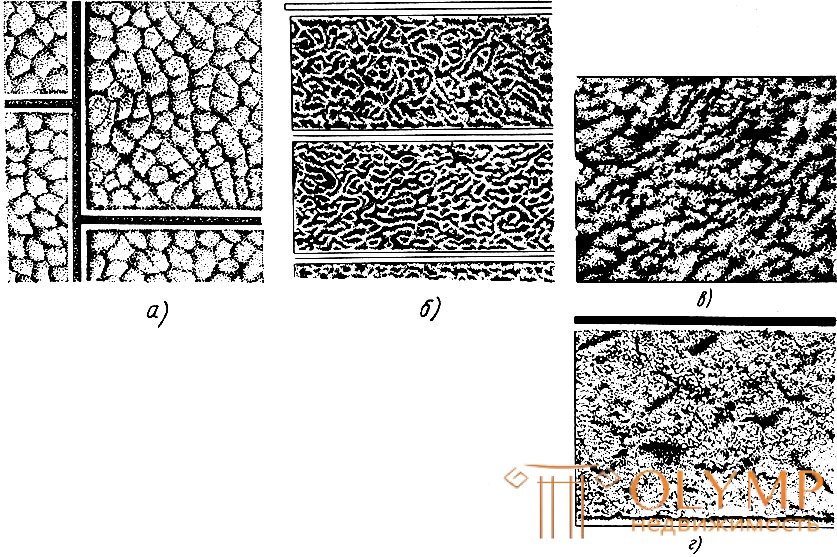
Fig. 112. The textures of stone plasters: a - under the gravel, b - under the lamb, c - under the waves, d - under the wet stone
Stone plaster - the most expensive and labor-intensive, but at the same time, the most durable, durable and decorative. Solutions of stone plasters (Table 6) are more rigid than terrazitic ones, therefore it is more difficult to apply them.

Table 6. Compositions of solutions for plasters that mimic natural stone, parts by volume (Crumb take that rock, which imitates this plaster. To shine add 0.5-2% mica of the total mixture.)
The main influence on the color of the plaster have a stripping and coloring binders. For plasters under white marble and limestone it is best to use white cement (ordinary cement is scattered). Lime, white marble flour or powder are used to grind ordinary cement. In order not to reduce the strength of the plaster, additives of lime and marble flour are introduced in the following amounts: for cements of grades 200 and 300 - up to 20-25% of the volume of cement, for cements of grades 300-400 to 40-50%.
Solutions of stone plasters are applied with a plaster spatula in 2-4 steps, since it is impossible to apply a layer of plaster 10 mm thick at one time.
Solutions for stone plasters are applied in the same way as terrazitic ones: first spray. after 1-1.5 hours a layer of soil, which is compacted and leveled. If the soil has a large number of holes, then they are repaired with the same solution, but more liquid, the surface is smoothed with a trowel or slightly rubbed with a float.
The plastered surface is moistened with water for 6-8 days, 3-4 days on the first day, 5-6 times on the next days. Then within 1-2 days. the plaster dries and gains sufficient strength. During this time, in a small area perform a test forging. If the crumb does not break apart from the impact, but kneads, then the solution has not yet acquired the necessary strength and should be further sustained. If the crumb is cracked and the solution is peeling off, then the plaster is suitable for forging.
Plasters are treated with bouchard, trojan, toothed, chisel or rubbed with bars, rasps.
During work, Bouchard is held with both hands and evenly strikes the surface of the plaster. From the impact, the teeth of the beechards cut into the surface, the upper layer of the solution is cut off, and part of the grain of the crumbs, which begin to sparkle and shine. The packing is carried out until the upper layer of the solution and part of the grains of the crumbs are completely removed. To obtain an evenly finished surface, the uniformity of strikes is of great importance.
During work, the trojan or chisel is held at an angle of 45 ° to the surface; they also break the upper film with plaster. Hammer blows must be of equal strength.
During the processing of the not completely hardened plaster, the solution is often packed between the teeth of the tools. In this case, the tool does not cut the plaster and does not chop the crumb, but rubs it, causing the decorative qualities of the plaster to decrease. Tools should be periodically cleaned with a wire brush from the solution that has jammed between the teeth. If the teeth are blunt, replace the instrument with a new one. The bar and rasp for ease of operation should be inserted into the wooden holder-pen.
Often the surface of the plaster is divided into stones, beating lines with a cord, which is rubbed with chalk or pigment. With the help of a rubbed cord, straps and other straight profiles are applied. Tapes are scrubbed according to the rule, which is pressed against the clip with a rasp or bar.
Finishing "under a fur coat" is most often carried out by a bushwood. The size of the texture depends on the size of the crumbs and teeth of the bouchards. The larger the teeth and crumb, the larger the notch.
Finishing hatching (under the grooves) produce a trojan. Depending on the size of the tool teeth, the grooves may be large, medium, small. The first strokes are made along the line repulsed by the cord, and the following are parallel to the first groove.
Finishing checker perform so. The surface is divided into cells using a cord or rule. After that, each cell is treated with a Trojan in a mutually perpendicular direction, but so that the texture made does not capture other cells. The cells can be processed in a combined way: one cell is cut with a bush under the "fur coat", the other with a trojan in the form of grooves.
Finishing by shading in a strip is achieved as follows. The surface with a cord is divided into stones. Between the stones, rectangular rusts are punched with a steel ruler over a soft, not yet hardened mortar or a chisel over a hardened mortar. Then beat off the line bounding the tape, and the lines denoting a series of strokes. Having made a notch of strokes, rusts are punched across all the stones. Rust line is treated with a conventional chisel or narrow skarpel. The chisel and skarpel should be kept at an angle of 60-70 ° to the surface in order to produce clean and even rusts.
Finishing under a ragged stone and sandstone is performed as follows: a layer of plaster mortar 40-50 mm thick is applied on the surface, then the applied mortar is broken into stones, the rust is cut through and the treatment begins.
A chisel is driven into the hardened plaster in various places, and side blows are applied with a hammer at its end, pulling out pieces of mortar: on the surface of the plaster, significant irregularities (chips) are formed.
The texture for hewn sandstone is obtained by cleaving small pieces of plaster with a chisel or tongue.
Semi-hardened stone plaster can be treated with toothed cycles, clamped in the holder. The cycle is moved according to the rule and it scratches small vertical grooves on the surface.
Rust device, finishing of edges, corners, slopes and other details . One of the most common types of finishing of socles and facades is breaking them down into separate stones.
The rusts between the stones can be of different profiles (Fig. 113, a, g): triangular, square, in the form of rods. Rustas are most often made of rectangular shape. For the device of rust the surface of the basement or facade is divided with a cord or ruler into stones. Along the lines of division on freshly applied plaster, rusta punch or pull patterns.

Fig. 113. The shape of stones and rust — a is Roman, b — with a chipped surface, c — rectangular stones with flat rusts, g — stones with roundings, d — rectangular and prismatic stones, e — complex-shaped rusts, w — beveled smooth rusts
Punching rustov ruler (Fig. 114, a). A steel ruler with a thickness of 5-15 mm is applied to the intended line and a hammer blow deepens it by 5-10 mm into the freshly applied plaster. Then the line is carefully removed, so as not to tear the edges of rust. To work you need to have two lines: one along the length of rust, the second in width or height. Rulers should be a little taper on the cone, so they are easier to get out of solution.
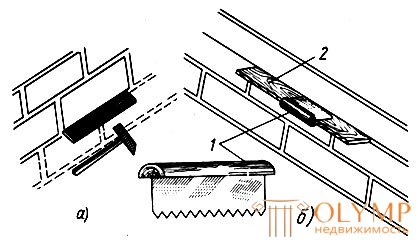
Fig. 114. Fulfillment of rusting: a - ruler, b - saw; 1 - saw, 2 - rule
Cutting rustov saw (Fig. 114, b). Rusty is cut into a hardened plaster with a piece of saw 1, 200-300 mm long, with a handle fixed at the top. Rule 2 is applied to the marked lines, according to which rust is sawn through with a saw. Packing and cutting can be made rusta not wider than 15 mm.
Rust device with rails . When rusta should have a considerable width and simple profiles (square, triangle), they are satisfied with the help of rails (Fig. 115, a). Reiki should be well-groomed. Quadrangular rails are usually attached to a trapezoidal section so that they are easier to remove from the solution. Depending on the required depth of the rust, the slats are installed in the ground or in the covering layer. Before installing the rail, it is better to coat it with grease. The solution applied near the rails is compacted with a scraper or a rammer so that there are no shells. Depending on the shape of the stone, the solution covers either the entire space between the slats, or only near the slats.
For the formation of profile rusts (Fig. 115, b), use of profile slats (Fig. 115, c), planed in the form of rust. For horizontal lines they make long slats, for vertical lines - short ones. Short slats cut into a long straight spike. They are easily removed after setting the solution. The use of rails allows you to increase productivity.
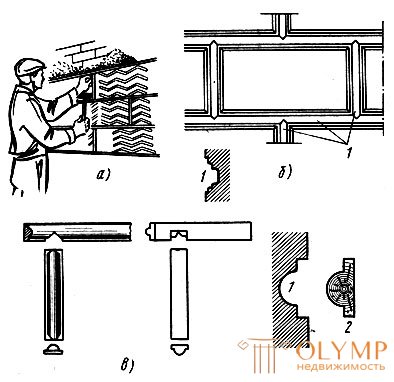
Fig. 115. Rust device with the help of rails: a - installation of rails, b - form of rust, in - profile rails with front and back sides; 1 - rust, 2 - rake
Extrusion and casting rust . Rusty pull on the rules hung (Fig. 116, a). However, they can also be installed from pre-cast parts.
Rust details are cast from gypsum or cement mortar. Cement mortar is prepared as a semi-dry mixture, then it is poured into a mold and compacted. This method of manufacturing products is called whipping. For the strength of the parts they are inserted rebar. Form for beating products produce lump - plaster or concrete. Gypsum products can also be cast in plaster or formoplast forms. To install the details of the rust, the surface of the wall is fixed, lighthouses and marks are arranged, a splash and primer are applied, which, after leveling, are cut into a cell with a cut or another tool. Then, the lines for the installation of the cast parts are punched with the help of an intended cord and freeze them on the solution. The space between the rusts forming the stone is then filled with a solution and treated to the desired texture.
Instead of casting, you can pull out pieces of a workbench on a workbench, which are then cut into pieces of the desired size and frozen with a solution at the place of installation. However, casting in forms is more productive than their extrusion.
Finishing the edges of corners, slopes and other details . These parts trim differently. In one case, they are given the same texture as the entire surface, in the other they are framed with a tape of no more than 30-50 mm wide, which is given a completely different texture. Tapes of cement mortar plasters are left smooth, rubbing them with a float or semi-grated in a freshly applied solution, or after hardening the solution is rubbed off in blocks on stone plaster. Tapes are often cut with a chisel or trojan, arranging grooves, or they are given an invoice “under a fur coat”. In order to make the ribbons perfectly straight and have the same width, they are pre-beaten off with the help of an intended cord or they draw lines according to the applied rule.
It is recommended to rub tapes with a scraper according to the rule applied to the plaster. Scouring tapes with a block or rasp is also performed according to the rule that serves as a guide. When scrubbing a bar, a smooth texture is obtained, a rasp on a terrazite is cycled, and on stone plaster a sawn one. If the tape on the edges is treated with a trojan, it should be directed from the acute angle inward, i.e., to the middle (Fig. 116, b). In the opposite direction, the trojan will cleave the usenka and there will be hollows on them. When forging a trojan of the same place in mutually perpendicular directions, an invoice “under a fur coat” is obtained. When notching a trojan or chisel should be kept at an angle of 60-70 ° to the surface.
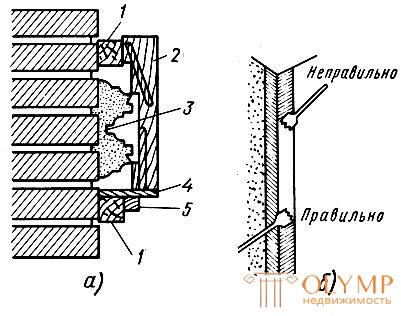
Fig. 116. Extrusion of rust (a) and forging (b) of ribbons in the corners: 1 - rule, 2 - pattern, 3 - rust, 4 - sled, 5 - skid
Putting a stone crumb on a fresh soil . In addition to forging stone plaster, a method of its invoicing is applied, which does not require machining with tools. This type of texture processing is performed in the following way.
Stone chips sort
Что бы оставить комментарий войдите
Комментарии (0)