Types of plasters . Conventional plasters are made of unpainted lime, lime-plaster, cement-lime or cement mortars. All solutions, except for lime-plaster, are used for plastering on brick and concrete. Lime-plaster plasters only wooden surfaces.
Plastering is most often performed on beacons. The grout is best to be dismantled, since when painting the traces of grout around the look in the form of circles, which spoils the surface. The plinths are always plastered with a cement mortar of 1: 3 or 1: 4. It is advisable to deepen the plaster into the ground 5-6 cm below the pavement level. After grouting, it is better to smooth it with a spatula or trowel. Such plaster is smoother, stronger, less absorbent. The upper part of the base (drain) is always performed with a bevel.
On the basement it is customary to make Usenko. However, they often break off, so it’s best to round them up a bit or chamfer them. All this should be coordinated with the architectural or construction supervision.
Decorative plasters are made of colored solutions with fillers of different sizes.
Solutions are painted by the introduction of dry construction paints. Paints must be light and alkali resistant. They must not destroy the binders or reduce their strength. Fillers of such solutions can serve as coarse sands, marble or granite chips, chips of red brick.
Depending on the materials used and the method of processing plaster are divided into lime-sand, terrazitovye and stone, as well as plaster, processed by etching with acid.
When plastering facades with decorative solutions, the proper arrangement of scaffolding and the location of their attachment plays a big role. Forests need to be fixed in places that at the end of the work could be carefully patched. It is best to do them where the grippers are joined. The scaffolding posts should be installed at a distance of at least 400 mm, and preferably 500-600 mm from the wall, in order for the solution to be applied behind the stands, near the stands and in places where the flooring is installed. At the same time, the carrying fingers of the scaffolding are not brought to the wall, and the gap between the uprights and the wall is covered with removable boards.
Ordinary plaster . Lime mortar is prepared from lime and sand. The limy dough must be aged in creative pits or in factories of ready solutions for at least three weeks. The more lime paste is aged, the higher the quality of the mortar. The amount of sand introduced into the lime paste is 1-4 hours and depends on the fat content of the lime paste. The composition of the solution should be 1: 1; 1: 1.5; 12; 1: 2.5, etc. In all cases, the solution should be of a normal consistency, since fatty solutions will crack much and thin ones will not have proper strength.
Picking up the composition of the solution, its constituent materials are measured using dispensers, loaded into mortar mixers and mixed until a homogeneous mixture is obtained.
Lime-gypsum solutions are prepared from a lime mortar with the addition of gypsum to it to accelerate the setting. Usually, 2-3 parts of a lime mortar are taken for one part of the gypsum.
Cement-lime mortars consist of cement and lime mortar. The composition of the solutions may be different: 1: 1: 6; 1: 2: 8; 1: 1: 9; 1: 1: 11; 1: 3: 12; 1: 3: 15 (for 1 part of cement they take from 1 to 3 parts of lime and from 6 to 15 hours of sand). The best solutions for plastering facades of 1: 1: 6 and 1: 2: 8. The composition of the solution is indicated in the project or appointed by the technical staff of the construction.
Solutions can be prepared in different ways. In one case, a cement mix is prepared from cement and sand. Lime paste is diluted with water to a cream thickness, for example, with a standard cone draft of 12 cm. Take from 6 to 15 parts of the dry mixture to one volume part of the lime paste, mix everything until complete homogeneity, adding water if necessary. In another case, a lime mortar is first prepared and 6–15 parts of a lime solution is mixed with 1 part of cement, and then everything is mixed.
Cement solutions are used compounds from 1: 1 to 1: 6, i.e. on one part of the cement take from 1 to 6 hours of sand. The best can be considered the composition of 1: 3. This solution is not very greasy and not very skinny, it cracks a little, it is convenient to apply it.
Typically, these solutions are prepared in the form of a dry cement mixture, served on jobs and there they add water as needed. This is explained by the fact that cement mortars must be used in the business within an hour from the moment of their preparation.
The solution is applied both manually (using a spatula, shovels and buckets), and with the help of machines and mechanisms.
When plastering facades with any solutions, such technological sequence is observed.
First of all prepare the surface: clean them from dust and dirt, make a notch or stuffing drani. Then they hang the surfaces (with a plumb mass of 1-2 kg), make marks and lighthouses. After that proceed to plastering; first apply the spray, then the soil, on the ground nakryvku and perform grouting.
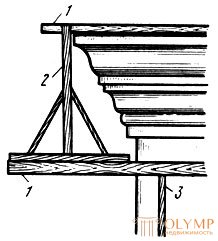
Finishing is always top to bottom. In buildings with a cornice, they first apply primer on the walls under the cornice, hang rules 1 (fig. 103) and pull out the crowning cornice. The rules should be firmly reinforced, as crowning cornices usually have a large takeaway. The bottom rule is attached to the wall or supported on the bracket 3.

Fig. 103. The position of the rules when extruding the eaves at the corners of the facade: 1 - rules, 2 - template, 3 - bracket
Hanging the rules for pulling the eaves on the facades, it is recommended that the lower ends of the rules be released around the corner of the wall for a length equal to the length of the sled. The upper ends should extend beyond the end of the thrust by 80-100 mm, so that using template 2 you can fully extend the eaves to the very end (ussenka).
There are two ways to make the rules.
The first method (Fig. 104, a). The bottom rule is hung in the usual way, and the top 3 is attached to the thin log 1 (floor stand) or to the thick boards laid in the gutter using the slats 2. It is forbidden to tamper strips under the gutter for fixing the rules, because the planks will raise the gutter, and nails will pierce the roof.
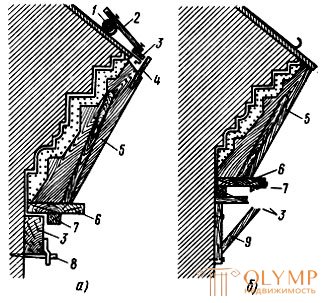
Fig. 104. Ways (a, b) of hanging the rules for pulling on the crowning eaves: 1 - log, 2 - slat, 3 - rules, 4 - resistant polozok, 5 - profiled board, 6 - slide, 7 - polozok, 8 - clamp, 9 - bracket
The second method (Fig. 104, b). The sled 6 of the template make a width of 400-500 mm. The patterns are moved according to the two lower rules 3, mounted on wooden brackets 9. The distance between the rules is 400-300 mm, which makes the pattern stable. Wooden brackets 9 put at a distance of 2-3 m from one another. This distance can be slightly increased if you make stronger brackets and thickened rules that do not bend when the template is moving.
After pulling out the crowning eaves, they proceed to plastering the walls. In the course of the work, trim the window slopes and trim, pull inter-floor belts, trim pilasters and other architectural details. Especially carefully it is necessary to rub husks, usenki and chamfers. They must be strictly vertical, and the chamfers are exactly the same in width.
The plinth is plastered after the walls are completely finished. Since the basement is subject to prolonged exposure to moisture, it is plastered with a cement or mixed mortar. If the top of the base should have a pull, it will be pulled out after lighthouses are arranged on the base, or after it has been plastered.

Что бы оставить комментарий войдите
Комментарии (0)