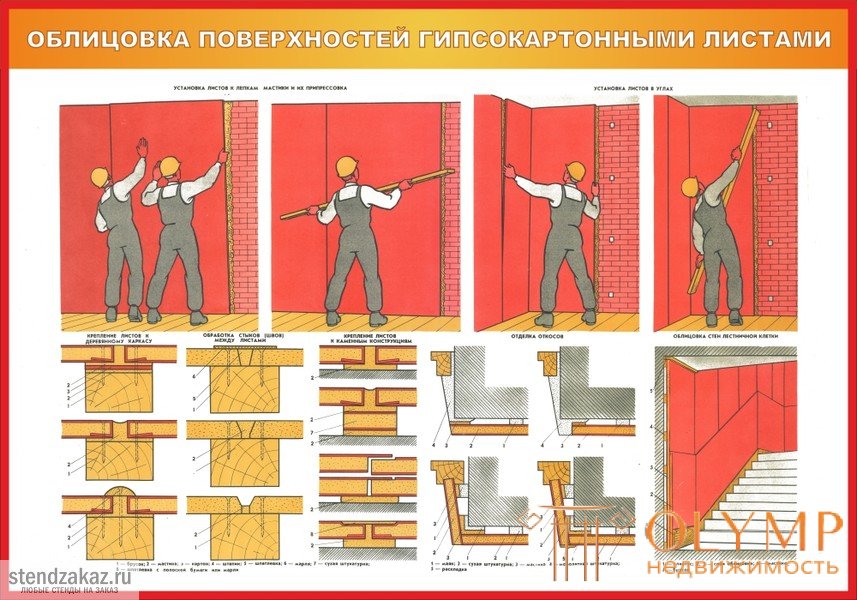
The walls . Before facing, the sheets are dry installed on the walls on the slats with a thickness of 10-15 mm and leveled with the help of linings and wedges. Then the sheets are successively fastened with nails or mastic. After the mastic has set, the linings are removed for use in further work; it is impossible to remove the lining before the mastic sets, as the sheets may fall down.
In the places of conjugation with door or window boxes in wooden buildings, the edges of the sheets should adjoin them closely and flush, on top of the places of adjunction should be covered with platbands.
The joints on the edges of the protruding dihedral angles are pasted over with a strip of gauze and patched or closed with wooden or plastic corners. Depending on the design of the surfaces of the available materials and the qualifications of the working surfaces, they are lined in four ways.
Fastening sheets with nails . In this way, the sheets are fastened to wooden or other nailing structures or to roughly made non-airy structures to which a wooden frame is previously attached. The device of the frame of the rails - time-consuming work, so you should produce lath boards of wood with a moisture content of not more than 18%. Reiki frame pre-impregnated with an antiseptic, protecting the wood from rotting. Reiki are used with a thickness of 20-25 mm, a width of 40-45 and 80 mm. In places of joints of sheets nails 80 mm wide are nailed. Shields are set strictly vertically and horizontally: verticality is checked by level or plumb, and horizontal position - by cord.
The first sheet of facing facing into a corner and nailed in the corners. Along the edges of the nails are hammered in one row at a distance of 100 mm from each other, retreating from the edge of the sheet by 100 mm. Heads nails embedded into the thickness of the sheet, proshpatlevyvayut or painted over with whitewash. The middle rows of nails (on the middle rails) are staggered in a staggered manner at a distance of 200 mm one from another along the walls and at a distance of 150 mm along the ceilings. The seams between the sheets are sealed, they should be no more than 6 mm wide.
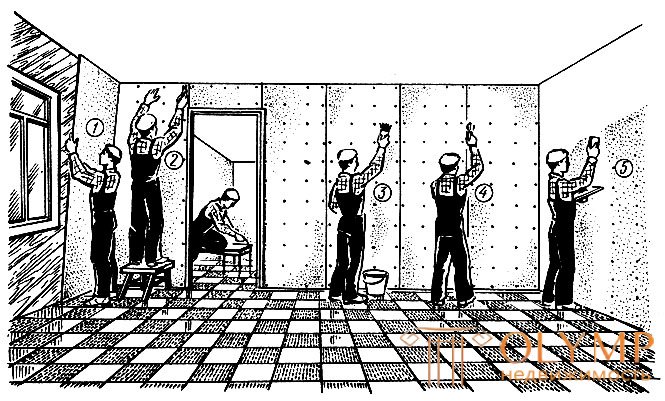
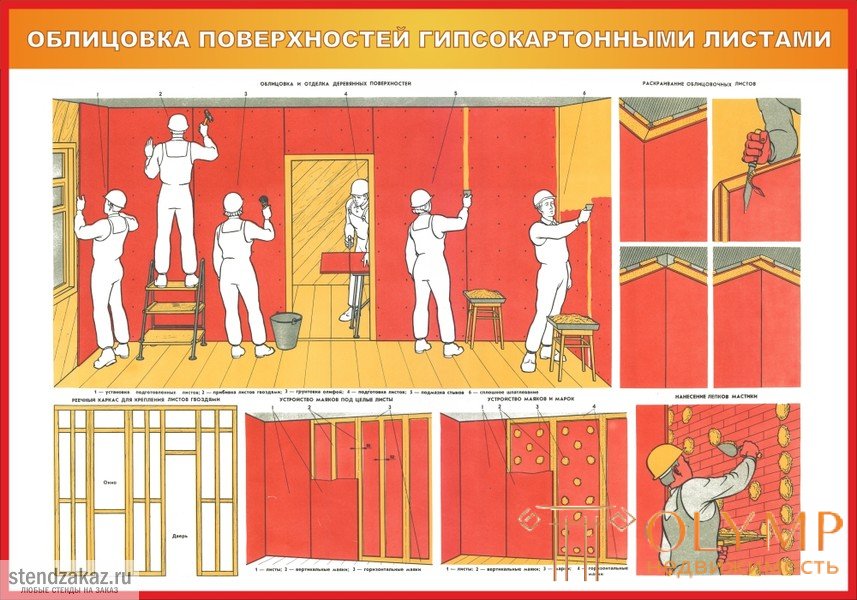
The sequence of finishing the room with cladding sheets on solid wooden walls is shown in Fig.127.

Fig. 127. The sequence of finishing the premises with cladding sheets: 1 - installation of prepared sheets, 2 - nail padding, 3 - linseed primer, 4 - jointing, 5 - puttying
Fastening sheets with mastic to the hardened mortar brands and beacons . On the trimmed surface determine the places where the sheets will be joined. In the corners, you can put the trim sheets: their edges form a husk. However, it is better to put a whole sheet, incising it so that the uncut cardboard remains in the husk. Then they hang the surface, make marks and lighthouses (Fig. 128, a, b).
The layout starts from the corner, the lighthouses are set so that the sheet is supported on them with all its edges. On each sheet 1 in width there should be at least 3-4 vertical lighthouses 2: two extreme, on which cladding sheets are joined, and one or two intermediate ones. Extreme beacons should be 80 mm wide, intermediate - 50 mm. Horizontal beacons are arranged at the floor and ceiling. 3. If the sheets are joined along the length, then horizontal beacons are also made at the joints. Instead of intermediate beacons, brands of 4 are often arranged in two rows. The distance between beacons and marks should not exceed 400 mm (Fig. 128, c).
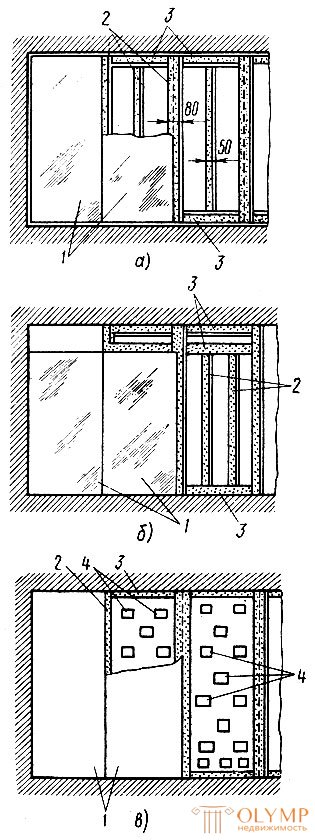
Fig. 128. Alignment of the surface with lighthouses: a - arrangement of lighthouses under whole sheets, b - the same, under composite ones, c - arrangement of lighthouses and marks; 1 - sheets, 2 - vertical beacons, 3 - horizontal beacons, 4 - marks
Stamps must be at least 80 x 80 mm in size, the reference area of the stamps or lighthouses, or both, should be at least 10% of the total area of the sheet to be glued, i.e., 1000 cm2 of the reference area of lighthouses or stamps ( 16 marks of the above size).
Depending on the material from which the structures are made, different solutions are used for the brands and beacons. On brick walls, brands and lighthouses are made from a gypsum binder, lime-gypsum mortar of 1: 1 composition (for 1 part of gypsum 1 part of lime mortar of 1: 3 composition). For concrete, brands and lighthouses are made of a cement-lime mortar with a composition of 1: 1: 6.
Sheets are glued to hardened mortar beacons and marks no earlier than 24 hours after their installation at normal room temperature. Under these conditions, the humidity of beacons or marks should not exceed 8%. If the temperature is below room temperature, the exposure times increase accordingly.
Stamps and lighthouses can be arranged from the waste produced by cutting sheets. These brands and lighthouses are glued to the surface with the help of mastic, which is smeared with a layer thickness of 3-5 mm.
Having arranged marks and lighthouses, first of all they stick a corner sheet (fig. 129, a). Sheet halves are put together, plaster mastic is applied to the surface of the marks and beacons with a layer of not more than 8 mm. A folded sheet of plaster is applied to one wall and pressed (Fig. 129, b) - pressed to the wall, striking the sheet with a rule. Checking the first glued half of the sheet, gluing the second half. However, you can stick the entire corner sheet at once. After that proceed to gluing on the walls of whole sheets.
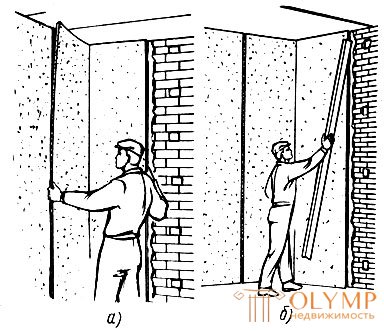
Fig. 129. Installation (a) of an angular sheet and its pressing (b)
Installed sheets for the period of setting mastic pressed and secured with mounting nails, which are driven into the rails laid over the sheet (if the surfaces are nailing), or various devices (if the surfaces are not breathable). As a rule, the sheets are left pressed for 24 hours; in the hot season, the shutter speed is reduced to 12 hours. Since the slats are used repeatedly, in each case it is necessary to pre-extract them from the nails.
The simplest devices are wooden and metal frames made to the size of the sheet. Stubborn bars are fastened to the frames, and pieces of bars are laid on the floor or stale bars are laid. Between the stubborn bars and the beds, they put the struts and wedge them to press the sheets against the walls.
Edges of sheets are pasted on a continuous strip of mastic in the form of a lighthouse. Due to this, the sheet is glued firmly and does not swell when performing painting work.
Fastening sheets on mastic directly to the surfaces of the support marks . First of all, they hang up the surfaces, hammer in nails and arrange marks in the amount of at least 6 pieces. under each sheet (Fig. 130). It is recommended to make the extreme bearing marks longer for the edges of two sheets to be supported on.
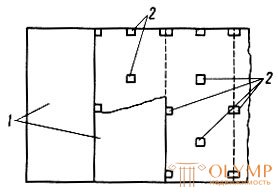
Fig. 130. Arrangement of support marks (2) for cladding sheets (1)
The sheets are fixed with mastic, which is applied to the surface of the walls between the brands. On the edges of the mastic smear a continuous layer or tape: the tape can be arranged with gaps.
As in the previous method, first of all set the corner sheet, leave it pressed, until it is completely glued to all reference marks.
The mastic squeezed out from under the vertical edges can either be cut off along the edges to the surface, or smoothed with a spatula, or left to stick to the edges of the next sheet. For leveling mastic, you can use the template in the form of pullet, which is attached to the front side of the sheet and the edge and lead upwards. Mastic leveling so that it was at the level of the lower edge of the sheet. In mastic it is necessary to arrange the products with the help of a lath, steel strip or bar.
Fastening sheets on plaster mastic under the rule . With this method, brands and beacons are not satisfied, which contributes to an increase in labor productivity. Under each sheet, mastic is applied by molding (Fig. 131, a), and under the sheet edges - with a continuous tape with products or individual strips. A sheet is attached to the mastic (Fig. 131, b) and installed vertically, checking the edge with a plumb or plunge rail. Then the sheet is pressed (Fig. 131, c). If the sheet is installed inaccurately, its position is corrected, since all subsequent ones will be installed on it.
Having pasted the first sheet, put sculptures or mastic tapes for the second sheet on the surface. Then put the second sheet and press it so that it is in the same plane with the first. The correctness of its installation is checked by the rule. In the same way install all other sheets.
Sometimes, in order not to apply thick mastic layers, the surface is fixed and on each wall four or six marks are placed under the first sheet. The remaining sheets are installed on the first one without marks and lighthouses.
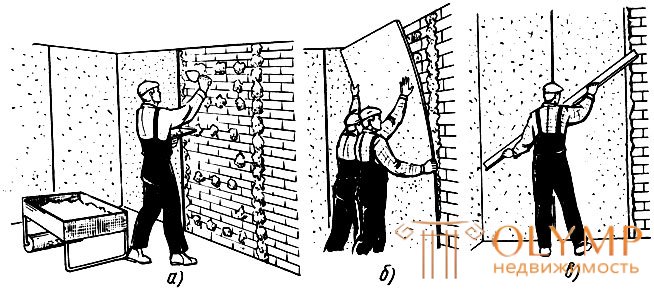
Fig. 131. Gluing cladding sheets under the rule: a - mastic application, b - sheet installation, c - sheet pressing
Ceilings . The surfaces of the ceilings are divided into maps, which will be used to fasten the sheets. It is desirable that one of the joints between the sheets pass along the axis of the ceiling of the room. The joints between the sheets should be placed perpendicular to the outer wall of the room.
For ceilings it is recommended to use sheets of full length. If the length of the sheets is insufficient, then indent the two sides of the sheet from the walls in order to get a ceiling frieze. On the ceilings, sheets are fastened in the same way as on the walls, but they are pressed against the ceilings with square or rectangular frames, and along the frames with racks. Installed racks wedged (tightened). Each sheet is recommended to press one or two racks, after putting a wooden frame under it. The frame dimensions should correspond to the dimensions of the cladding sheet.
If wooden liners are installed on concrete ceilings in the form of rails and traffic jams, then the sheets pasted on the mastic are additionally fastened with nails in 1-1.2 m, embedding hats into the thickness of the sheets. Nails are driven from the middle of the sheet to the edges. This mounting procedure protects the middle of the sheet from sagging and the formation of waves.
Work is carried out with a telescopic lift-scaffolding. The flooring of these scaffolding rises and rotates around the axis. If there is no telescopic lift, work with ordinary scaffolding or with inventory tables.
Eaves . In the premises, lined with cladding sheets, sometimes set light and simple in shape gypsum-fiber or gypsum cornices. They close the joint between the planes of the walls and the ceiling.
Eaves suit after facing of walls and a ceiling. The front sides of the precast moldings must be cut at the square.
Eaves establish in such sequence. First, attach one element of the cornice in the corner. On it on a wall and a ceiling put labels. The same is done in the second corner. According to the marks on the walls and the ceiling, straight lines are beaten off with a cord of cords to correctly install subsequent elements of the cornice. The ends of these elements are cut "on the mustache" by a saw with small teeth, using a block, that is, a device in which the parts of the cornice can be cut at a certain angle. The prepared element on the back side is smeared with mastic, attached to the marked lines and pressed. Following the corner elements set intermediate. The ends of the elements are recommended to be smeared with mastic and butchered. Installed elements on the walls and ceilings further strengthened.
The eaves are fastened to nail structures with galvanized nails, screws or non-galvanized nails previously coated with drying oil. Their caps are embedded in the thickness of the eaves of not less than 2 mm. Places above the caps putty and cut. If the surfaces are not nailed, the eaves are attached to pre-installed wooden traffic jams.
The installation of eaves can be simplified if the rules are strengthened along the walls and elements are supported on them. After installing the eaves, the rules are removed. Correctly installed eaves have the form of elongated pattern.
The eaves of sheets in the form of steps are arranged as follows. Strips of the desired width are cut from the sheet, lines are painted on the walls and the ceiling with the help of an intended cord, the lines for the first strips are strengthened. After that, they beat the lines to install the second strips, having strengthened the second strips, install the third ones.
Slopes . There are various options for finishing slopes.
If the slopes are finished with monolithic plaster (Fig. 132, a, b), this work is done in advance in such a way that the monolithic plaster on the slopes will dry before the beginning of the wall covering with sheets. This is necessary in order not to delay painting work.
Before plastering the slopes, the outer walls, on which the window openings are located, are hung, made marks or beacons on them. When plastering around the perimeter of the opening, leave a strip of mortar with a width of at least 100 mm. The thickness of the plaster of this strip must be such that it is equal to the thickness of the marks or lighthouses. This strip is then glued to or supported by cladding sheets while facing the walls. This strip can be made with a ledge, then the sheet is laid so that it is adjacent to the ledge edge.
To perform such a strip, the slats are nailed to the walls, under which they throw the solution, or they use bevel with a notch that moves according to the beaten rule and levels the mortar according to the shape of the desired strip.
When finishing is done with dry plaster (Fig. 132, c), the seams between the box and the wall are pierced and coated with mortar, then strips of cladding sheets of the desired width and length are cut, and marks or beacons are arranged around the box on the wall. When facing the beacons, the edges of the sheets are glued completely around the box and on the hook. When using stamps in such places it is necessary to apply a strip of mastic, as the marks are only stops holding the sheets to the desired level. For the convenience of work in the box, you can choose the groove where the edge of the covering sheet is inserted.
The ends of the joined strips are glued with strips of gauze. Often the seams between the slope and the wall are covered with profiled wooden layouts (Fig. 132, d). In the case when the slopes are made of wood, they are also adjacent to the edge of the cladding sheets, which is closed layout.
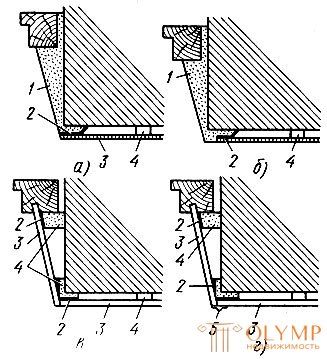
Fig. 132. Finishing of slopes when facing surfaces with cladding sheets: a - plastering of slopes with monolithic plaster with a sticker of a sheet flush with plaster, b - plastering of slopes with a monolithic plaster with sticker of a sheet not flush with a slope; - joint, closed layout; 1 - monolithic plaster, 2 - mastic, 3 - dry plaster, 4 - lighthouse, 5 - layout
The walls of the stairwells . The walls of the stairwells (Fig. 133) are revetted in different ways. Pre-cladding sheets cut in accordance with the slope of the flight of stairs, so that they are precisely docked with kosourami or beams. The seams between the sheets should be strictly vertical.
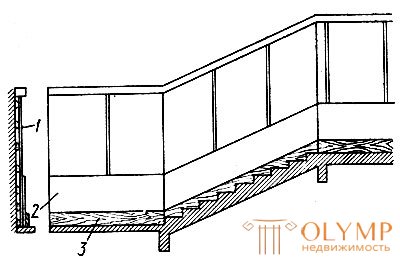
Fig. 133. Facing the walls of the staircase with cladding sheets: 1.2 - facing layers, 3 - plinth
Each sheet is dry-installed on temporary linings and after checking the accuracy of its installation, they are nailed or glued with mastic. The sheet should rest on the step with a flat edge, previously cut at the appropriate angle. It is not recommended to cut the shape of the steps in sheets. If required, pieces are selected from the trim pieces according to the shape of the steps and glued with mastic. Sometimes these places are sealed with mortar or veneered with ceramic tiles.
In order to obtain a more durable cladding, the panels of the walls of the staircases are glued to a height of 1200 mm with a second layer of 2 sheets that have long sides along the march or landing. The second layer is glued to the previously installed on the mastic.
Gypsum, gypsum sawing or other mastic with the addition of gypsum binders are prepared more liquid and plastered with moldings on previously installed sheets. The edges are glued on a continuous strip of mastic. In the process of sticking, the sheets are pressed as tightly as possible.
In the lower part of the walls arrange a plinth of cement mortar or facing tiles. Sometimes it is made of boards. The height of the plinth is 150-200 mm.
Что бы оставить комментарий войдите
Комментарии (0)