Game: Perform tasks and rest cool.11 people play!
Play game
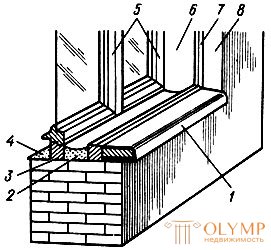
Openings and their filling . The window opening (fig. 48) is filled with a box 3, 7 with bindings 5, a doorway - a box with one door leaf or two. Most often in the box set two binder. The box only takes up part of the wall thickness in the opening and is usually installed in the middle of it. The remaining portions of the wall thickness on the inside and outside are called slopes. When the window opening is filled with two boxes - summer and winter, which are placed inside the opening at some distance from each other, the space between the boxes is called damped. The slopes are top and side, zaglushins - top, side and bottom.

Fig. 48. Filling the window opening: 1 - window sill, 2 - bottom blind, 3, 7 - boxes, 4 - drain, 5 - binders, 6 - side blind, 8 - slope
The sill board 1 is always made wider than the slopes (dimensions are indicated by the project). At the bottom of the sill board along its length make a groove with a depth of up to 10 mm, which is called a teardrop. A teardrop is 20-50 mm away from the edge of the window sill. The top and side plugs 6 are made flat; bottom 2 - in the form of a tray, which is necessary to collect water running out of windows and to protect boxes 3 and 7 from rotting. From the outer bottom side of the window aperture arrange a window sill with a large slope to the outside, which is called the drain 4.
In order for the bindings 5 to open freely, the plaster in the blind and the slopes should be 15-20 mm below the level of the boxes. Therefore, to remove the solution used bevel with a cut or shoulder.
The upper slopes within the same room should be on the same horizontal line. The upper slopes on the facades should be in one straight line regardless of the number of windows and the length of the walls of the facade. The side slopes 8 should be placed vertically on the same vertical line along the entire height of the building.
The slopes are made with the angle of dawn, i.e. with the bevel, leaving the distance between the inner edges of the slopes narrower than between the outer ones. For example, the distance of the boxes between the slopes is 1500 mm, and the walls may have 1600 mm or more. The dawn angle of all the slopes inside the building is made the same. The angle of dawn is measured by a square (Fig. 49) with a nailed or mobile bar. The square is inserted into a quarter of the box, and the rules are fastened along the bar (see fig. 11, and).

Fig. 49. Angle to determine the angle of dawn on the slopes: 1 - slat, 2 - angle, 3 - blind, 4 - box, 5 - caulk, 6 - plaster of the slope, 7 - clip, 8 - rule
To accurately install the boxes, first fix the inner surfaces of the outer walls, arrange marks and lighthouses, and set the boxes at the same distance from the arranged beacons. Usually they put a rule on the beacons and measure the necessary distance from it, putting marks on the walls of the opening. These labels are attached boxes vertically and horizontally strictly, observing the appropriate level.
After installing the boxes between them and the wall there is a gap that is filled with tow. Tow is pre-cut into strands and moistened in a liquid diluted gypsum solution. The tow inserted into the gap is compacted with a wooden or metal caulk, which is hit by a cam or a wooden hammer-mallet. So that the boxes of the box do not twist, strutting is placed before the caulking of the gaps between the opposite bars of the boxes.
The gaps are filled with tow not to the very edge of the box, but they leave a groove 20-30 mm deep, which is filled with mortar when plastering slopes and blind spots. If the gaps are caulked flush with the box, then a crack forms between it and the plaster of the slope or the blind. Grasping, the gypsum mortar expands and presses the tow more strongly against the box and the wall, sealing the gap filling.
If the mortars or slopes, there will be thick slurries of the mortar, nails are tied into the stitches of the masonry or box and the nails are woven around the nails. When plastering into such places to save the solution, pieces of slag, brick, and dried solution are inserted.
Game: Perform tasks and rest cool.11 people play!
Play gameInternal slopes . Prior to the beginning of the decoration of the slopes, the walls should be plastered and rubbed completely or only near window openings with a width of up to 50 cm. At first they plaster the upper slope, hanging the rule on the measured angles of dawn. The rule is fixed with nails, clips, crutches, or frozen with plaster dough. Together with the upper slope plaster and the upper blind. After removing the rule and making corrections, proceed to the plastering side slopes and blind spots. The bottom plug is trimmed last, before or after the installation of the window sill.
Plastering slopes and zaglushins, first of all apply a spray, then a primer and a covering on it. The soil is made of a thicker solution in thick layers.
Upper slopes and deafons plastered with scaffolding or ladders.
After installing and checking the rules (plumb or level) they are fixed. Thus, to finish the slopes on each window, you have to hang three rules and measure and check the angle of dawn repeatedly.
Game: Perform tasks and rest cool.11 people play!
Play game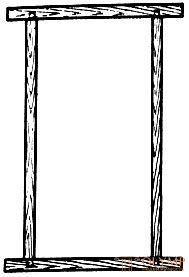
Fig. 50. Frame for plastering slopes
The solution on the slopes is leveled with pulp 2 (fig. 51), made of tesa. One side of the pulley, which has a cut-out, moves along the box, and the other one follows the frame or rule 1. Cut-out 3 is made so that the solution removed by the bead is not on the same level with the box, but lower by 15-20 mm. Thanks to the ledge, the plaster of the slope does not prevent the bindings from opening and the hinges on the slopes remain free of plaster. In cases when loops-awnings are placed on the boxes, an additional round neckline is made in the pulley and it moves freely around the box 4. To make it easier to level and cut off the setting solution, the pullets are recommended to be bound with roofing steel.

Fig. 51. Malka for leveling the solution on the window slope: 1 - rule, 2 - malka, 3 - cut, 4 - box; 5 - caulker
To level the solution, the pulp is taken with both hands and pressed against the frame or the rules and the box (Fig. 52). Having smoothed out the applied primer, prepare a skimming solution, put it on the slopes and also level it with a bit.
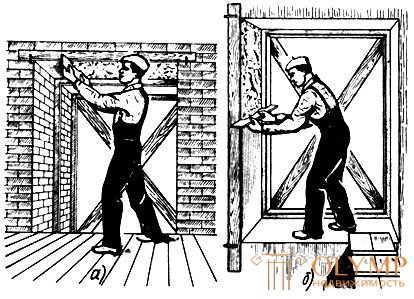
Fig. 52. Plastering window slopes: a - top, b - side
When plastering slopes plaster is better to rub the rake. The rules are removed only after grouting and right there correcting inaccuracies and rubbing Usenko and chamfers. On the upper slopes always rub the usenki. On the side slopes, a small segment of a sharp length of 200–300 mm is left above, and flat or rounded chamfers at the bottom. On the side slopes leave sharp Usenko should not, as they quickly break off. Zaglushin. Blinders (fig. 53) are plastered in the same way as slopes. The solution is leveled with pulp with two notches at the ends. Cutouts are arranged to leave ledges between the boxes and plaster. The dimensions of the gaps are the same as on the slopes. If the boxes are not on the same level, then one step is made more than the other, so that the plaster in the blind spots is horizontal. In fig. 54, a, b are shown for leveling mortar in the blind between window boxes standing on the same and different levels.
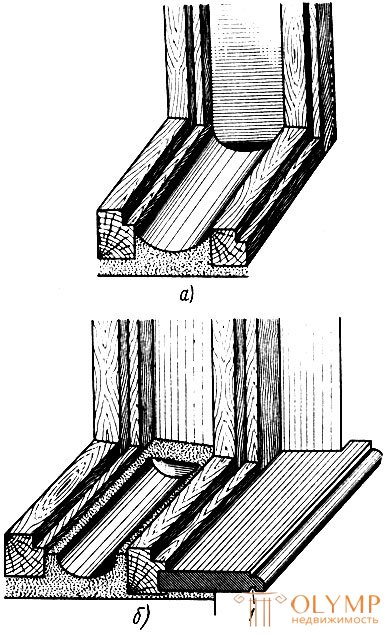
Fig. 53. The device of the lower blind plugs: a - through, b - with shoulders; 1 - dripstone
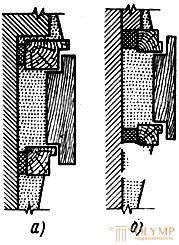
Fig. 54. Malki between window boxes located at different levels (a) and at the same level (b)
The solution is applied, smoothed, smoothed and rubbed, as usual. The lower plugs between the summer and winter window boxes in stone buildings are made of cement mortar, the lower plugs are ironic (smoothing down).
When the bottom cap is arranged through without hangers, the lower parts of the side plugs are plastered to a height of 100-150 mm with cement mortar. If the hangers are arranged at the ends of the lower plug, then the side plugs right up to the hangers are made of lime or lime-gypsum mortar. In both cases, the side plugs prevent from contact with the water that collects in the bottom blind.
In the lower blind spot, the solution is smoothed with rounded beet in order to give the blank the shape of a tray. In this case, small ones (Fig. 55) are used: simple 1 and with a hanger 2.
Game: Perform tasks and rest cool.11 people play!
Play game
Door slopes and deafons plastered the same way as window. The side door covers are plastered with lime or lime-plaster solutions. The lower plugs are made even without shoulders from cement mortar and must be fermented.
For plastering slopes and blinds are widely used gypsum cement puztsolanovoe binder - waterproof gypsum. This binder is beneficial in that, along with water resistance, it has short setting times (start after 4-5 minutes and end after 14-16 minutes from the time of mixing). Such setting time can dramatically reduce the intervals when applying layers of plaster, which greatly increases productivity.
Iron cement plaster . To get on the surface of the cement plaster dense and smooth waterproof crust, plaster iron. Before fermenting, the cement plaster layer is level and rubbed. There are two ways of iron formation: dry and wet.
Game: Perform tasks and rest cool.11 people play!
Play gameWet iron any surface. First of all, the cement is sifted on a sieve and the dough is prepared, which is spread on a layer of 2-3 mm thick on a lightly dried cement plaster. The laid layer of cement paste is smoothed off with a cut, plaster spatula, steel trowel or trowel until you get a clean, smooth, surface without any seams. A layer of dried dough can also be rubbed on smooth surfaces with metal graters.
From careful and long-lasting grouting, the cement dough becomes almost black.
The surface smoothed by the wet method possesses higher qualities than the surface smoothed by the dry method.
It is advisable to add waterproof additives to cements, liquid glass, etc. in solutions used in ironworking of the lower caps. In this case, the plaster becomes more than waterproof.
External slopes and plums . Exterior slopes and plums are trimmed in the same way as internal ones and with the same solutions as the facade of the building. If the facade is not plastered, and trim only one slopes, then most often used Cement mortars.
First, the rules are hung on the slopes, then the mortar is applied, leveled and rubbed. Drain suit from cement mortar and cover with roofing steel. If the plums are not covered with Steel, then they are fermented, and a bottom is made from the bottom to drain water. For a better design of window openings on the walls on the side and top slopes arrange the solution strips - straps (Fig. 56, a). To do this, two rules or special rules 1 with sides are hung on the wall and plastered slope. The rules should be well-cleaned, the sides should be nailed at a certain distance and then lubricated with kerosene-stearin grease, emulsion or solar oil. Solution 2 is applied in such a way that it penetrates under the rules. To do this, the solution should be as liquid as possible. Filling the empty space, the solution forms a strip of the required width under the rules.

Fig. 56. Device straps: a - rule with sides, b - small; rule 2 - plaster mortar 3 - malka, 4 - caulker, 5 - wall
For the simultaneous leveling of the solution on the slopes and straps on the walls, pulp 3 (Fig. 56, b) and the rule are used, thereby increasing labor productivity in these operations. In addition, it is possible to use a special template for pulling slopes. They pull out the slopes also without rules, according to existing boxes. The boxes must have the correct shape, and they need to be installed precisely. The template slides for greater stability make them wider and longer. The stability of the sled is necessary so that the profile board of the template draws out the exact profile of the slope.
Doorways trim in the same way as the window.

Что бы оставить комментарий войдите
Комментарии (0)