Slopes. Slopes cast in place in the form. The form is made from dry wood, planed, impregnated with hot drying oil, dried and dyed for two times with oil paint. The painted form does not warp and can last for a long time. The front side of the form can be upholstered with linoleum. Details of the form have elastic rubber gaskets in the joints so that they can be slightly compressed from the expanding gypsum or lime-gypsum mortar used in casting slopes. If you do not put elastic gaskets, the slope cast from the solution will crack and may fall apart when the mold is removed.
The form is set on the wedges, with which it is raised or lowered to the desired level. Having established a form, laths are nailed to its sides. Before pouring the form coated with grease.
The prepared solution with a draft of a cone of 7-9 cm is poured through the bosom into the space between the form and the wall manually or from a mortar pump. First, it is poured to form the lateral sides of the form (side slopes), and then install the upper rail and cast the upper slope. After setting the solution, the form is removed and the slopes are cleaned.
In centralized manufacturing, parts are cast in wooden forms consisting of planed boards with a minimum width of 250 mm, a length of 250 mm greater than the height of the slope and batten to form a side of a corresponding length of 25 mm thick and 80-100 mm wide. Reiki nailed to a wide board - the shape of the details of the slope. Then the form is smeared and poured with a layer of mortar, having previously laid the cut dran for reinforcement. After the mortar has set, the sides are removed and the part is freed from the formwork. Cast slopes with a thickness of 24 mm set on the solution, pressing them with a template. Details should be cast entirely across the width of the slopes. To do this, first of all, hang the walls on which there are window openings, arrange beacons and determine the width of slopes for each room individually. Parts can be cast of any length and width, interrupting for this purpose only the slats (sides) on the form board.
It is recommended to cast the parts from a solution of a composition of 0.5: 1: 2 (cement: lime: sand), and to install them on a solution of a composition of 1: 1: 4 (cement: lime: sand). In the same way it is possible to cast and install window blind plates. In the process of installation, first put the upper part of the plug on the solution, and then the side.
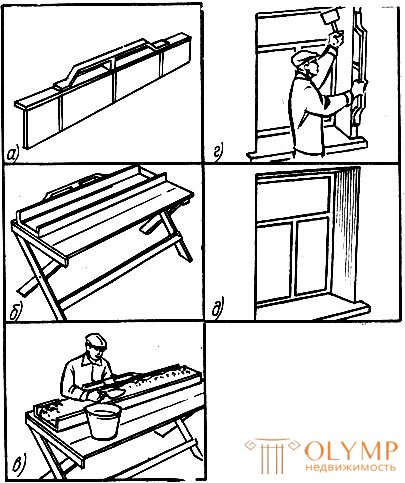
Directly in the openings, the slopes are molded as follows. Forms (Fig. 57a) are made from solid, well-planed and dried boards according to the size of the slopes. So that the boards do not warp, they put 40-50 cm of tabs on the back side, cutting them into 1/3 of the board's thickness. A rail is nailed to one of the longitudinal edges of the board, so that it protrudes by the edge of the board by 2-3 cm. A handle is nailed to the same side. Often on vertical slopes make chamfer. In the forms for these slopes, a bar of triangular section is nailed into an angle formed by the board and rail. To make the forms were smooth, they are polished and painted over twice with oil paint, can be upholstered with linoleum, oilcloth or sheet plastic.
Forms are mounted on a light folding worktable table (rice, 57, b) 2 m long, 0.7 m high and 1.2 m wide. In the middle of the table lid they nail a longitudinal restrictive planed rail 4 cm high, which serves as an emphasis when installing the form on the table. To harden the solution easier to take out of the form, it is covered with lubricant (soap emulsion, grease, etc.). Starting to finish the vertical slopes, the form is laid on the table so that it rests against the restrictive bar. Prepare the desired amount of gypsum dough (an average of 10 liters to fill one form).
Having laid the plaster dough (Fig. 57, c) in an even layer, it is flattened so that it has a slope to the outside of the form. Having leveled the dough, it is given an opportunity to grasp a little, that is, slightly thicken, the form is immediately brought up to the opening (fig. 57, d), one edge is supported on the lower part of the opening, the form is quickly raised to the vertical position and pressed to the wall the place where there will be a slope.
The form is put on a plumb line or level, knocked its back side with a wooden hammer, compacting the plaster dough and eliminating the irregularity of the established form. Similarly, trim the second side slope. After 15-20 minutes, i.e. after setting the gypsum, in the form, tap with a mallet (with a wooden hammer) and tighten the form from the escarpment by the handle (Fig. 57, e).

Separating the side slopes and fixing the solution at the top, in the same sequence, trim the top slope (the side slopes may be contaminated with plaster). It is best to first trim the upper slope, then the side.
To reduce the consumption of gypsum in the dough, it is recommended to add sawdust (gypsum sawed composition: 1 part of gypsum and 3 parts of sawdust), ash, slag or other lightweight aggregate. The slopes pre-hang and arrange four marks of plaster or mortar, two on the edge of the slope and two near the box. Instead of stamps in the box you can drive two nails.
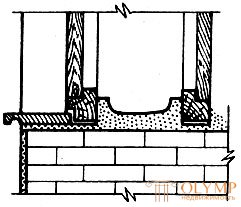
Sills . Window sills are entirely of reinforced concrete, reinforced concrete, decorated with marble chips, marble and wood. They are installed (Fig. 58) after plastering the bottom plugs.

Fig. 58. Installing the window sill
Finished window sills are placed at the bottom of the window opening from the inside of the room. From the bottom of each window sill they arrange a teardrop in the form of a longitudinal groove 10-15 mm deep, located at a distance of 20-50 mm from the outer edge of the window sill, to drain water from the wall on which the window sill is laid.
Between the laid sill board and the wall they knock wedges in such a way that the board becomes horizontal along its length and has a slope of 2-3 ° along the width of the room. Wedges should go beyond the wall by 20-30 mm. In order not to knock down the set wedges and not to disrupt the location of the window sill, they are frozen immediately after installation with a lime-gypsum mortar. Only after that you can carefully remove the board, and pour the lime-gypsum mortar under the sill, moistened well with water, so that the level of the mortar layer is 10-14 mm above the level of the wedges. On the laid solution, lower the window sill and press it to the wedges so that an extra solution is squeezed out from under the board. The sill should closely enter the quarter of the box. The extruded mortar is flush with the plaster, the excess is cut with a spatula and rubbed. The bottom of the side slopes adjacent to the window sill, grease and rub.
When installing concrete, marble, stone and mosaic window sills, the ends of the window sills are wrapped with felt to create an elastic gap in case of thermal expansion and uneven building sediments. Such window sills can be poured by any solutions.
In order to protect the window sills from bending and breaking, metal strips are sometimes put under them, which ends come to the Lower blind. In this case, first install window sills, and then arrange the bottom blind.
Much less often, mainly during repairs, window boards are arranged directly on the spot. To do this, in a wooden formwork slightly below the middle of the sill arranged, reinforcement is laid in the form of a grid, pieces of rubble are placed under it, raising the grid by 10-20 mm. A teardrop is made at a distance of 20-50 mm from the edge of the board. To do this, put on it planted semicircular rail or straightened reinforcement rod with a thickness of 10-15 mm. Then pour the cement solution of the composition 1: 4. After setting the solution of its iron. The formwork is removed 5-7 days after the mortar is poured, and the rail or reinforcement rod is removed from the drip tray.
Что бы оставить комментарий войдите
Комментарии (0)