Polyvinyl chloride and coumarone tiles are used for flooring in kitchens and corridors of residential buildings, in corridors, foyers and offices of administrative and educational buildings. Coatings of polyvinyl chloride and coumarone tiles are placed in rooms where pollution and moistening of the floor especially often occur due to active movement and moisture from the street or neighboring rooms. Tiles have high strength and wear resistance, low water absorption, brightness and variety of colors, ease of repair and replacement.
PVC tiles are available in two types: square and trapezoidal, they have a thickness of 1.5; 2 and 2.5 mm, square tiles have a size of 300x300 mm. The tiles are single or multi-colored, with a smooth and embossed front surface. Monochrome tiles should have a uniform color-resistant color throughout the area, this requirement applies to the entire batch produced. In addition, on the front surface of the tiles should not be sagging, dents, scratches, shells, bumps, etc.
When constructing a floor of synthetic tiles, the air temperature in the room should not be below 15 ° C, and the humidity should be 60%. Tiles are glued to the base of fibreboard, on smooth reinforced concrete floors, carefully aligned cement-sand screeds.
For better adhesion of tiles with a leveling base, a primer from one part of bitumen and 2 ... 3 parts of gasoline or kerosene is applied, which is applied to the base 18 ... 30 hours before gluing the tiles. When applying the floor mastic used mastic KN-2, KN-3, bitumen-synthetic and mastic "Perminid", bustilat or bitumen mastic.
The device coatings of synthetic tiles produced in the following technological order:
• cleaning and leveling the base surface;
• the priming of the base;
• sorting tiles by size and selecting them by color;
• marking and breakdown on the cord of the axes of the floor of the room;
• preliminary layout of tiles according to a given pattern along the axes with their fitting in the places of junction with walls, partitions, etc .;
• heated tiles (if necessary);
• applying mastic with a thickness of 0.8 ... 1.0 mm on a tile with its leveling with a notched trowel;
• laying tiles on mastic with sealing ends;
• installation of plinths;
• cleaning tiles and places with mastic acted with solvent;
• floor covering with a layer of sawdust.
It is necessary to heat the tiles only in the winter when the room temperature is below 10 ° C or when they are laid on a quick-hardening mastic. The screed is cleaned with a metal scraper, the dust is removed with a vacuum cleaner. Troughs and irregularities on the coupler are removed by lubricating with a polymer-repair composition using a spatula. The grounds of small rooms are ground with a fly brush, for large areas fishing rods are used, mastic is supplied from the pressure tank with compressed air. Tiles must be brought to the premises in advance and allowed to stand at room temperature.
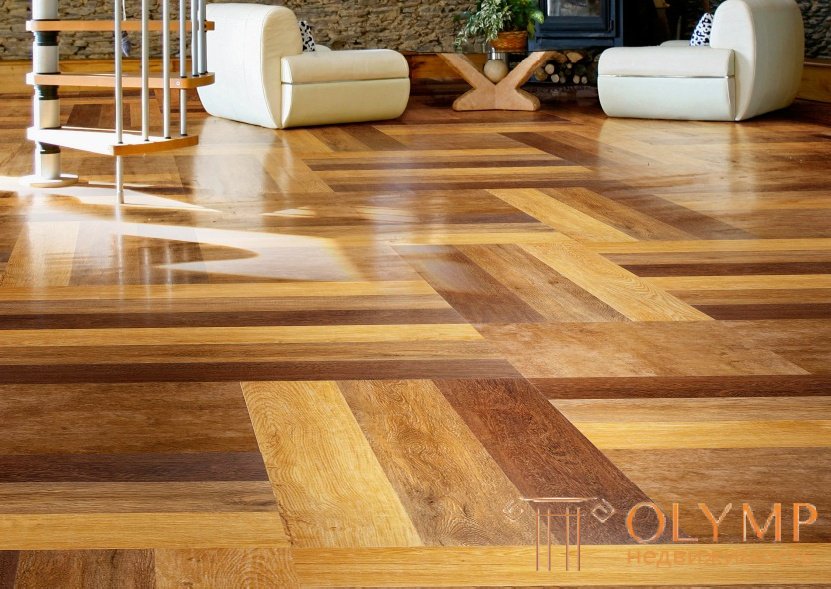
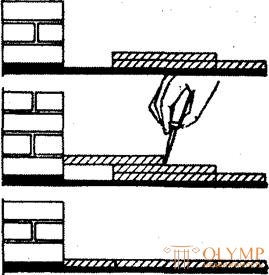
Work on the installation of coatings from tiles begin with a breakdown of the axes. On the prepared base chalk put the longitudinal and transverse axis of the room. From the point of intersection of the axes dry two mutually perpendicular rows of tiles are laid out. If an integer number of tiles does not fit exactly along the length and width of the room, the centering axes are displaced so that when laying the tiles they have to be cut along one or two mutually perpendicular walls (fig. 25.1).
Fig.25.1. | Before a sticker, tiles are sorted by color, texture and shades, as well as by size. The underlying layer is carefully cleaned of contamination and dust and ground in small rooms with a roller, for large areas - by spraying. Gluing the tiles start from the intersection of the centering axes, the labeling is carried out in four, more often in two directions from the centering axes. The tile is applied close to the previously laid, gradually lowering pressed to the base and upset on the mastic to the required level with the blows of a rubber hammer. |
Tiles stick in two ways: on yourself and on your own. When laying the worker on himself as the gluing of the tiles is on a primed base, when laying the worker moves from himself and produces a sticker of the tiles from the already finished coating. When using KN-2 liquid mastic, it is poured from a container onto the base, into an area of approximately 2 ... 3 m2 and leveled with a notched trowel. Then carefully lay the tiles, controlling the flatness of the laying and selection of the pattern, as well as observing the necessary clearances. For thicker mastics, it is desirable to apply them directly to the tile and flatten them all over the plane.
After gluing the tiles, they are covered on top with a layer of sawdust; it is forbidden to walk on the glued floor for three days.
The main defects of coatings from tiles: peeling, warping edges, cracks in the joints. Gluing the tiles is because they were glued to a dusty and damp base. When repairing, raise the tile, clean the base of the old mastic, dirt and dust, if the base is wet, then it is dried. Further put mastic on the basis or on a tile, and it pastes. When peeling off edges or corners, the place is cleaned, a portion of fresh mastic is added to the joint, thick paper or cardboard is put on the tile, and the tile is pressed down with a load. Allowed before laying the cargo smooth tiles with a hot iron.
Defective tiles must be replaced. The defective tile is removed, the base is cleaned of the old mastic, the new tile is adjusted in place, glued onto the mastic, the tile is loaded for several hours. If necessary, the mastic can be heated, but only in hot water. It is prohibited to use fire in places where mastic is stored and when laying the floor.
There is no secret for anyone the fact that the best floor covering looks beautiful and aesthetic only if its installation was technologically correct. This article provides recommendations for the proper installation of quartz-vinyl coatings.
Coatings of quartz-vinyl tiles must be laid on a flat, clean (without traces of sand, dust, grease, oil, polish, paint) and always dry basis. Coatings do not allow moisture, so if you stick them on an insufficiently dry base, moisture will accumulate under the material, destroy the coating and glue. The relative humidity of the floor can be measured with a hygrometer, while for quartz-vinyl coatings it should not exceed 0.05%. On a concrete basement of the floors of the first floors and in wet areas (in the kitchen, for example), waterproofing is necessary.
When installing a “warm floor”, the heating system must be turned on at least 4 weeks before the flooring, but it must be turned off 24 hours before any surface preparation. The temperature of the heating during operation of the "warm floor" should not exceed 280C.
After checking the base for moisture and horizontal surface, you can begin laying the coating.
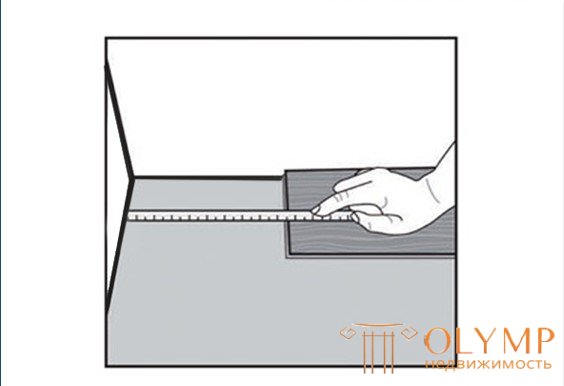
In order to lay the cover professionally, with high quality and minimal costs, it is necessary to use special tools. For cutting requires special knives with interchangeable blades: trapezoidal blades are used for marking, and hook-shaped - for the final pieces. To determine the required amount of material you need to know the length and width of the room. With diagonal stacking a large amount of waste is generated than with parallel; in oblique or round rooms - more than in rectangular.
Quartz-vinyl coatings should always be completely glued.
When gluing it is necessary to avoid the ingress of air under the coating. It is impossible to lay the material close to the walls, it is necessary to leave a small gap. In order for the glue to be applied evenly and precisely in the amount that is necessary for the sticker of each specific type of coating, it is necessary to use serrated spatulas with replaceable blades. At the same time, due to the different shape and pitch of the teeth of the spatulas, the required glue consumption is ensured.
Having pasted the covering, it is necessary either to roll it with heavy special rollers or to grind it with the help of corkboard. This is done both to remove bubbles, and for better adhesion.
For gluing quartz-vinyl coatings it is necessary to use acrylic dispersion glue or glue recommended by the manufacturer, otherwise the coating can be spoiled. Our company has in its range of adhesives for both PVC and quartz-vinyl coatings of domestic and foreign production.
It should be noted that the adhesives for quartz-vinyl coatings basically have a waiting time (maturation) which is 5-10 minutes, i.e. the coating can be glued only after the glue "matures" on the substrate. On the adhesive package is usually given all the necessary information about these parameters.
After the quartz-vinyl coating is glued, it does not require special treatment of the joints, except for particularly wet areas, cold welding is used for this. For hot welding, a special cord of the same color with a coating or contrast is used if this is required by the design task. Sealing of the seams should be done after setting the adhesive, i.e. when using dispersion adhesives no earlier than 48 hours after installation. If the seams are closed too early, this will adversely affect bonding and may lead to defects in the seam edge.
If you do not have the time or desire to engage in self-laying flooring, you can professional services from the installation team.
Plywood laying
All wet work on the site must be completed before plywood is laid. Waterproof plywood 12-15 mm thick is applied. Plywood sheets are cut into pieces 50x50 cm (but not more than 50x70 cm) and laid on mastic or glue. Plywood is additionally fixed with dowels, it is necessary to use at least 5 dowels per one piece of plywood. After plywood is laid, it is ground and wet-cleaned. The moisture content of the plywood base should not exceed 8-10% to exclude its deformations, which can later cause damage to the parquet flooring. Changes in the color or deformation of the parquet flooring can be caused by high humidity of the base, displacement of its elements, heating to temperatures above 30 degrees C due to the presence of heating pipes in the floor or contamination of the base with oil, paint, bitumen, etc.
Training. Putty
If the base with which you have to work is far from ideal (there are gaps, breaks or cracks, large irregularities), then this problem is easily solved when using Thomsit R726 fast-curing resin to close the gaps and cracks, and for larger gaps - Thomsit RS88 applicable on vertical and horizontal surfaces for ladder repair. If there are foundation irregularities of several centimeters, then to speed up and reduce the cost of work it is recommended to use Thomsit SE93 concentrate for quick-drying screeds (mixed with sand in a ratio of 1: 5). After 24 hours, the base, made of these materials, is ready for further work.
Training. Padding
Surface priming is an integral process of the foundation preparation system. The primer serves to increase the adhesion of self-leveling and repair masses to the base, to regulate the absorbing properties of the base, as well as to strengthen and waterproofing. Thomsit R777 penetrating primer is used on concrete, cement and anhydrite bases; xylolite and magnesian bases must be treated with Thomsit R755 primer, which is also used as a waterproofing barrier, including as a capillary moisture blocker. On non-porous, non-absorbent substrates (stone floors, ceramic tiles), Thomsit R760 is used for treating wooden substrates and self-leveling masses before using dispersive adhesives.
Alignment
Without the use of self-leveling masses it is impossible to get a perfectly flat base. Permissible surface roughness at a distance of 10 m - up to 12 mm. With proper and high-quality filling, the optimum thickness of the self-leveling mass should not exceed 1-10 mm. Thomsit offers a wide range of self-leveling masses to solve any problem on virtually any basis. Materials can be used in apartments and shops, offices and business centers. Ready for laying flooring - after 24 hours.
Thomsit DD - self-leveling mass for leveling the base before laying linoleum, carpet and laminate under normal loads in dry rooms with a layer of 0.5-5 mm.
Thomsit DX - self-leveling mass for leveling the bases before laying linoleum, carpet, parquet with medium loads in dry rooms with a layer of 0.5-10 mm. Thomsit FA97 - self-leveling mass, fiber-reinforced for leveling the bases before laying any coatings under high loads in dry rooms with a layer of 3-15 mm. It has high flexibility, suitable for use on mobile wooden bases.
Thomsit EA99 - high-strength express - self-leveling agent for rooms with high loads, ready for laying flooring in 3-4 hours.
Thomsit SL 85 is a universal elastic self-leveling compound for leveling bases made of wood, concrete, cement-sand mortars and asphalt concrete. Layer thickness in one application -0,5-50 mm. It can be used on deformable bases (hardwood floors, etc.).
Thomsit SE 93 is a universal quick-hardening mixture for the device and restoration of bases, various types of screeds subject to mechanical stress. Suitable as a heated layer.
Laying-gluing coatings
The Thomsit brand offers a wide selection of flooring adhesives.
Adhesives for flexible coatings
Thomsit T4400 - dispersion adhesive for textile coatings with and without base, for particularly hard-to-apply coatings should use Thomsit UK4000, which is designed for bonding homogeneous and heterogeneous PVC, textile coatings with normal or foam latex, PVC or textile, PVC cork coatings . Thomsit K188E is used for raw, adhesive, contact bonding of all types of PVC, XB, polyurethane, cork coatings, rubber and polyolefin on horizontal and vertical surfaces, suitable for bonding PVC on PVC, it is recommended to use on heavily loaded critical objects. We recommend using Thomsit K172 or Thomsit R710 for thick and hard rubber coatings. Thomsit K172 is used for gluing cork, as well as vinyl, carpeting on the stairs, for installation of baseboards. For tiles and rolls of natural linoleum, we recommend using the specialized Thomsit L240D adhesive, which perfectly adheres the coating and does not destroy the natural material.
Laying Laying Quartz-Vinyl Tiles
Laying starts from the center of the room. First, the center point of the room is outlined and the laying guidelines are drawn. Then the first tile is laid.
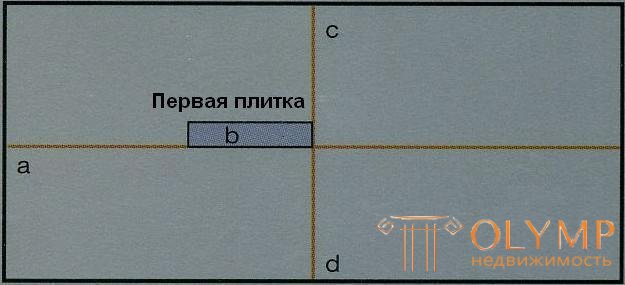
After that, using the "pyramid" method, there are several incomplete tile layers.
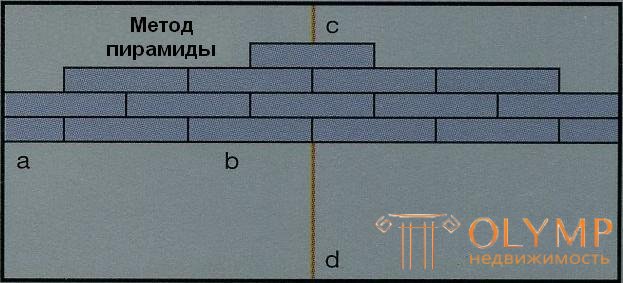
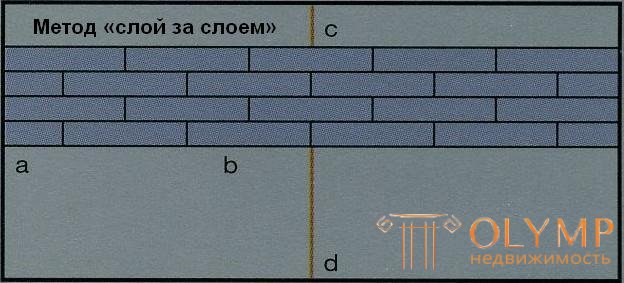
Then by the layer-by-layer method, complete rows of tiles are laid.
After that, using the "pyramid" method, several more incomplete layers are laid out, and so on.
The cutting of the tile near the walls of the room and the "obstacles" is carried out with a stationery knife: the upper (protective) layer is cut, then along the cut line the tile is cracked and cut from the reverse side. Tiles can be cut as easily as drywall. It is possible to trim the tiles according to prefabricated patterns, for example, from fiberboard, if the “obstacle” has a very complex shape (for example, a column, steps of a complex shape, a pipe, etc.).
RECOMMENDATIONS FOR RELATED MATERIALS
Primer to prepare the base of wood, particleboard, plywood:
UZIN-PE 260 Dispersion Primer . It has adhesion and water retention properties, Consumption: 100-150 g / m2
UZIN-PE 317 Solvent-Based Adhesive Primer . Frost-resistant, anhydrous, deep-penetrating, for moisture-sensitive surfaces.
CERESIT CT 17 Strengthens the surface of the base ; reduces the absorbency of the base.
Primer for the preparation of the base of concrete and prefabricated screed.
UZIN-PE 317 Solvent-Based Adhesive Primer . Frost-resistant, anhydrous, deep-penetrating, for moisture-sensitive surfaces
THOMSIT R777 Dispersion Penetrating Dust Binding Primer.
CERESIT CT 17 Strengthens the surface of the base ; reduces the absorbency of the base.
CERESIT CN Universal primer.
Клей для укладки плитки.
UZIN-КЕ 2000S Дисперсионный клей для эластичных покрытий. Универсальный, используется как мокрый и как контактный. Устойчив к пластификаторам.
UZIN-КЕ 2428 быстрый дисперсионный клей.
THOMSIT UK 4000 Универсальный дисперсионный клей.
THOMSIT K-188Е Дисперсионный клей экологически безопасен.
ТЕКС Акриловый клей .
Резинобитумная мастика.
ГАРАНТИЙНЫЙ СРОК ЭКСПЛУАТАЦИИ 15 ЛЕТ !
Для укладки Вам потребуется :
1. Строительный/канцелярский нож
2. Линейка
3. Карандаш
4. Рулетка
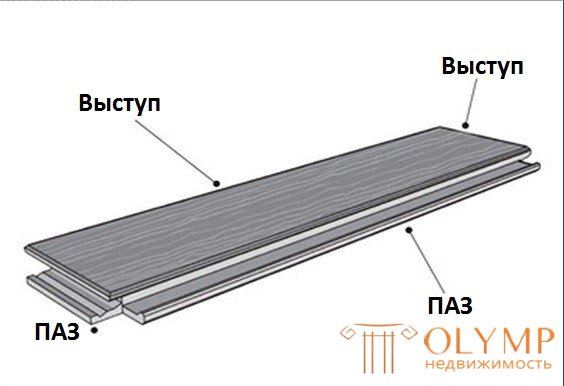
Замковая кварц-виниловая плитка «ALPINE FLOOR» укладывается плавающим способом. Данное напольное покрытие нельзя приклеивать, или иным способом фиксировать к основанию пола. Фиксация (приклеивание) кварц-виниловой плитки допускается при монтаже данного покрытия на стены или потолок. Перед укладкой рекомендуется в течение 16 часов выдержать данное покрытие в горизонтальном положении в помещении при температуре от +18 до +28 градусов Цельсия. Также необходимо поддержание данной температуры во время укладки.
Для основания допустим плавный перепад до 5 мм на 1 м, при резком перепаде в виде ступеньки монтаж покрытия запрещен. Укладывать плитку можно на жесткое основание: бетонная стяжка, кафель, водостойкая фанера толщиной не менее 12 мм, OSB толщиной не менее 12 мм, ДСП толщиной не менее 16 мм.
Attention! Замковая к варц-виниловая плитка «ALPINE FLOOR» укладывается без какой-либо подложки.
1. Подготовка к укладке
Поверхность должна быть чистой, сухой, ровной без резких перепадов по высоте. Небольшие ямки должны быть заделаны.
2. Укладка
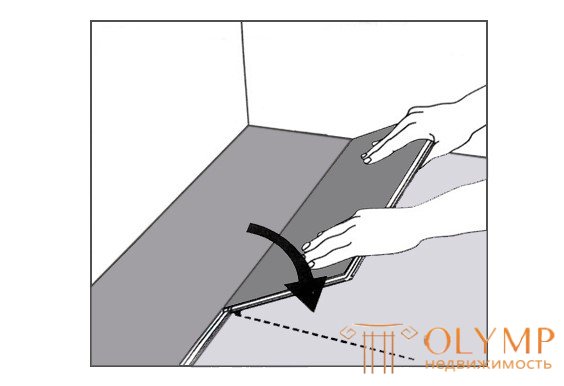
Укладка первого ряда начинается из угла помещения с правой стороны от себя, при условии, что Вы находитесь лицом к стене. Укладка осуществляется справа налево, причем пазы должны быть направлены к Вам. Между стеной и сторонами плитки, прилегающими к стене, следует оставить зазор 3-5 мм.

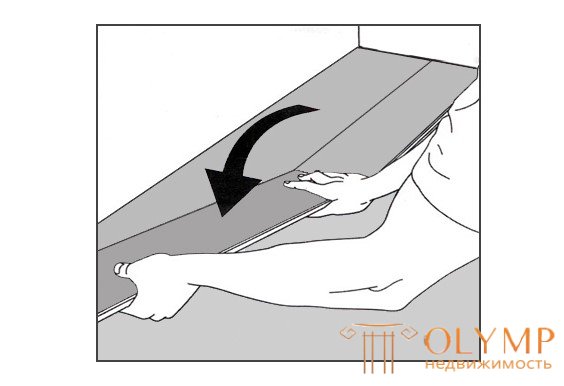
После формирования первого ряда, начинается укладка второго.
Возможно использование отрезанной части последней плитки первого ряда. В данном случае с этой части формируется первая плитка второго ряда.
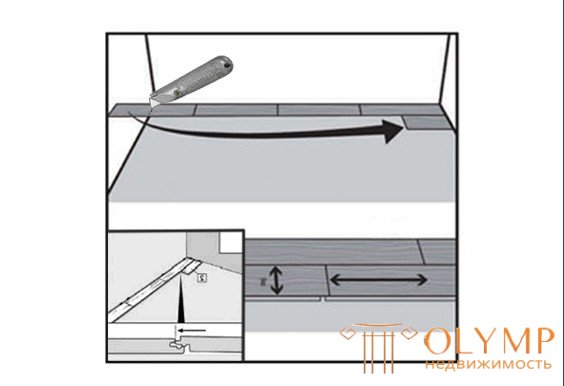
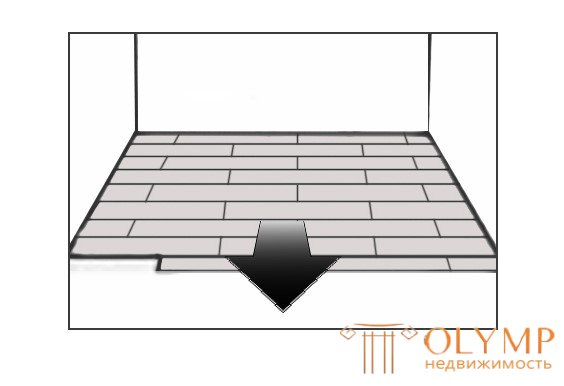
Attention! When laying the second and subsequent rows, the prerequisite is a shift. (The minimum shift that must be observed is 30 cm). Thus, the laying is carried out "in the run-up" or on the principle of "brickwork". The ideal condition for the formation of rows will be laying "in the floor boards." This type of installation makes the connection more durable.
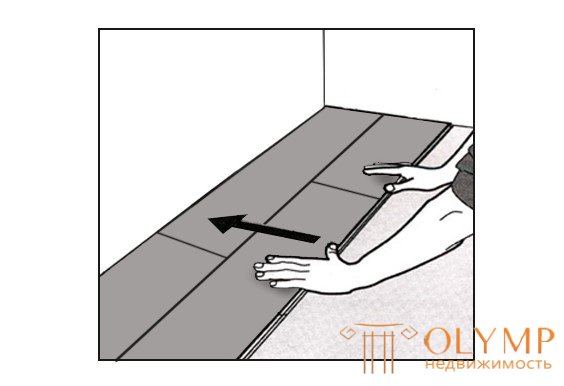
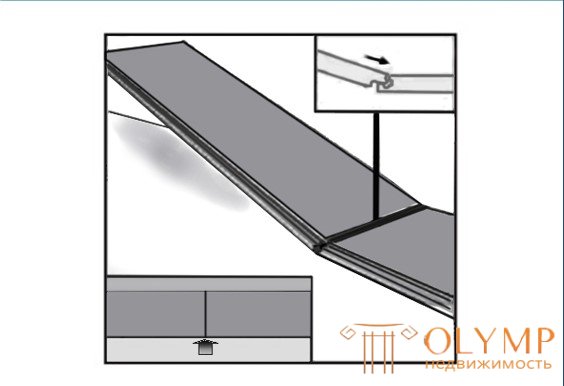
Next, install the tile in the end lock and connect to the first row. For a strong connection it is allowed to knock out tiles with a palm.
Attention! It is forbidden to tamper tiles with a hammer or other tool, as when laying laminate or parquet, it may cause damage to the locking joint.
Laying on the "warm floor"
The quartz-vinyl tile "ALPINE FLOOR" is laid with any type of floor heating. When laying on the "tape" warm floor is forbidden to use any substrate! In addition, this flooring can not be laid on the system "warm floor", which is used to heat the room.
After laying the tile, the temperature should be gradually increased: a few degrees a day, until the required temperature is reached. Important! When using a "warm floor" surface temperature of the tile should not exceed +27 ° C, not compliance with this condition will void the warranty.
Care and maintenance
For long-term use of PVC tiles, it is advisable to lay a mat at the front door that collects dirt from the street and walk around the house in slippers. It is also advisable to collect garbage daily with a brush or vacuum cleaner. Wet cleaning should be done once a week. For perfect cleanliness, you can use a neutral detergent (soap solution) or special care products for vinyl flooring.
To clean the tiles is not recommended to use:
· Products containing abrasives (for example, Pemolux cleaning powder and others),
· Solvents (acetone, ethyl acetate and others - for example, household solvents, nail polish remover),
Such tools contribute to premature wear of the coating and impair its appearance.
Modern production technologies provide reliable protection against the penetration of ordinary dirt into the tile, so a necessary element of care is only the immediate removal of specific stains (iodine, brilliant green, wax, vinegar, ink, traces of black rubber, and some others).

Что бы оставить комментарий войдите
Комментарии (0)